What is Tyk Cloud
Tyk cloud is a fully managed service that makes it easy for API teams to create, secure, publish and maintain APIs at any scale, anywhere in the world. Tyk Cloud includes everything you need to manage your global API ecosystem: Tyk Gateways, Tyk Dashboard, Tyk Developer Portal and Universal Data Graph.- No need to wrestle with infrastructure: You can be up and running within a few clicks. No need for complex deployments or large infrastructure teams.
- Flexible deployment options: Whether you’re a startup or a large enterprise, Tyk Cloud has deployment options to suit your needs. You can scale and manage your API ecosystem easily and efficiently. The control plane is hosted by Tyk in the cloud, in one of the 5 regions available. Meanwhile, the data planes, composed of Tyk Gateways and Redis for temporary storage, can be either hosted by Tyk or managed by you on your infrastructure.
- Geographical freedom: Tyk Cloud allows you to select your preferred AWS location as your home region, ensuring your data and Tyk Gateways are live and secured in the region that suits you best.
- Designed for platform teams: With Tyk Cloud, you can use role-based access control (RBAC) to manage your team structure, as well as multiple environments and multiple organizations.
Why Tyk Cloud?
Next Level SaaS
Tyk is cloud native and has always been a true multi-cloud product and now we’re taking it to the next level with our next level SaaS platform, Tyk Cloud. Now you don’t need to worry about vendor lock-in, or complex deployments, you can benefit from being able to optimize your platforms across and between a myriad of providers such as AWS, Google Cloud etc.Quick deployments Wherever you need them
Want to handle Govt API traffic in Singapore? With just a few clicks your data and Tyk Gateways are live and secured in the AWS Gov cloud. Want to add local Gateways in Australia to improve performance and resilience? It’s just a click away. Want to deploy your management layer to your own hosted servers rather than a cloud provider? We make it simple. The new Tyk Cloud platform allows you to quickly setup the full Tyk Enterprise API Management platform, simply choosing the regions where you wish to locate your gateways and where you wish your data to reside, resulting in immediate and secure data sovereignty. Seamlessly wire your environments between cloud providers, and your own infrastructure, anywhere in the world at the click of a button, not only eliminating lock-in but making it possible to expand your platform to cater for the changing needs of your clients.Designed for Enterprises
Tyk Cloud is designed for Enterprises who may have multi-organizations and multi-teams, so you can combine or isolate your platform and the underlying providers, the choice is completely yours! To make it even simpler, Tyk Cloud is pre-configured so you can be up and running within a few clicks, no laborious tasks for your internal teams and best practice configuration and security is delivered out of the box.Where is Tyk Cloud hosted?
Tyk Cloud is currently available to auto-deploy on AWS. Paid plans and Enterprise trials allow users to select one of 6 AWS locations as their home region as well as the locations of their Cloud Data Planes. The 6 AWS regions to choose from are:- aws-ap-southeast-1, Singapore
- aws-eu-central-1, Frankfurt, Germany
- aws-eu-west-2, London, UK
- aws-us-east-1, N. Virginia, USA
- aws-us-west-2, Oregon, USA
- aws-ap-southeast-2, Australia
Checking the Tyk Cloud status
If you want to check if there are issues with the environments and any upcoming down times, you can go to the Tyk Status page.Quick Start Tyk Cloud
The Tyk Cloud trial is limited to 48 hours. After this period, your data will be deleted.
The Tyk Cloud trial does not include access to Hybrid deployments or the Developer Portal.
To try out these capabilities, please get in touch for a guided evaluation with our team.
- Signing up with Tyk Cloud .
- Creating your first API using the Tyk Dashboard.
- Setting up a Policy and generating a Key to secure your APIs.
Steps for Setting up Tyk Cloud
- Create Tyk Cloud Account
- Get started with your first API with Tyk Dashboard
Comprehensive Tyk Cloud Setup
This section walks you through how to start using Tyk Cloud, creating organization, environment and users before creating an API. If you are in a hurry, try the Quick Start guide for a 5 min version of this tutorial.- Creating your Tyk Cloud account
- Your first Organization
- Creating your first Team and Environment
- Configuring and deploying your Control Plane and creating your Cloud Data Plane
-
Adding and testing your first API
Comprehensive Tyk Cloud Setuprequires access toTyk Cloud Console(management UI). Please note that free trial users do not have access to theTyk Cloud Console. To obtain the required access, contact support.
Prerequisites
The following information would be useful so you can set up Tyk Cloud as quickly as possible:- Team member information including their email address and the role you plan to assign to them.
- We have some specific terminology used within Tyk Cloud. It would be useful to checkout our Glossary so you understand what we are referring to.
Hierarchy
This diagram shows how Organization, Teams, Environments, Control Planes and Cloud Data Planes fit in with each other and which object contains which: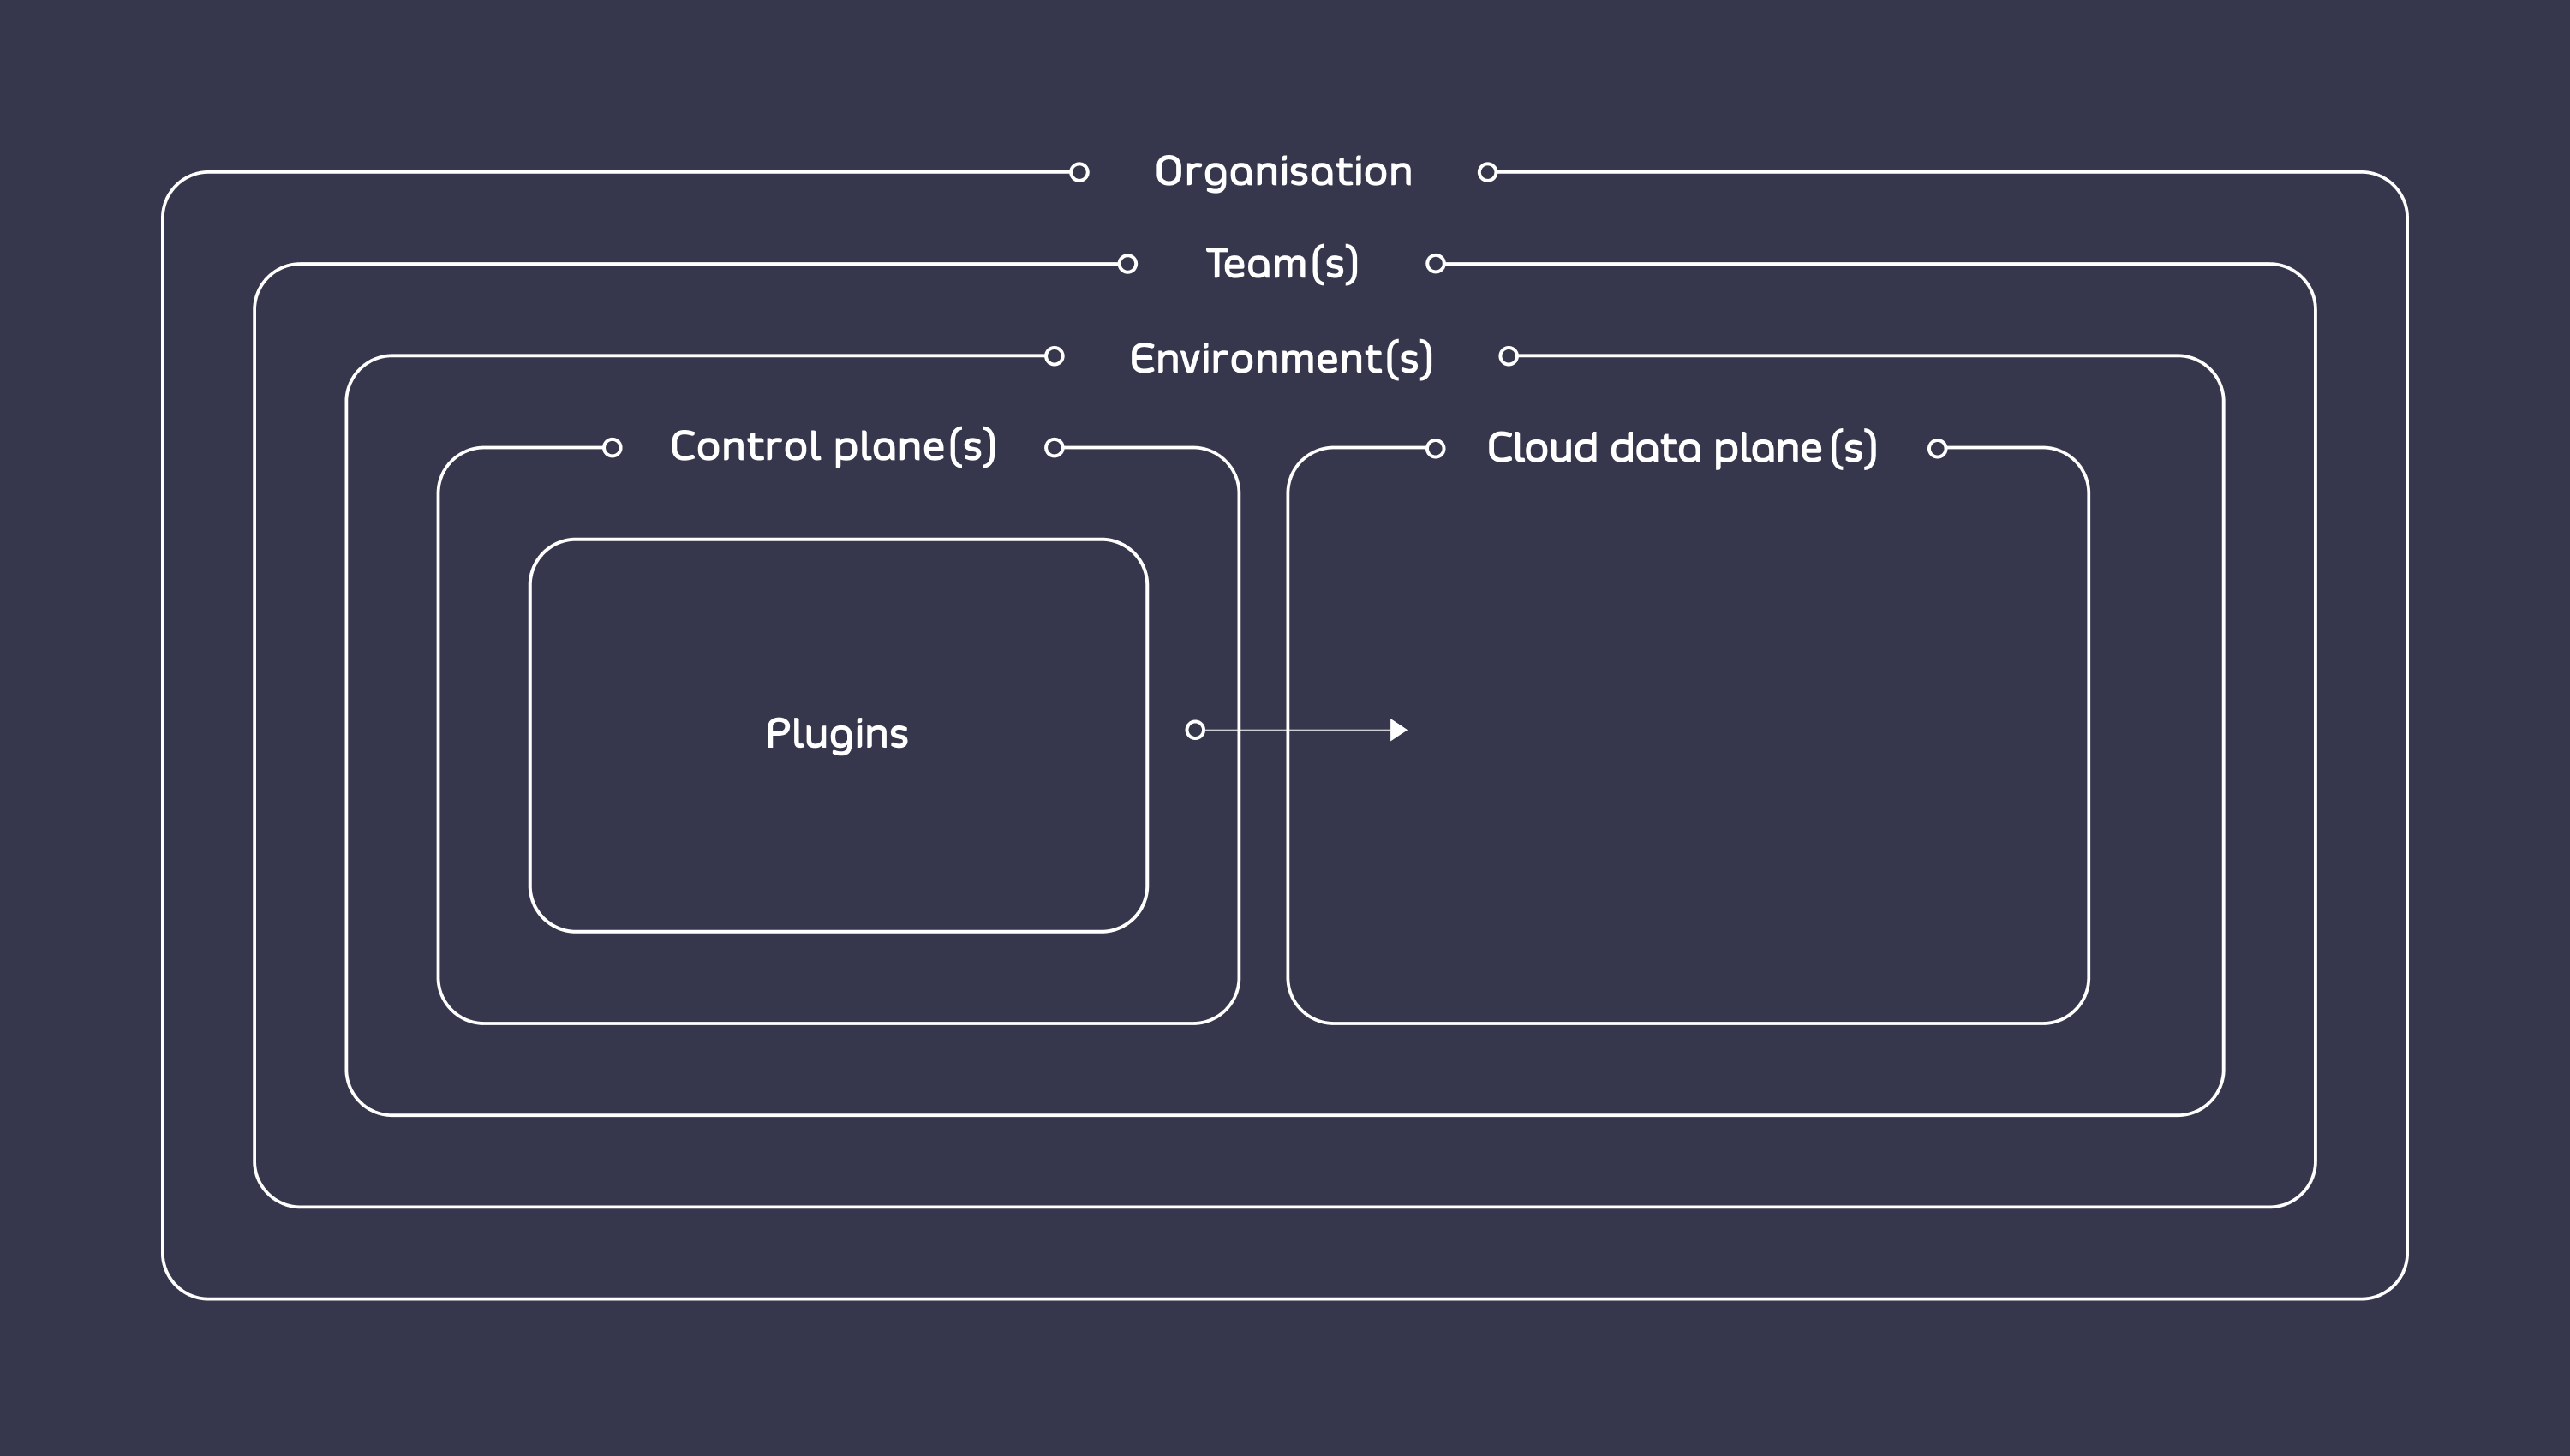
Complete Cloud Setup Tasks
Create an Account
You can use Tyk Cloud to manage your APIs effectively and with minimal effort. This page explains how to create an account, in order to start doing so.What happens when you create your Tyk Cloud account?
When you create your Tyk Cloud account, we do the following for you:- Assign the account creator as a Billing admin for the Organization. This user role allows you to manage the billing and plans for your org. You can also add other billing admins as required.
- Assign the new account to our 48 hours free trial plan
Creating your first account
Start here.- To create your account, you will have to fill in first-level details like your first name, last name and email.
- Then, set up a password for your Tyk Cloud account.
- Following that check the box at the bottom of the page to confirm that you have read and accepted our Terms and Conditions.
- Finally, click Create new account
- After completing the Account Creation form, click Start Organization Setup.
Set Up Your Organisation
Now that you have created the new Tyk Cloud account with your basic details, it is time to set up your organization. This page will tell you how to set up your organization and also about the two ways of setting it up.What is an organization?
- An organization is the main entity for all your data (Environments, APIs, Users, etc)
- An Organization is connected to a single region and once connected, cannot be changed.
Steps to set up your organization
- Step 1 - Name your Organization: Give your organization a name. This is up to you, but most users use their company name.
-
Step 2 - Select a Home Region: Select a region from the drop-down list where your Control Plane will be deployed and your data stored. The number of regions available will depend on your license. Further regions can be added as an upgrade option.
Tyk Cloud can currently be deployed across 2 AWS regions in the USA plus UK, Germany and Singapore. If you have any concerns about Brexit impacting the way you store data you should read AWS regularly updated Brexit statement.
Types of Setups
You can now select how to configure your deployment. Option 1: Demo Setup Our demo setup will quickly configure your first deployment setup automatically, creating your first team, Cloud Control Plane and Cloud Data Plane. Option 2: Manual Setup This setup option gives you full control on creating the following:- Teams
- Environments
- Configuration and deployment of Control Planes and Cloud Data Planes
Create Your First Team
Following organization setup, you will have to set up your team(s) on Tyk Cloud. This page will tell you all about the process.What is a team?
- A team is a sub-grouping inside an organization.
- Inside a team, you can define users(team members) and roles(permissions that can be applied to a user or a team of users).
Steps to set up your team
After creating your Organization you’ll land on the success screen. Click Get Started.- Step 1 - Name your Team: Give your Team a name. You may find it useful to reflect the names used within your organization.
- Step Two - Invite your Users: Invite your users to your team. You’ll only need their email address and which of the available roles you want to assign to them. This step is optional and can be completed within the dashboard later.
User Roles in Tyk Cloud
Out of the box, the following roles are setup:- Team member: They can manage deployment activity for the team they are added to.
- Team admin: They can manage deployment activity and users for the team they are added to.
- Organization admin: They can manage deployment activity and users for a single organization.
Configure Environment and Deployments
An Environment allows you to group deployments together. In this step we will create an Environment and configure our first Control Plane and Cloud Data Plane deployments.What is an environment?
An environment is a grouping of ‘deployments’ that can have multiple Control Planes and Cloud Data Planes.Steps to set up your environment
- Step 1 - Name your Environment: Give your Environment a name. You may find it useful to reflect the names used within your organization such as Development, Production etc.
- Step 2 - Name your Control Plane: Give your Control Plane a name. Again, this is up to you and you may already have an infrastructure you want to re-create in Tyk Cloud.
-
Step 3 - Configure your first Cloud Data Plane: Select the region you want to locate your Cloud Data Plane in from the drop-down list. Your Cloud Data Plane is not confined to the same region as your Organization and Control Plane but the amount of regions you have to choose from can be limited depending on your subscription plan. Give your Cloud Data Plane a name.
You need to have at least one Cloud Data Plane with a Deployed status connected to your Control Plane.
- Step 4 - Deployment:
- Click Deploy Control Plane and Create a Cloud Data Plane. You can watch your Control Plane being deployed and your Cloud Data Plane being created. You will then be taken to the Control Plane overview screen within the Tyk Cloud dashboard.
- From your Control Plane overview you will see the Cloud Data Plane is in a Not Deployed state. Click on your Cloud Data Plane to open its overview.
- In the top right of your Cloud Data Plane overview, click Not Deployed and choose Deploy from the drop-down.
- With your Cloud Data Plane successfully deployed, make a note of the tags assigned to your Cloud Data Plane. One tag is “edge” and the other is the location of your Cloud Data Plane. You’ll add a tag when creating your API.
Next you’ll set up your first API from the Tyk Dashboard.
Deploy and Add Your First API
Your onboarding is now complete! The next step will be to setup a very basic API to demonstrate how APIs are managed within Tyk Cloud.Steps to add an API in Tyk Cloud
- Step 1 - Access the Dashboard: Go to the Control Plane overview and click the dashboard link in the Ingress list. You’ll be redirected to the Tyk Dashboard for your Control Plane.
- Step 2 - Add a New API: Click the APIs menu item and then click Add New API.
-
Step 3 - Core Settings:
- Give Your API a name - We’ll use “my app” for the rest of this Getting Started journey.
- Scroll down to the Target URL setting and use the URL https://httpbin.org/
- Then scroll down to the Authentication section and select Open(Keyless) to keep things simple for this demo.
-
Step 4 - Advanced Options:
- Click the Advanced Options tab of the API Designer.
- Scroll to the Segment Tags (Node Segmentation) setting and add the cloud data plane tag (edge) you saw when creating the Cloud Data Plane.
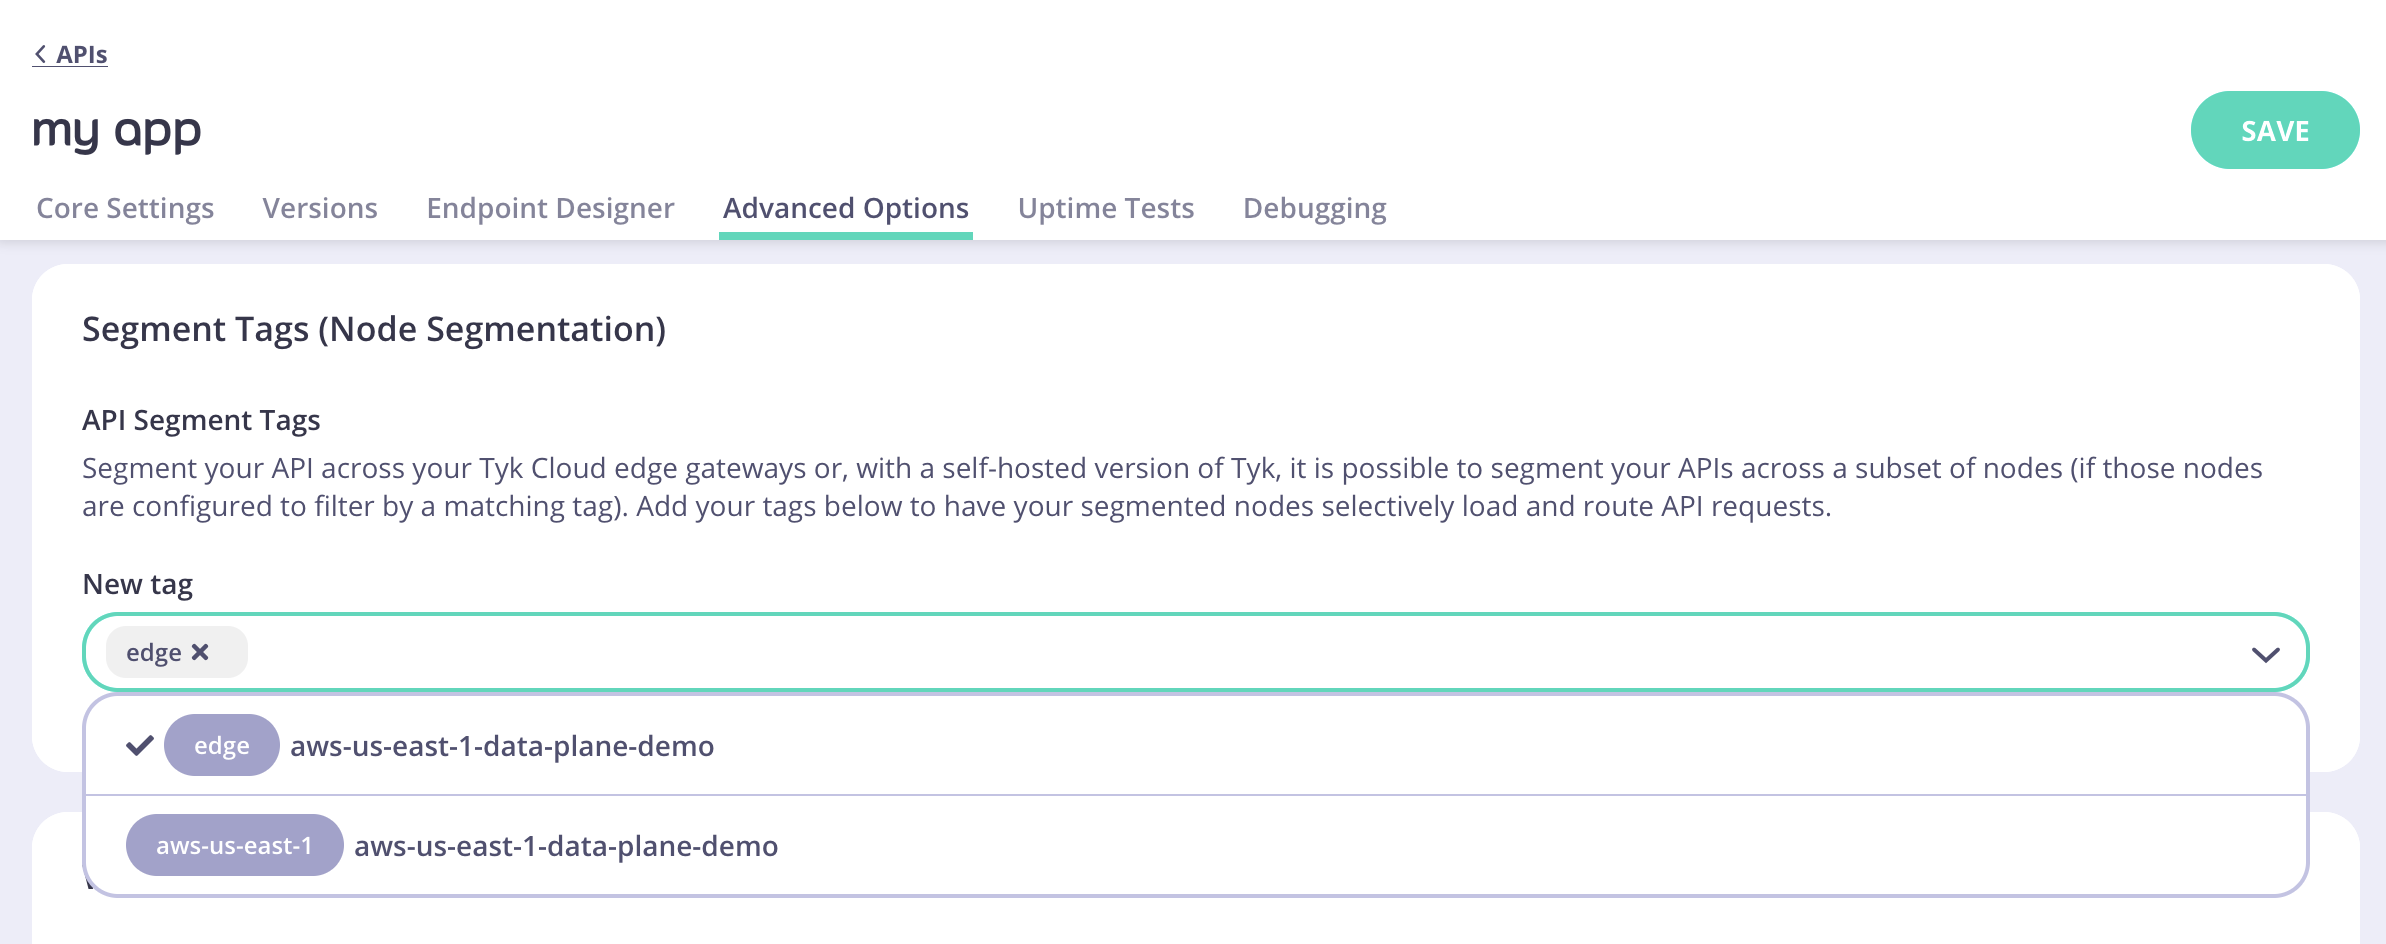
Note:How Segment Tags work in Tyk Cloud?When a Cloud Data Plane is deployed, the tag ‘edge’ and a location tag are automatically generated for the Cloud Data Plane. You use these tags to connect your API to the appropriate Cloud Data Plane. It works as follows:
- Add the edge tag to your API to connect it to all Cloud Data Planes within the Control Plane.
- Add the location tag to your API to connect it to only Cloud Data Planes with that location within the Control Plane.
- Step 5 - Save Your API: Click Save from the API Designer. Your API will now be added to the APIs list and as the next step you’ll access your API from the Gateway Ingress.
Want to learn more from one of our team?
Test Your API
Your first API has been added. What’s next? Testing it! This page shows how you can test an API that you have added to Tyk Cloud, to ensure that it’s functioning correctly. You’ll now access the API you setup in Task 5 from the Cloud Data Plane within Tyk Cloud.Steps to test your API
- Step 1 - Access the Gateway Ingress: From the Cloud Data Plane overview, copy the Ingress link and open it in a browser tab. You will get a 404 error.
-
Step 2 - Append the URL with your API: You created a API named my app in Task 5. Add
/my-app/to the end of the URL. You should be taken to https://httpbin.org/, which you added as the Target URL for the API in Task 5.
View Analytics
We have now created and tested our API. How do we know that they are performing well? This page walks you through how to then view your API analytics so that you can ensure your APIs are performing perfectly.Steps to check your API analytics
- Step 1 - Access the Dashboard: You’ll now look at the analytics for the API you created in Task 5.If you’re not still in the Tyk Dashboard for your Control Plane, click the dashboard link in the Control Plane Ingress list. Click the Gateway Dashboard menu item and you can see the successful calls made to your API from the Cloud Data Plane you created.
-
Step 2 - Create an Error: From the Cloud Data Plane, make a call that will throw an error. For example, use
me-appinstead ofmy-app. You should see the error displayed in the Analytics.
Review Your Setup
This summary page explains the steps required to implement Tyk Cloud, which enables you to manage your APIs seamlessly. We’ve covered the following to get you started with the Tyk Cloud way of managing Tyk deployments:- We’ve created a new Organization
- We’ve added a Team
- We’ve added an Environment, including a Control Plane and an associated Cloud Data Plane and deployed them
- We’ve added a very simple API to the Control Plane Dashboard and tested it via the first Cloud Data Plane
- We’ve seen the data from the Gateways displayed in the Analytics section of the Control Plane Dashboard
- Managing your Deployments
- Adding Plugins and Middleware to your Control Plane