Introduction
Why OAuth2.0 is important OAuth 2.0 is a crucial security mechanism for both public and internal APIs, as it provides a secure and standardized way to authenticate and authorize access to protected resources. It enables granular access control and revocation of access when necessary without exposing sensitive login credentials. In short, OAuth 2.0 offers a secure and flexible approach to managing access to APIs. Implementing an OAuth2.0 provider can be a complex process that involves several technical and security considerations. As such, many API providers choose to use specialized identity providers instead of implementing OAuth2.0 provider themselves. By using specialized identity providers, API providers can leverage the provider’s expertise and infrastructure to manage access to APIs and ensure the security of the authentication process. This also allows API providers to focus on their core business logic and reduce the burden of managing user identities themselves. How does Tyk help Tyk offers a standard and reliable way to work with identity providers through the Dynamic Client Registration protocol (DCR), which is an Internet Engineering Task Force protocol that establishes standards for dynamically registering clients with authorization servers. Tyk Enterprise Developer portal allows API providers to set up a connection with identity providers that support DCR so that API Consumers can use the OAuth2.0 credentials issued by the identity provider to access APIs exposed on the portal.Prerequisites
Before getting starting with configuring the portal, it’s required to configure your Identity provider and the Dashboard beforehand.Create an initial access token
Before setting up Tyk Enterprise Developer Portal to work with DCR, you need to configure the identity provider. Please refer to the guides for popular providers to create the initial access token for DCR:- Gluu
- Curity
- Keycloak
-
Okta
Whilst many providers require initial access tokens, they are optional. Please refer to your provider documentation to confirm if required.
Create OAuth2.0 scopes to enforce access control and rate limit
Tyk uses OAuth2.0 scope to enforce access control and rate limit for API Products. Therefore, creating at least two scopes for an API Product and plan is required. The below example demonstrates how to achieve that with Curity, Keycloak and Okta in the tabs below.- Curity
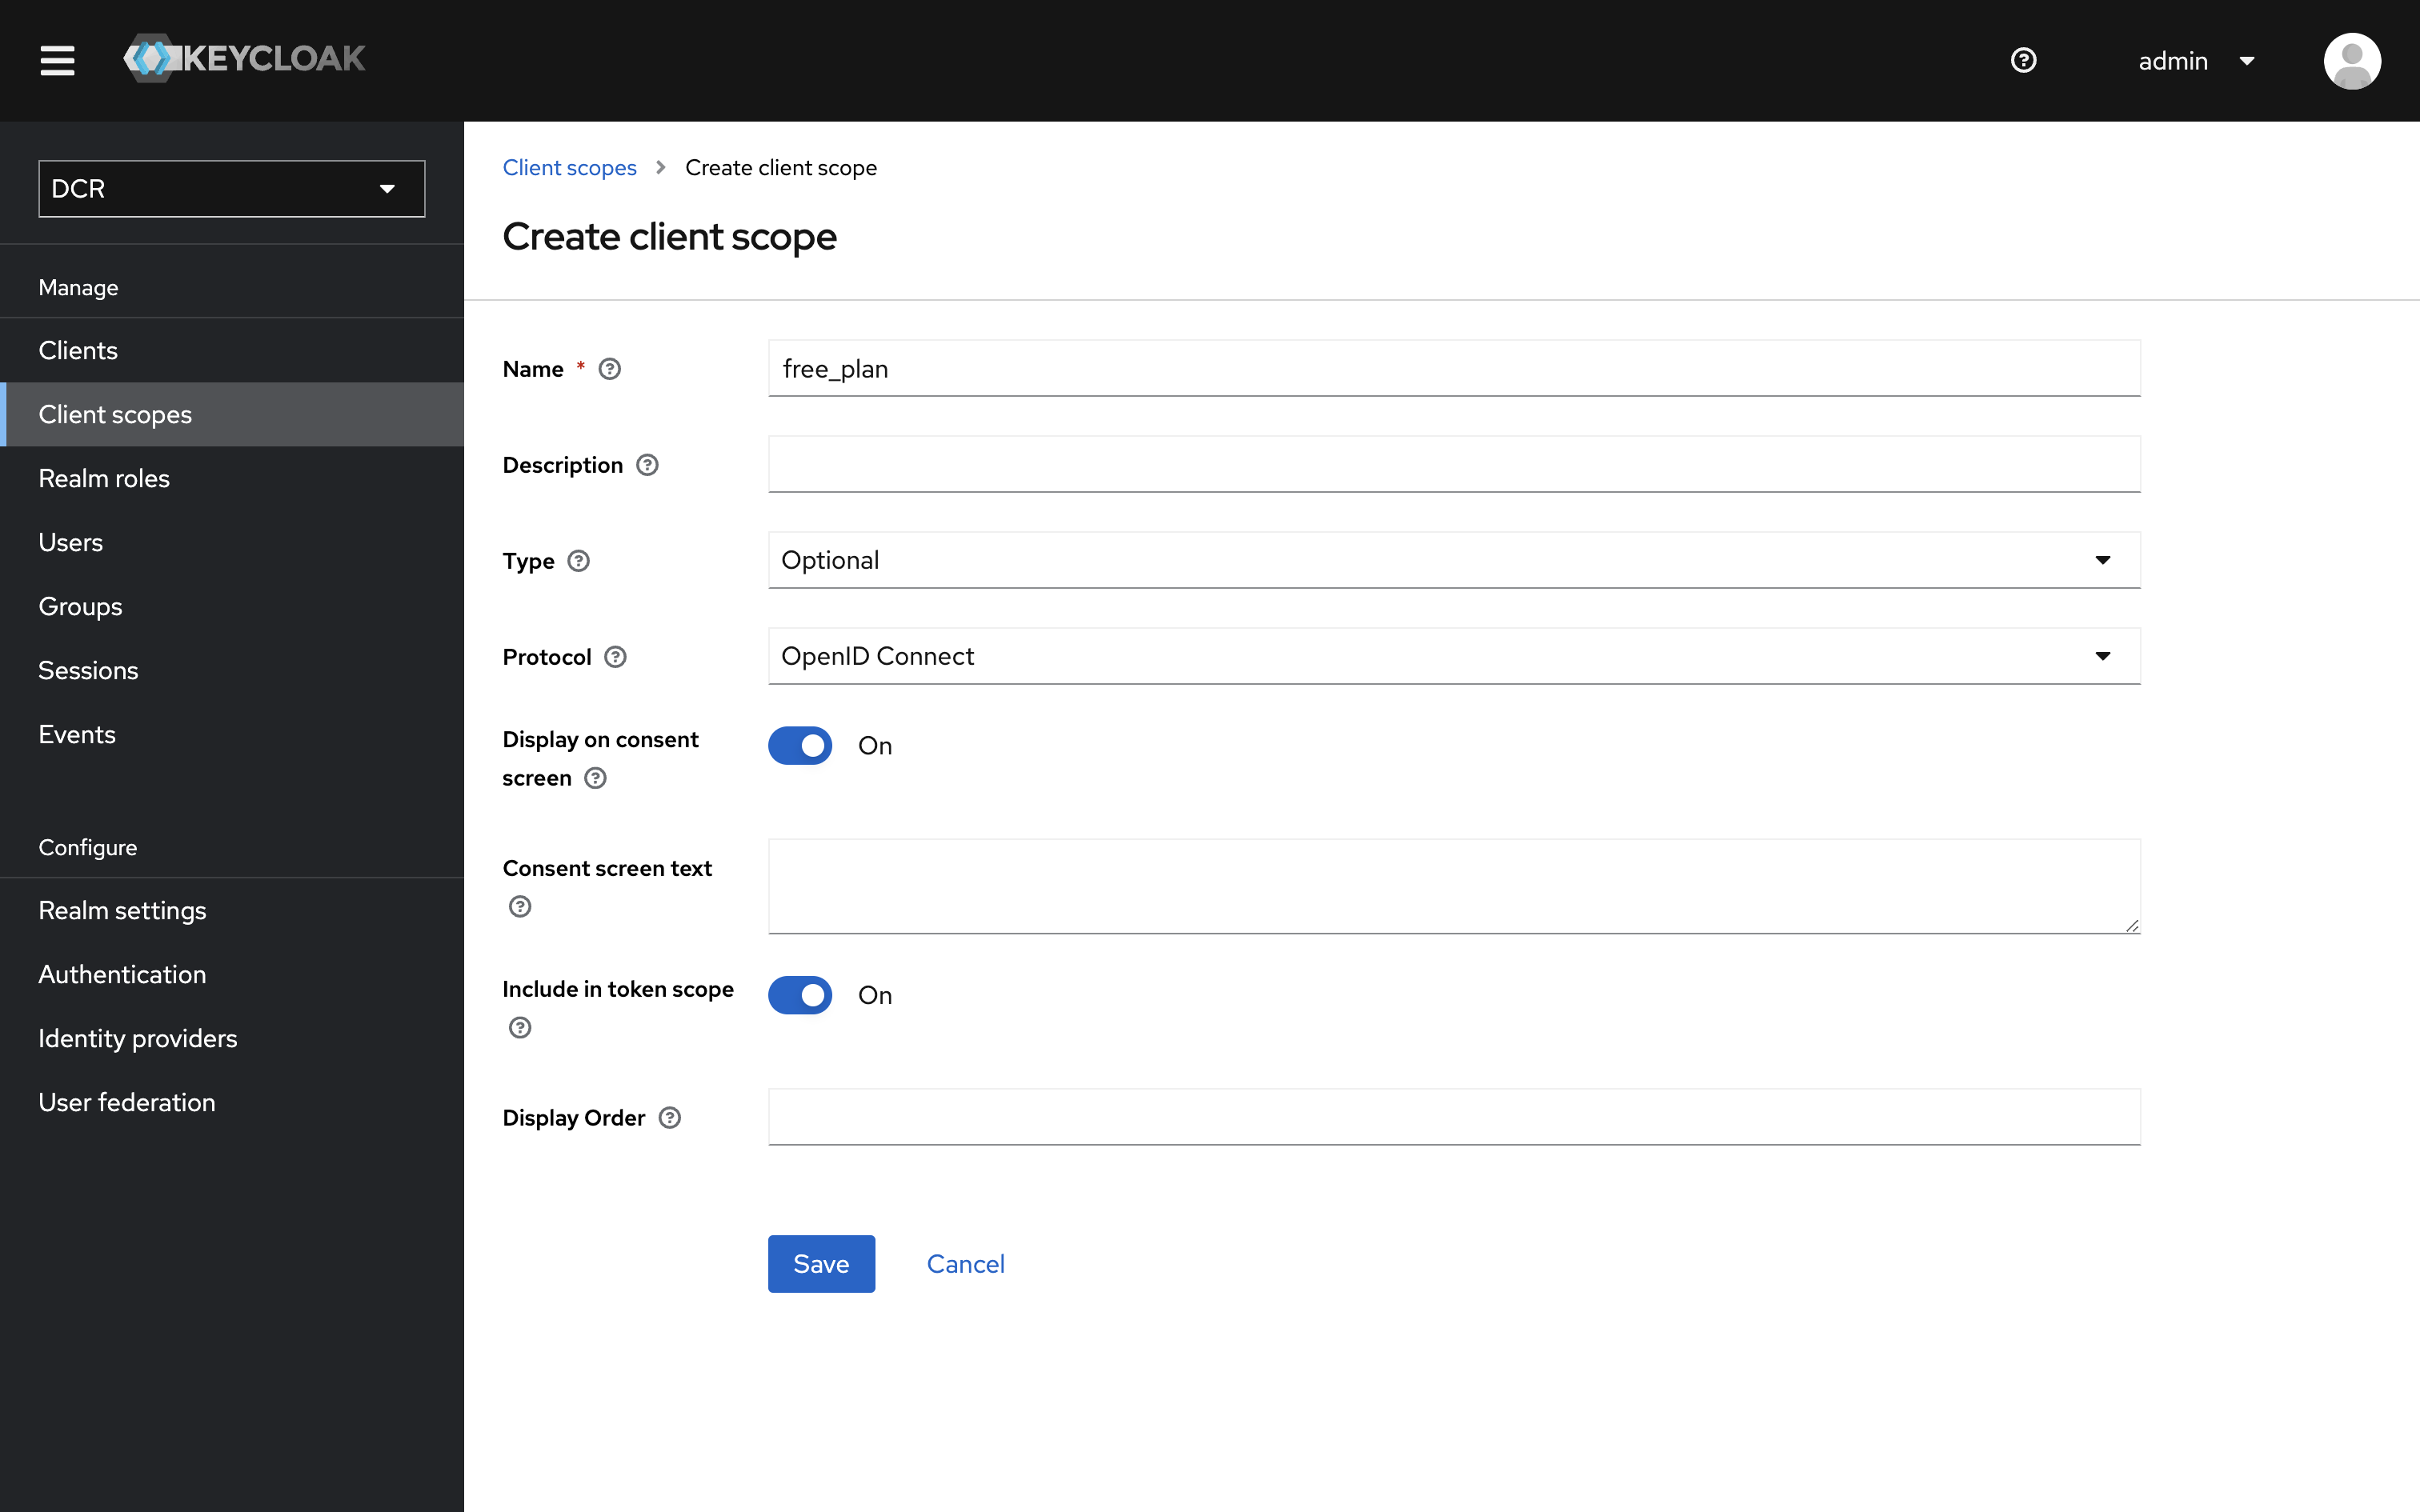
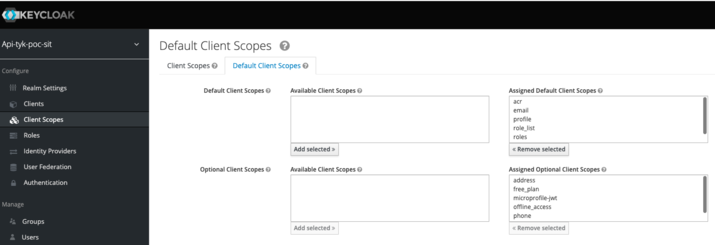
- Keycloak
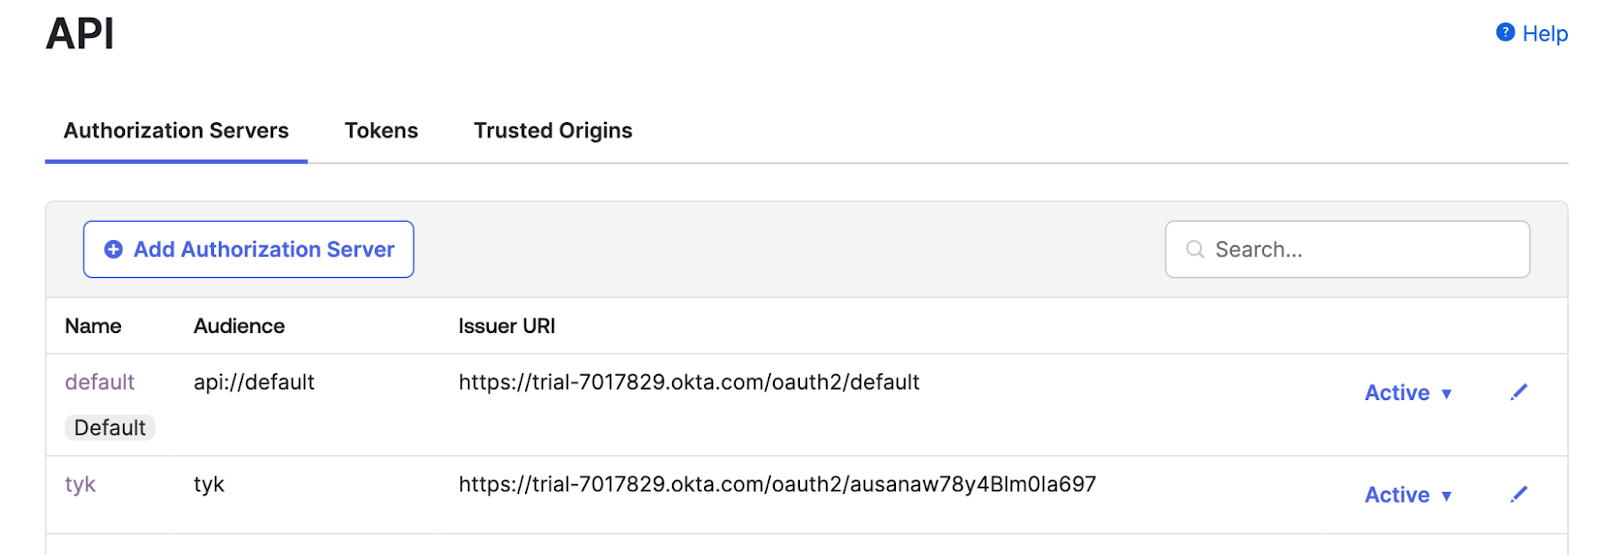
- Okta
-
Navigate to Profiles → Token Service → Scopes
Click
+ Newto create a new scope.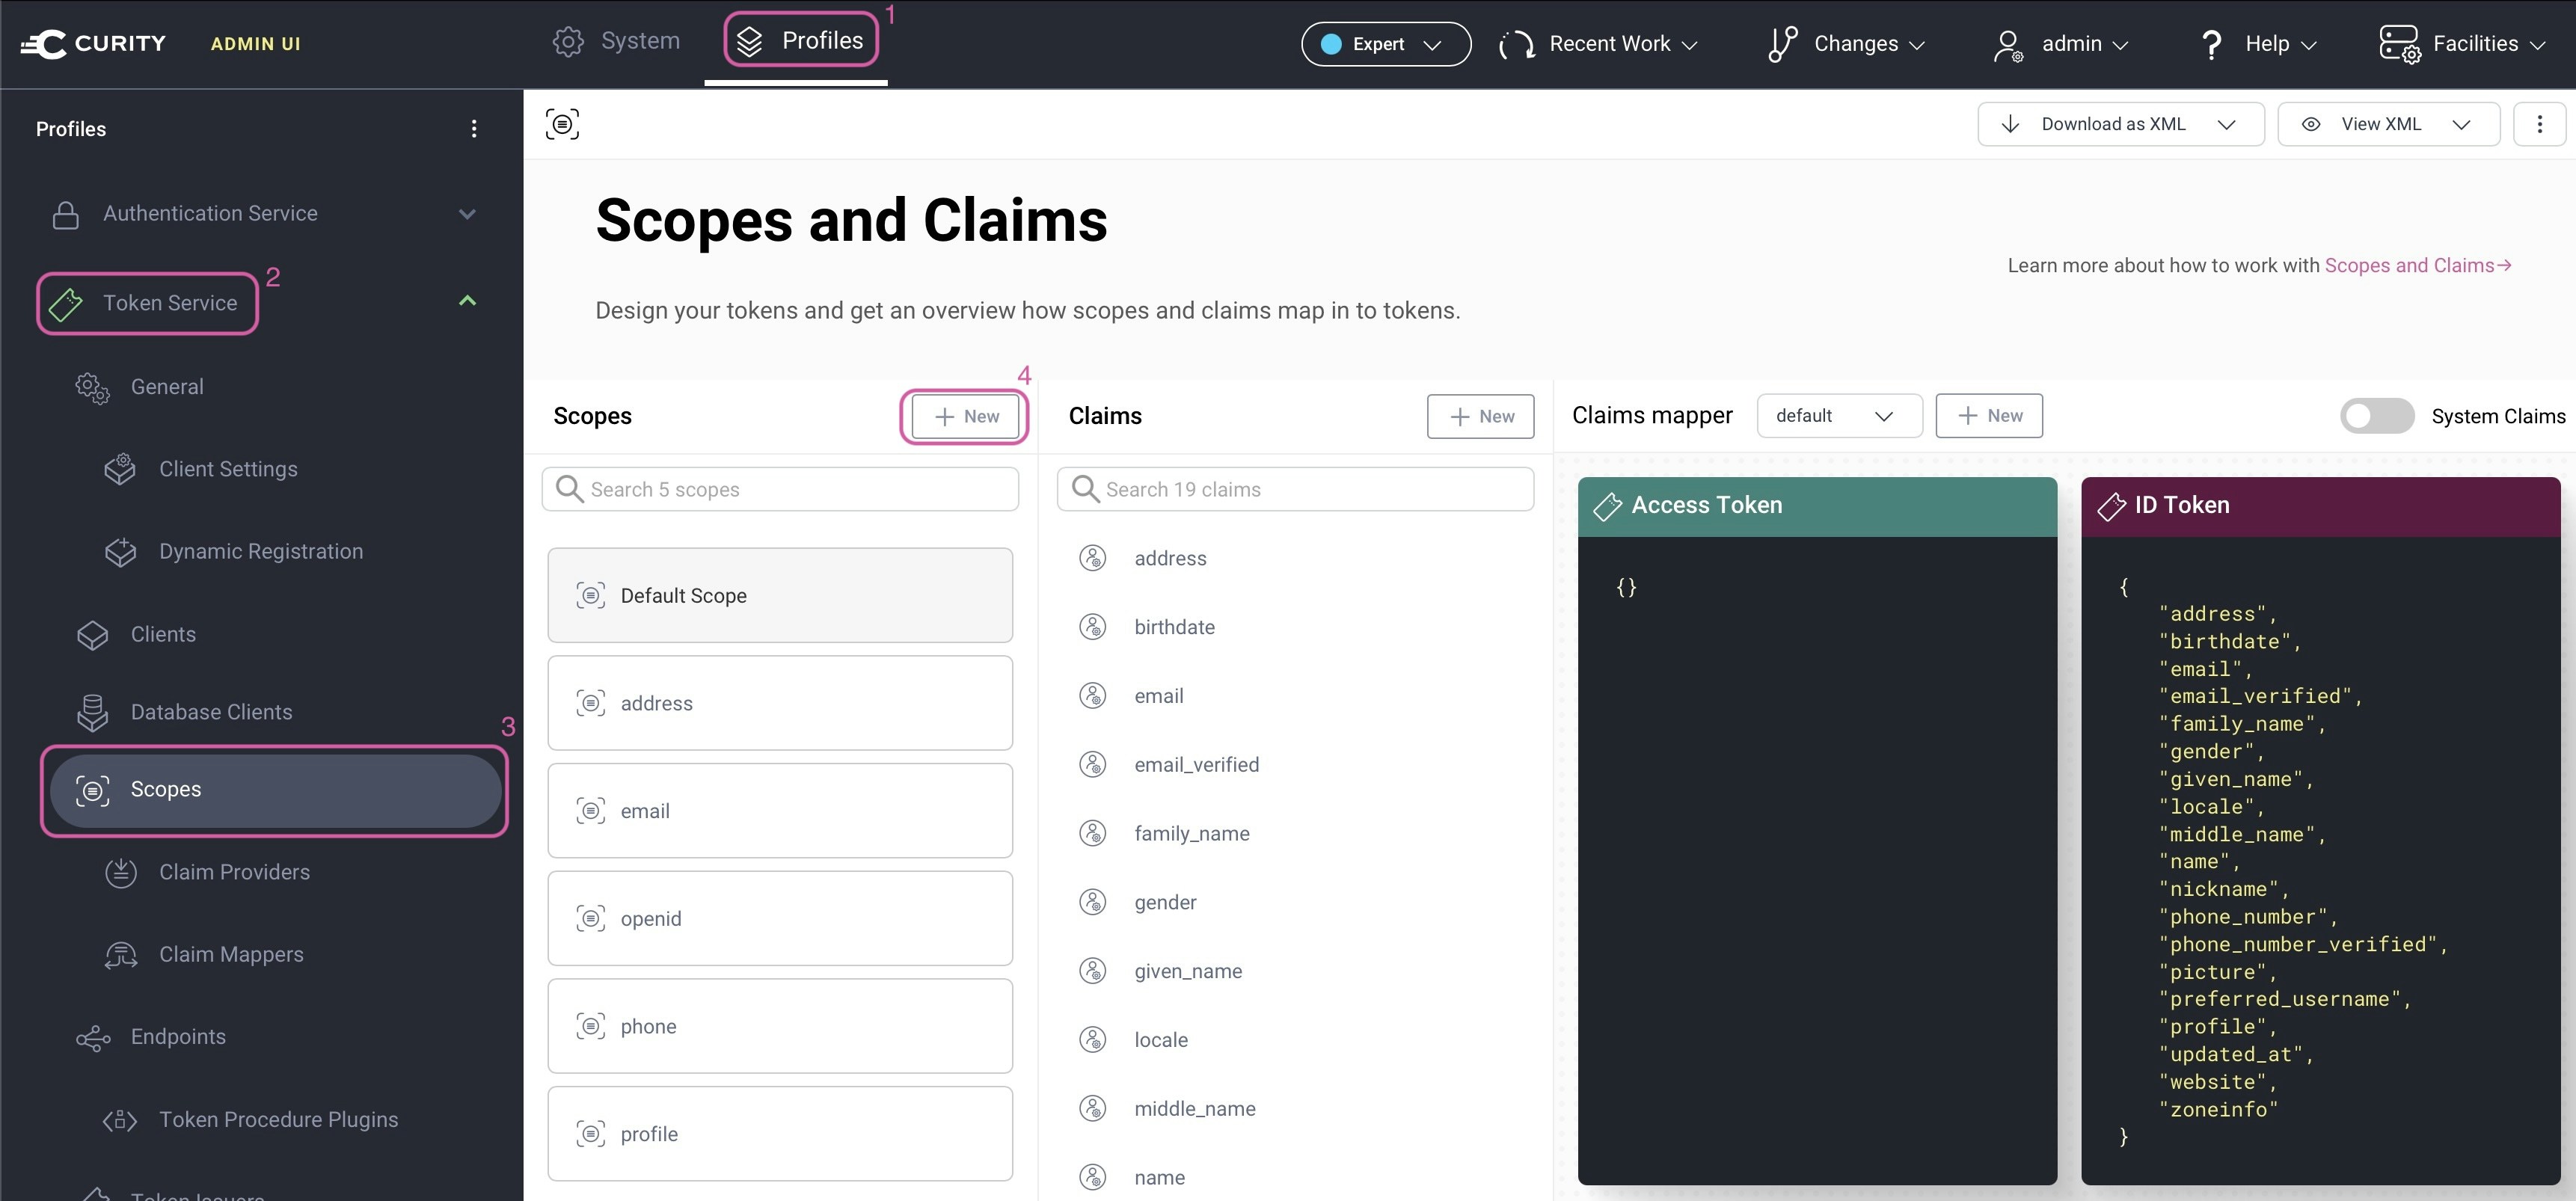
-
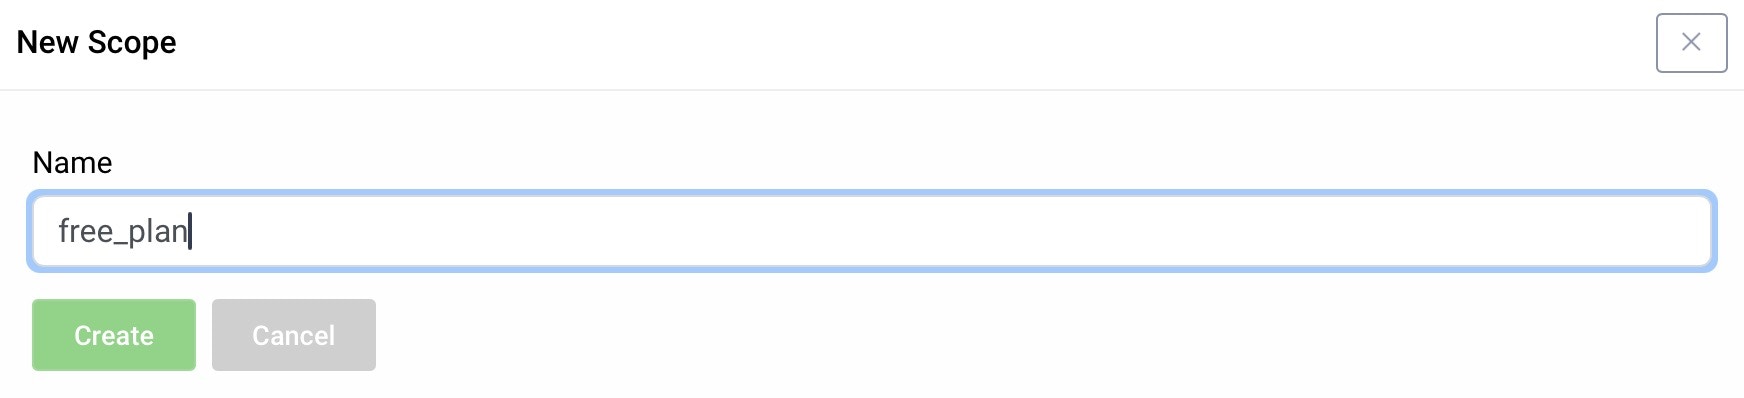
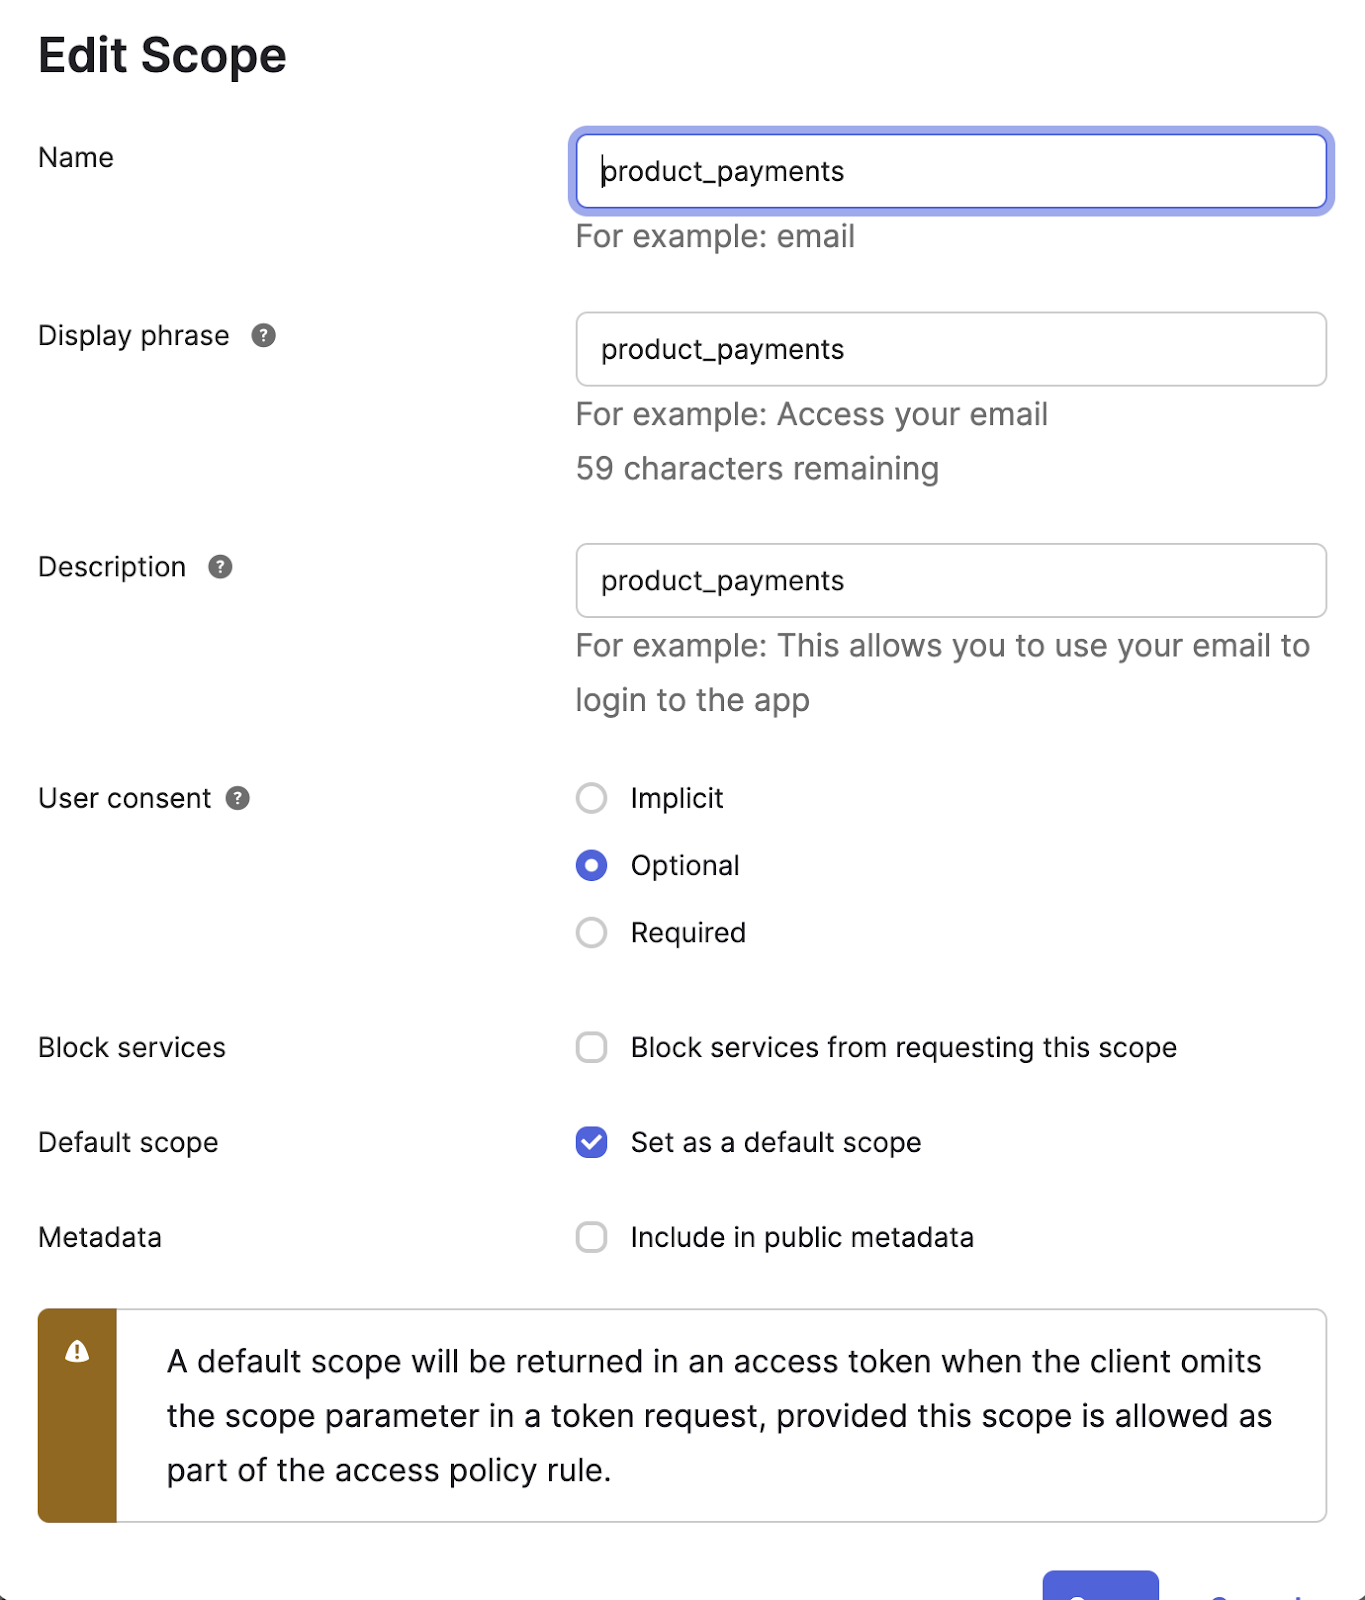
Give the new scope a name
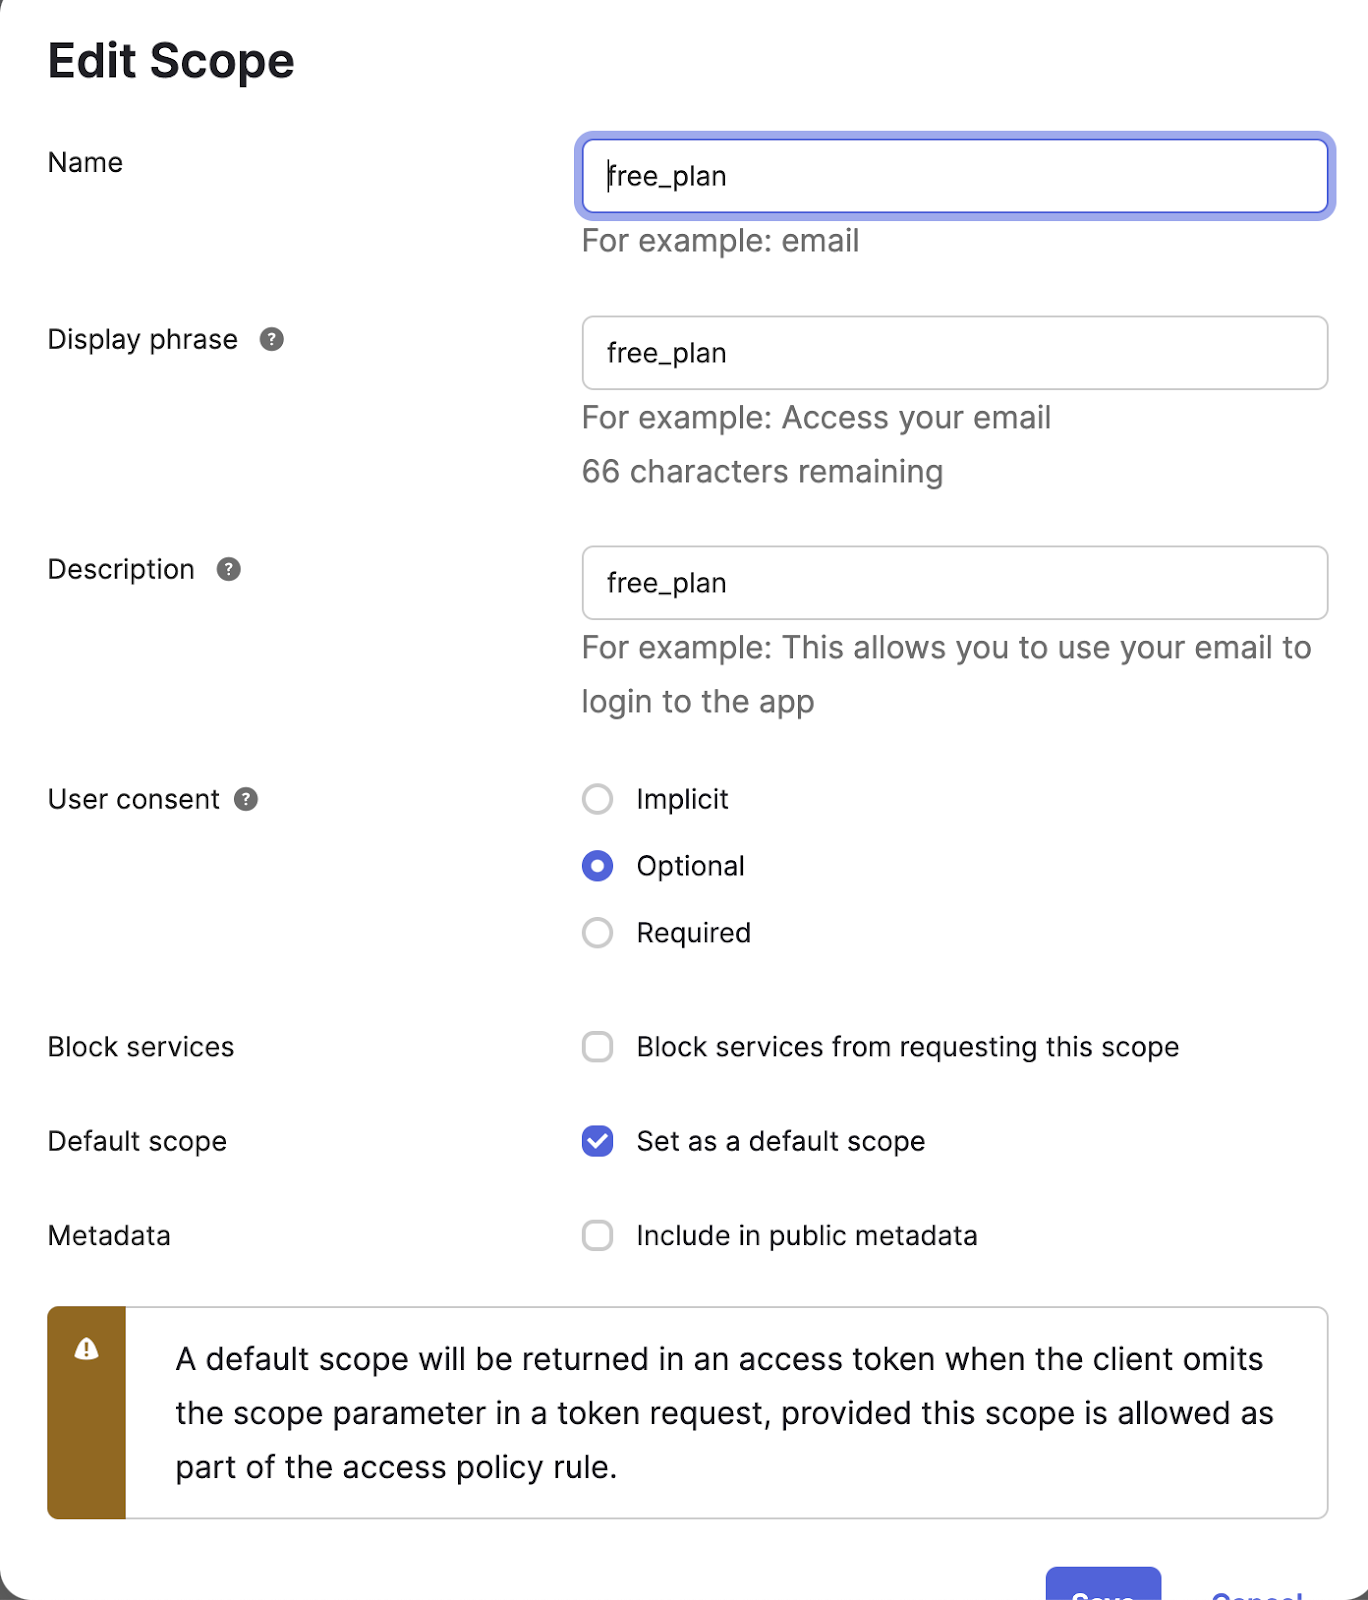
Name the scope product_payments and click
Create. Repeat to create another scope and give it the name free_plan.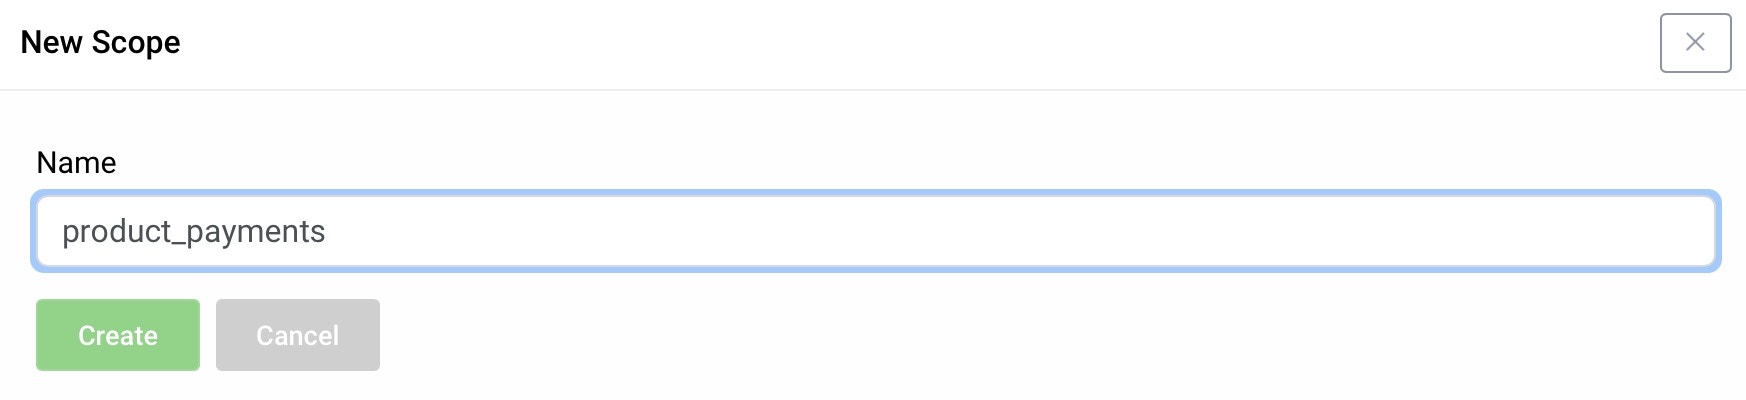
dcr scope to authenticate the DCR endpoint. It obtains this via normal OAuth flows. It is, however, not possible to define an OAuth client_id and secret in Tyk to obtain such a token. A workaround is to disable authentication of the DCR endpoint in the Curity Identity Server by setting it to use no-authentication.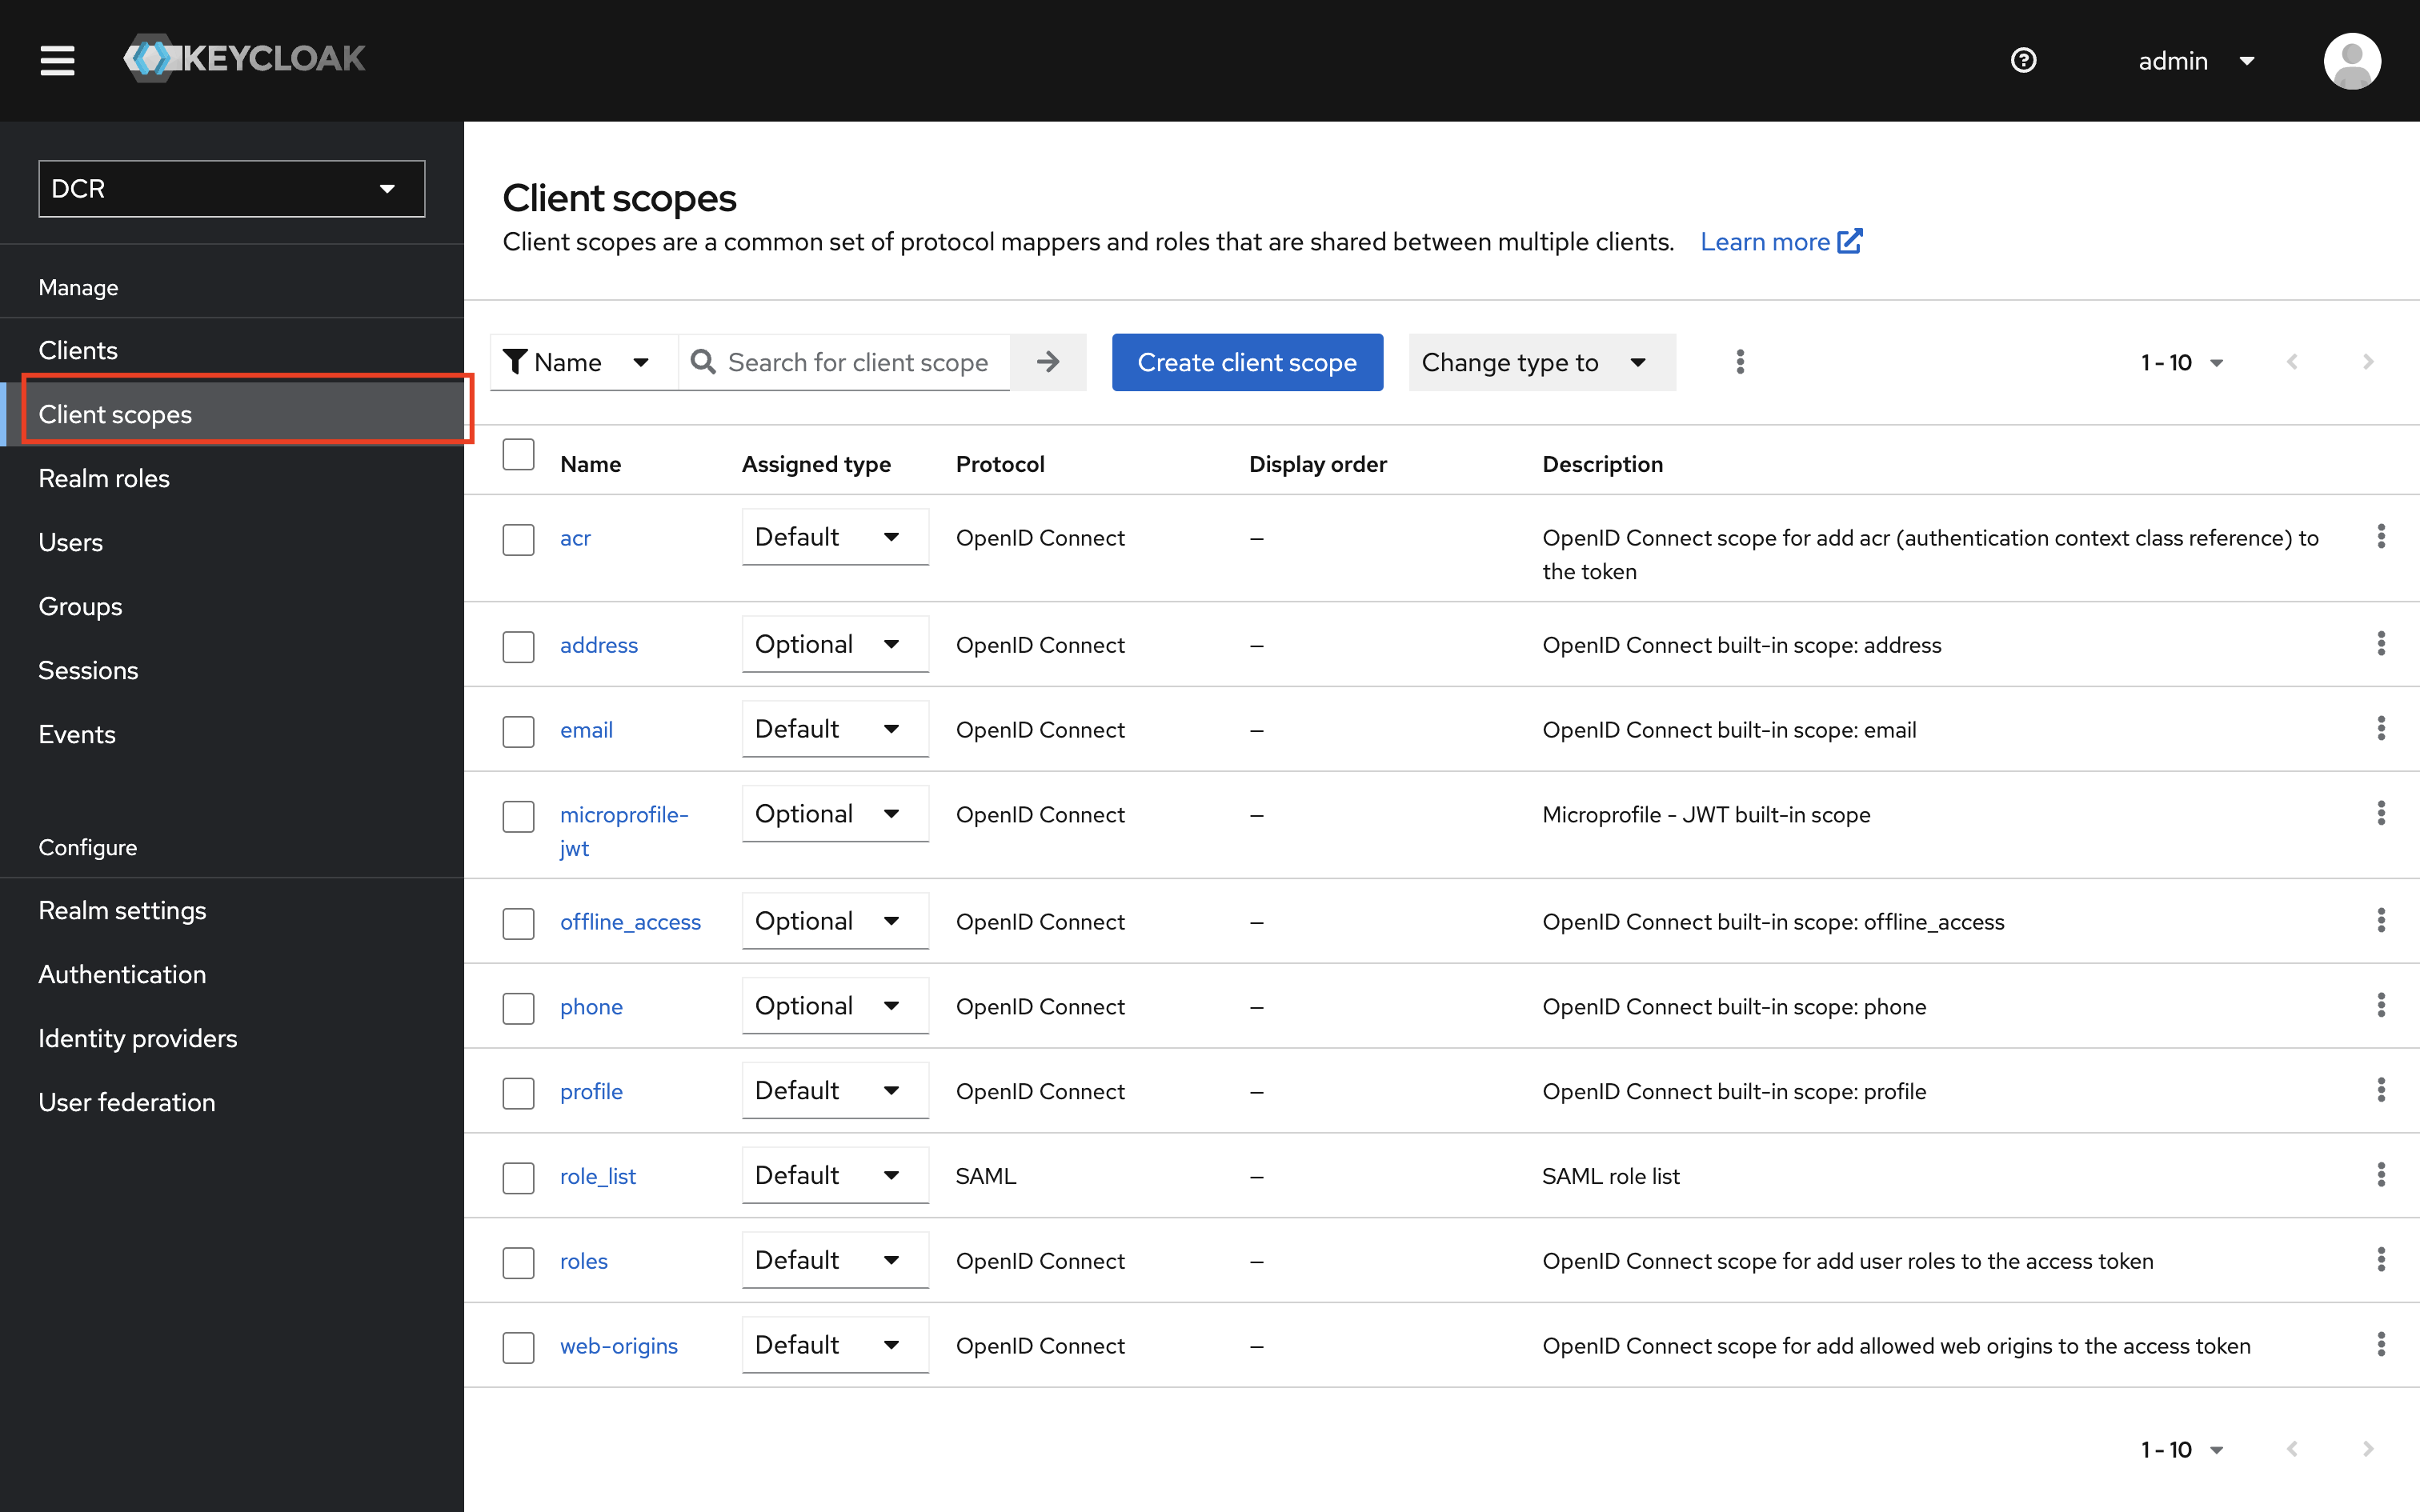

Create Tyk policies for an API Product and plan
You can skip this step if you are using Tyk Developer Portal version 1.13.0 or later.
Go directly to Configure Tyk Enterprise Developer Portal to work with an identity provider.
-
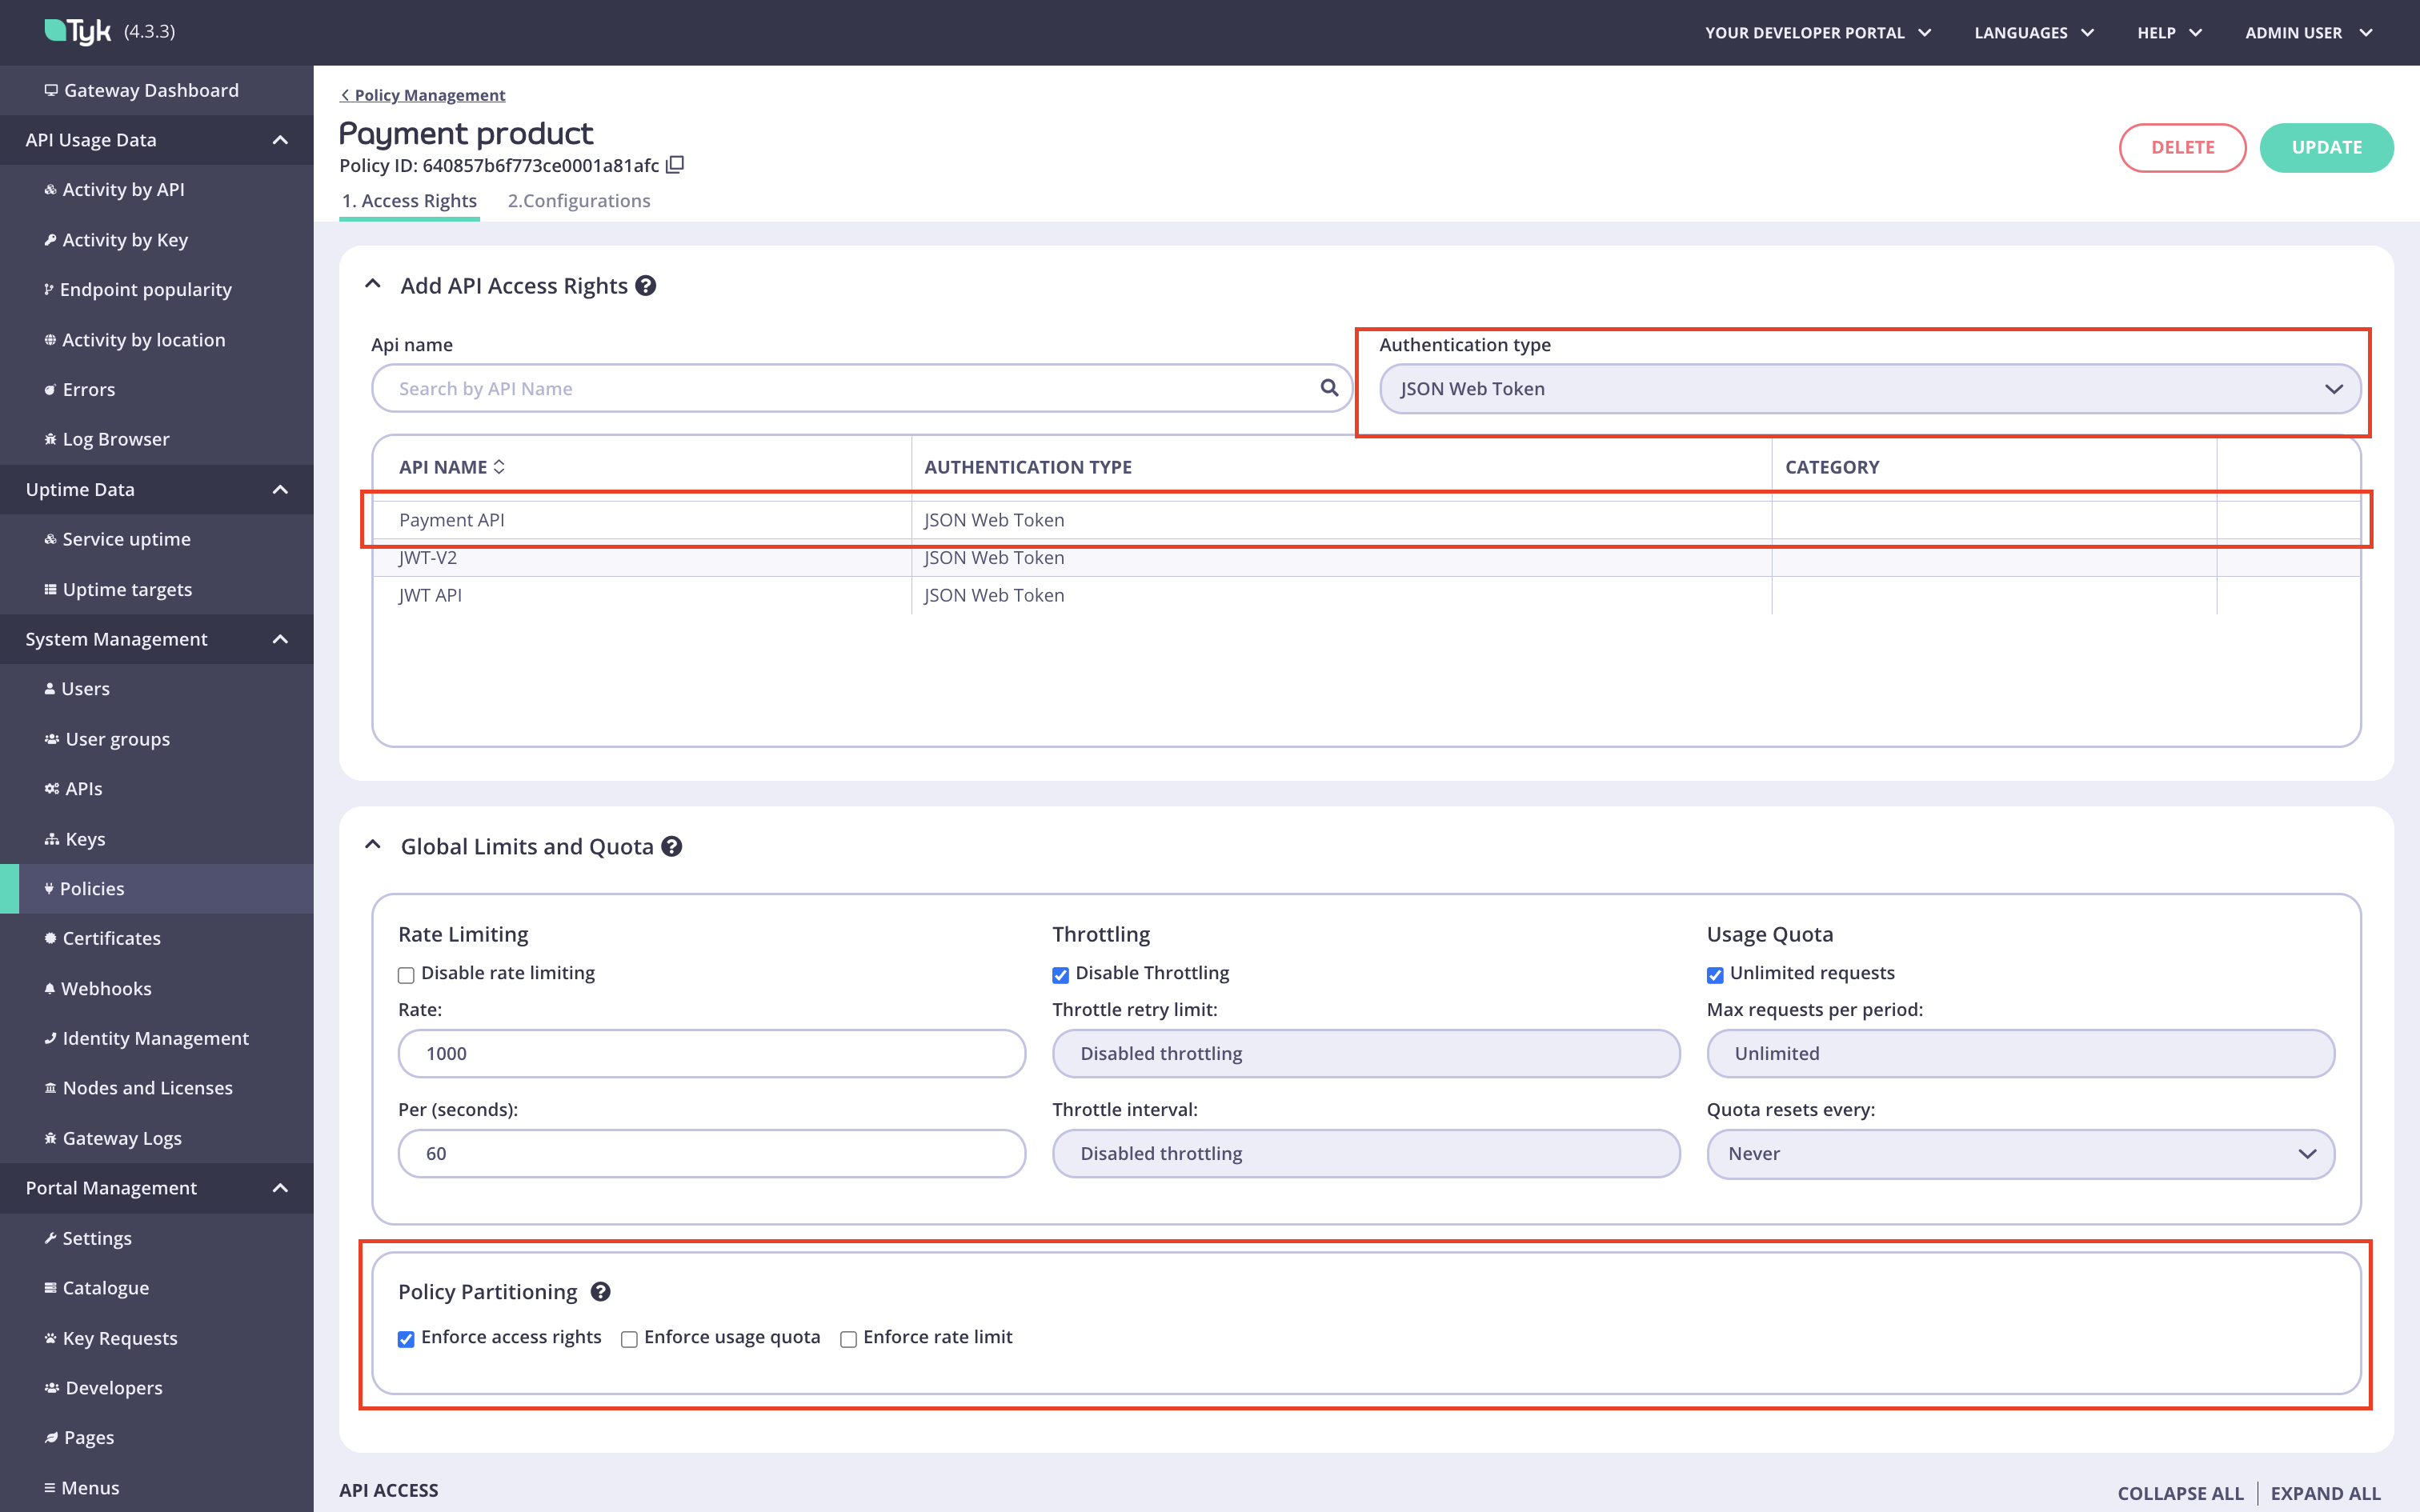
Create a policy for an API product.
-
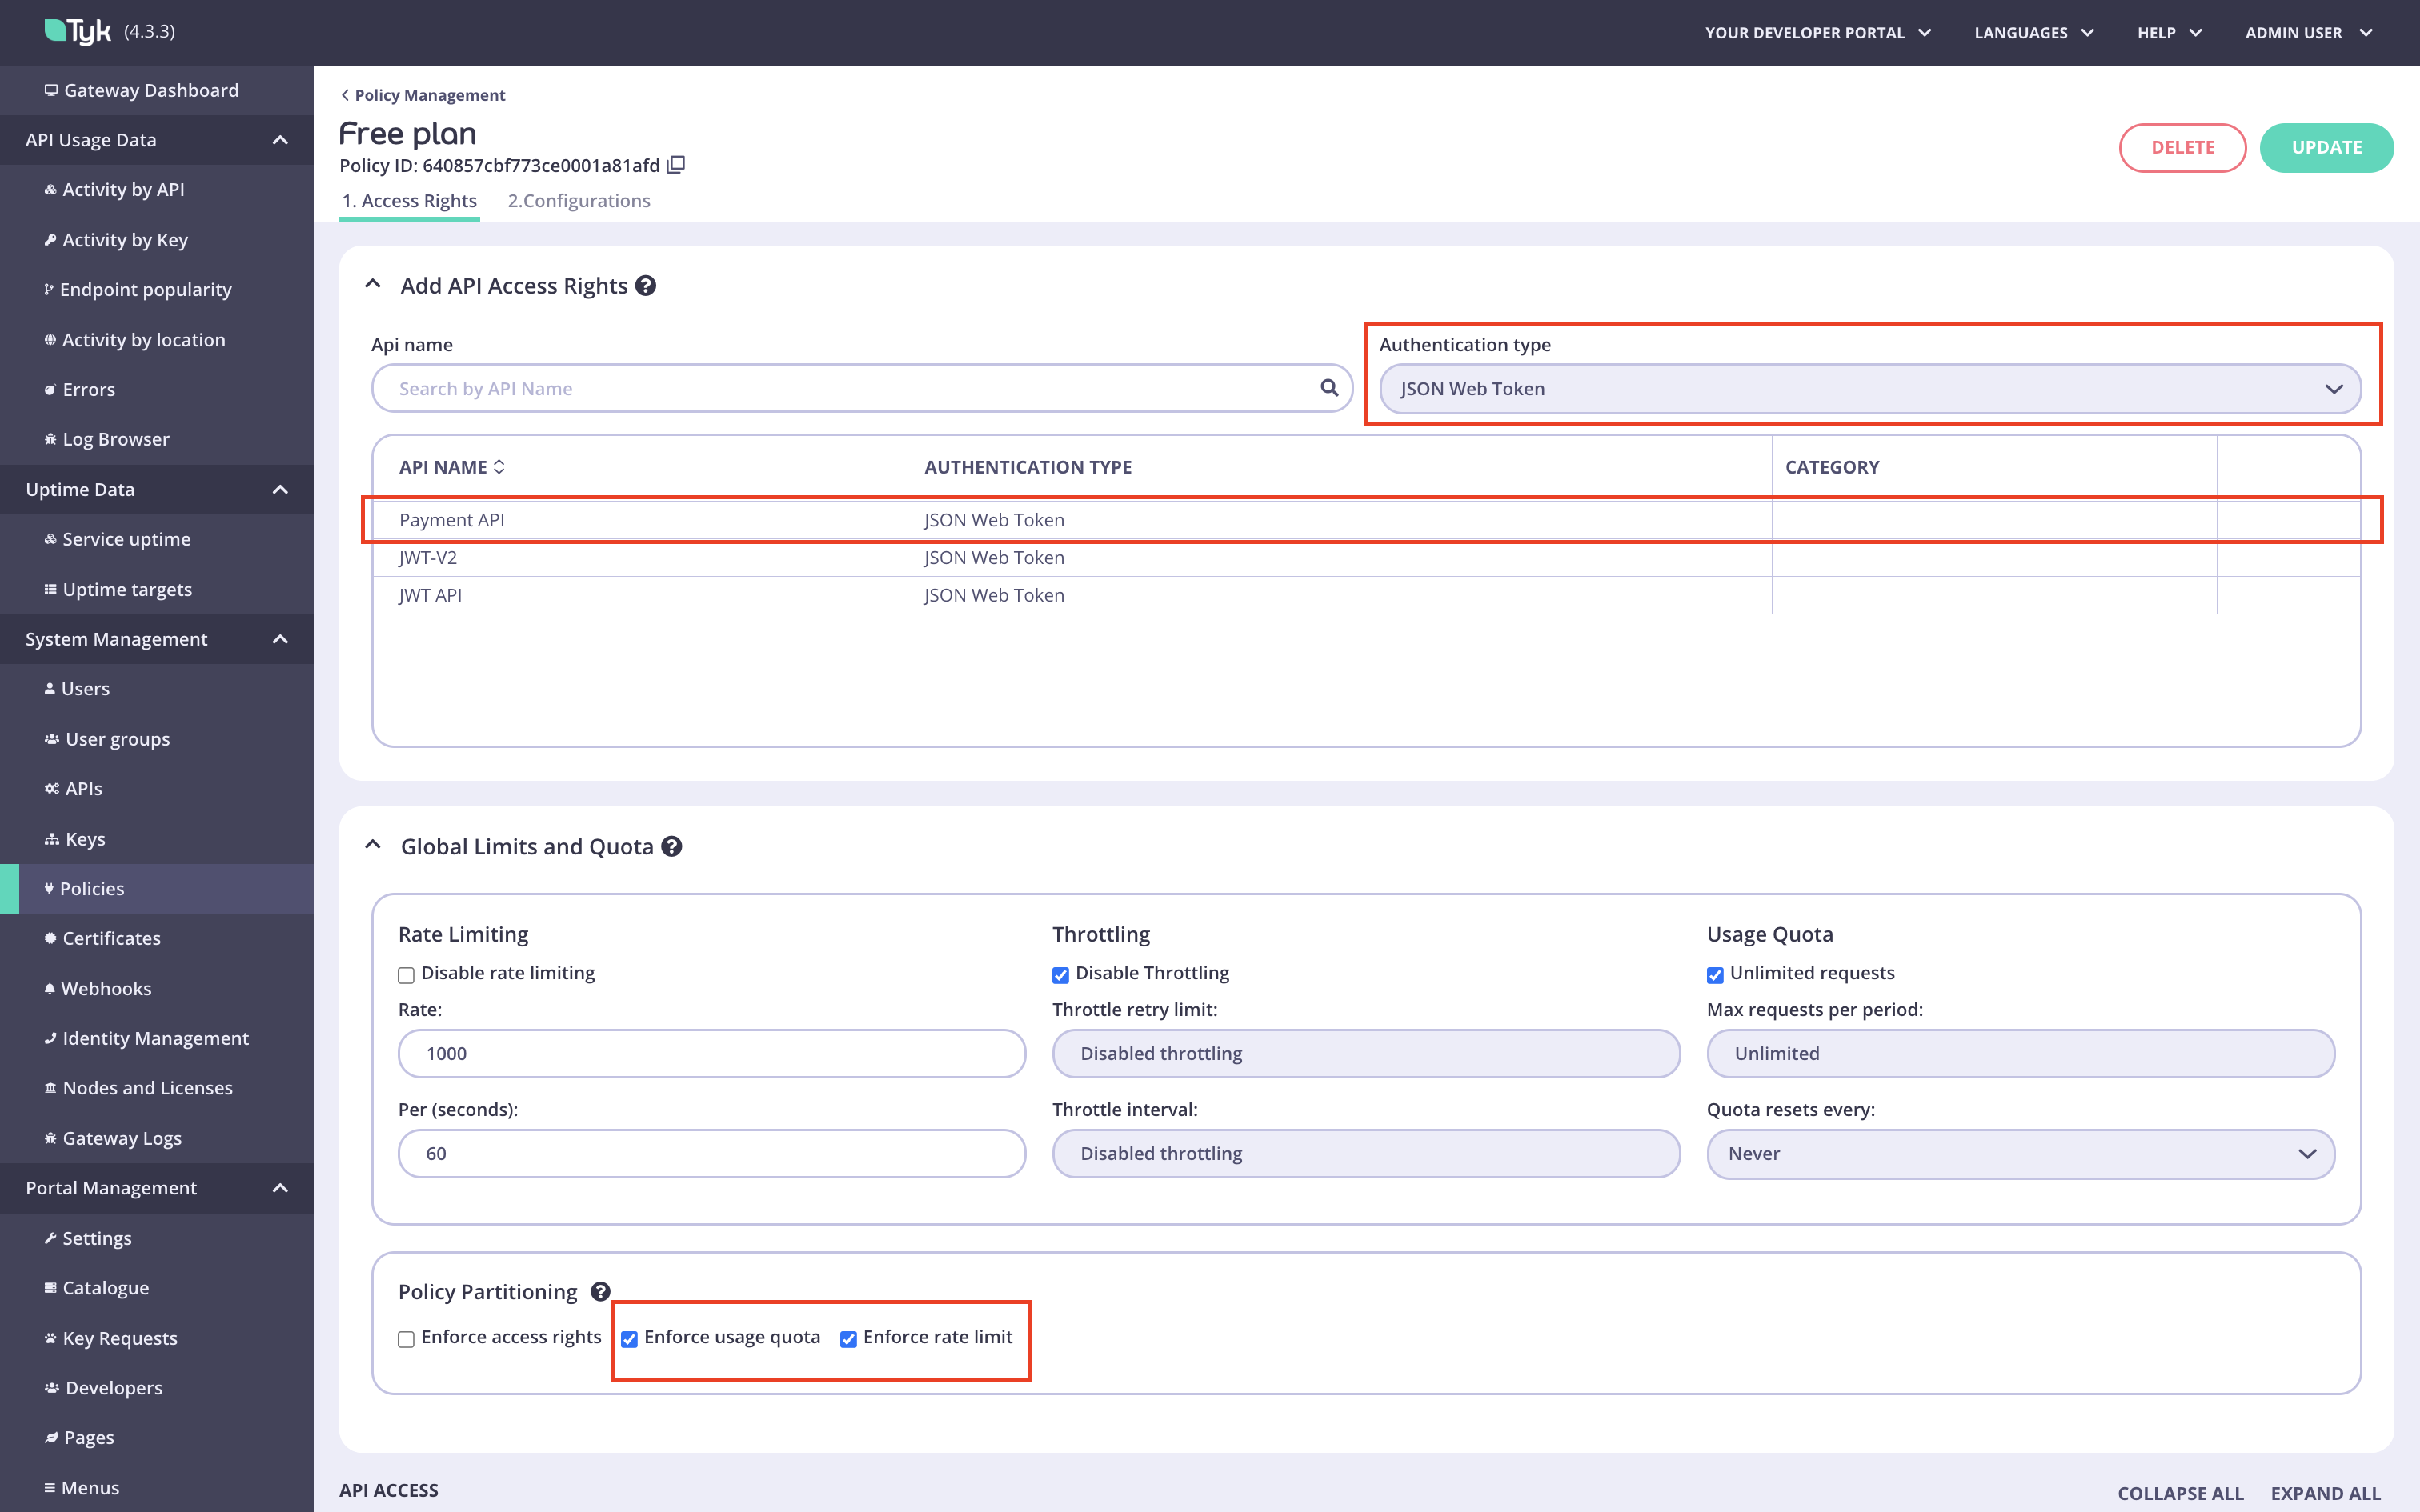
Create a policy for a plan.
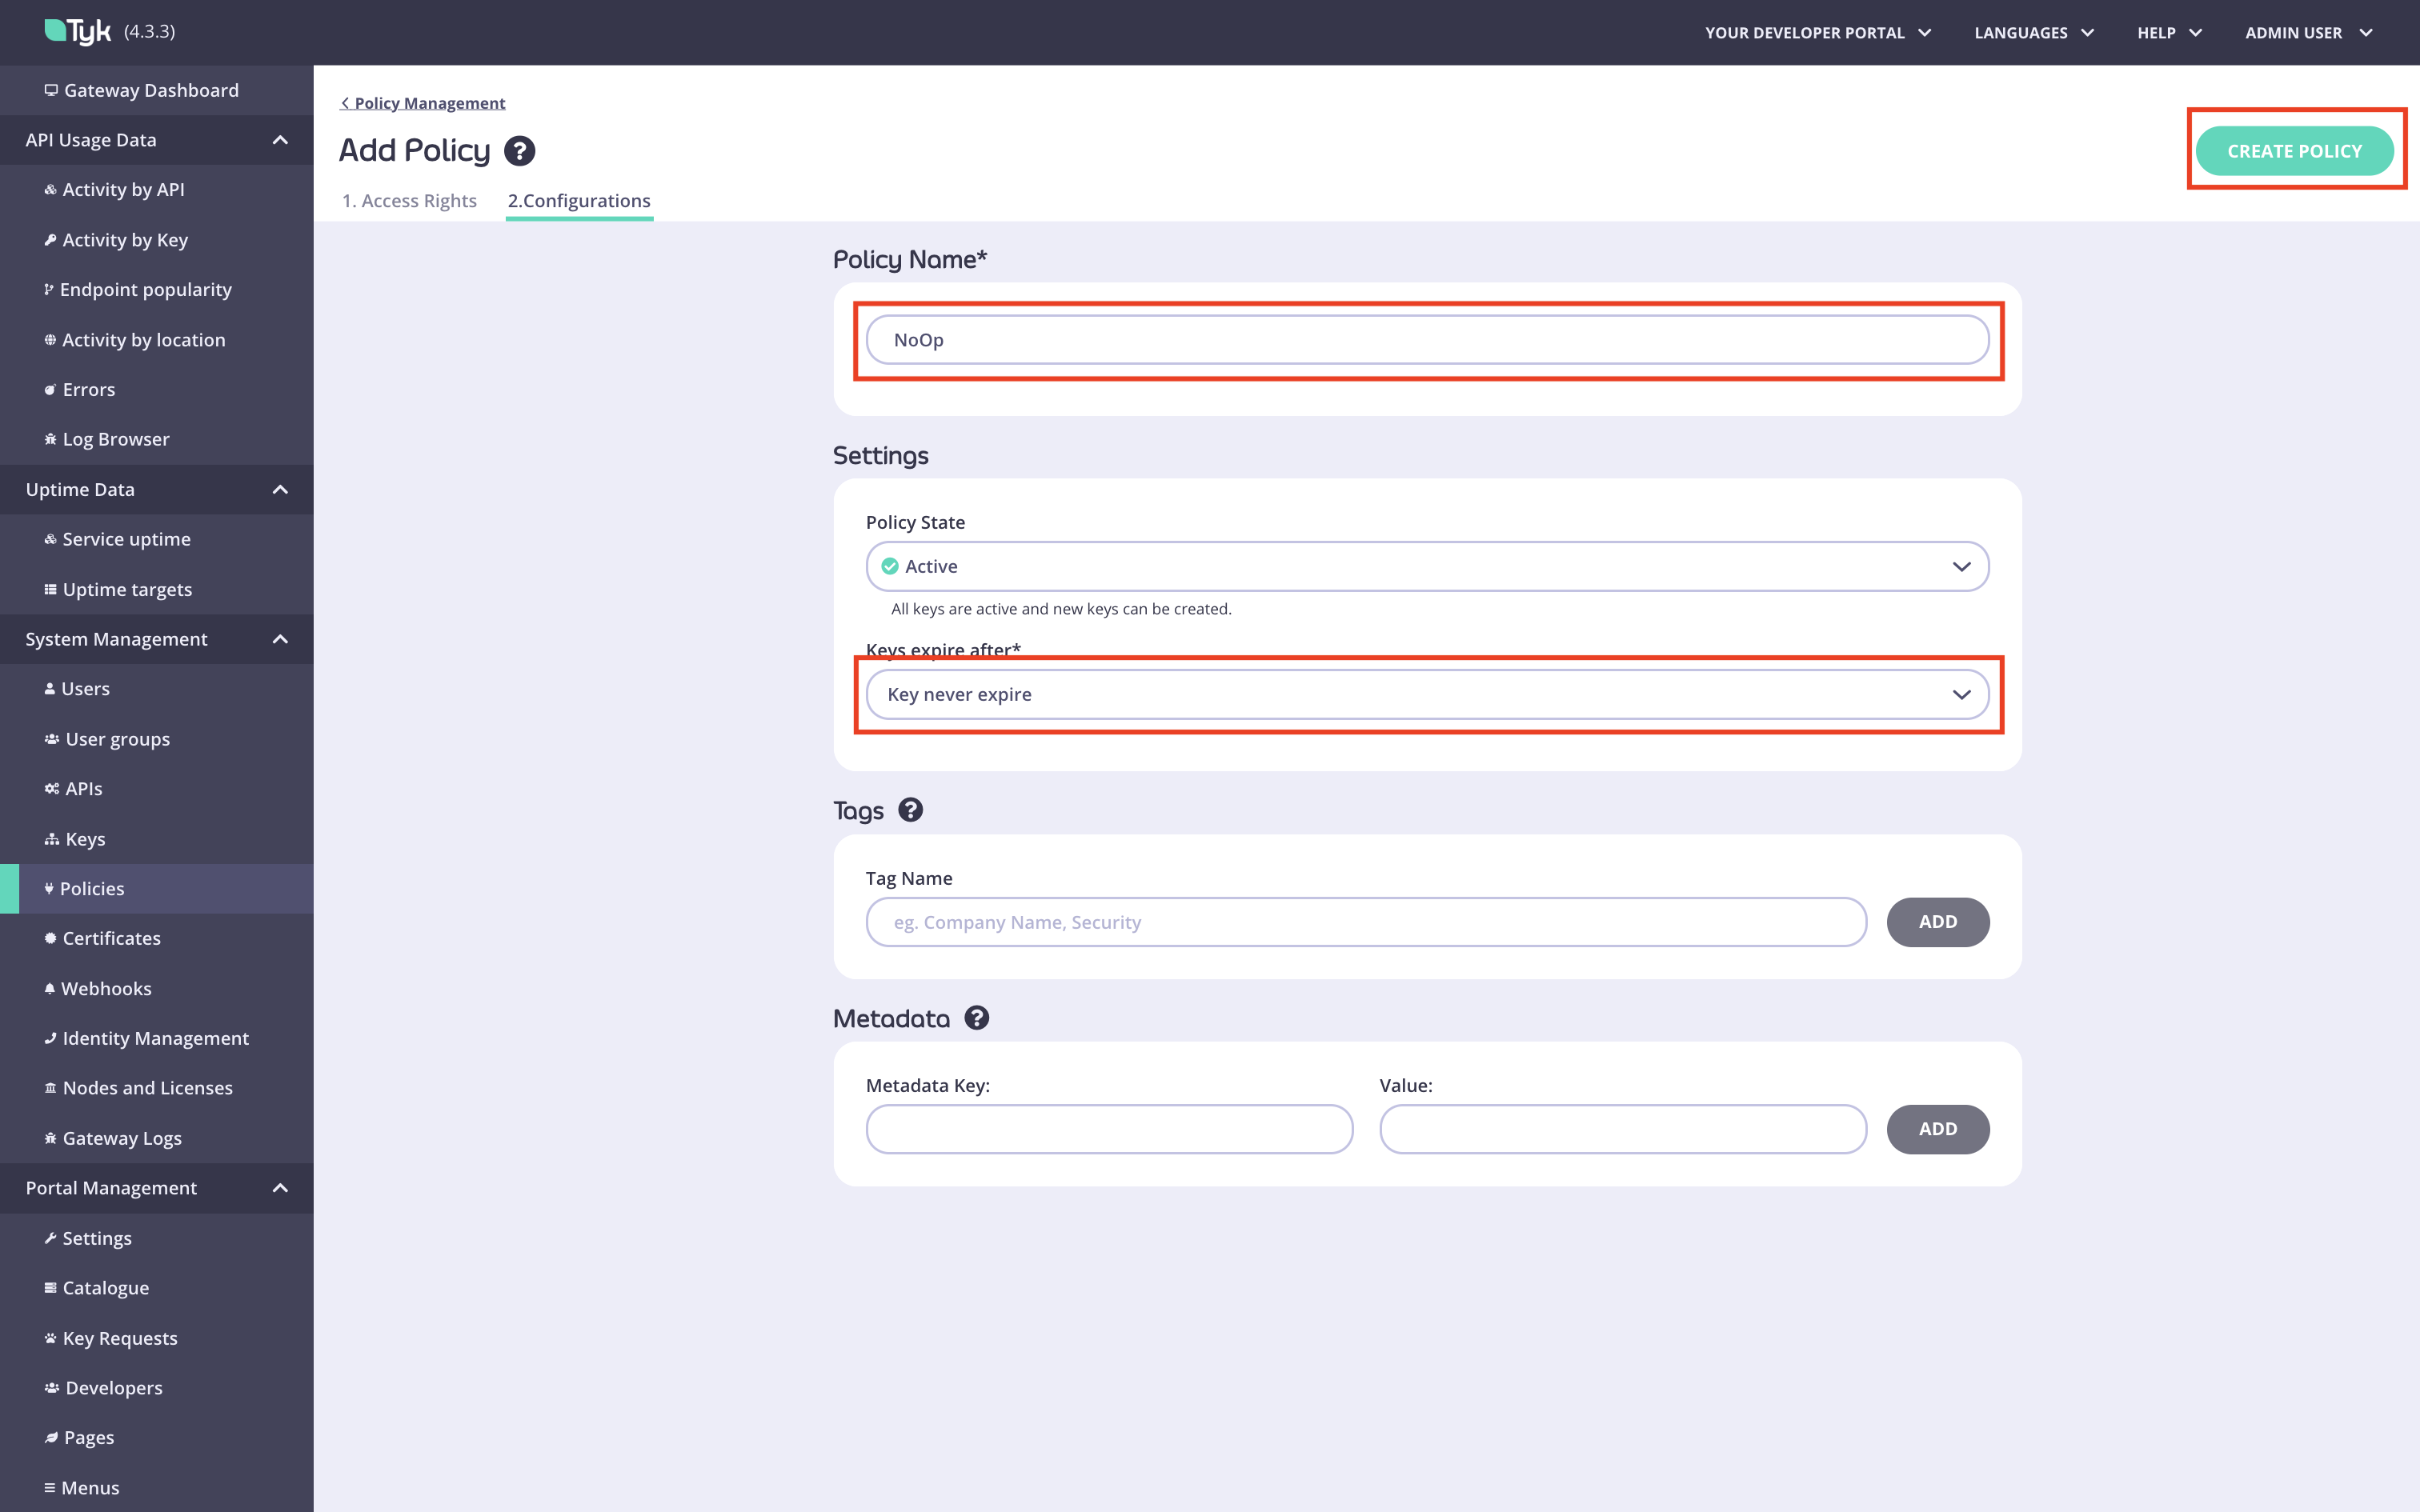
Create the No Operation policy and API
You can skip this step if you are using Tyk Developer Portal version 1.13.0 or later.
Go directly to Configure Tyk Enterprise Developer Portal to work with an identity provider.
-
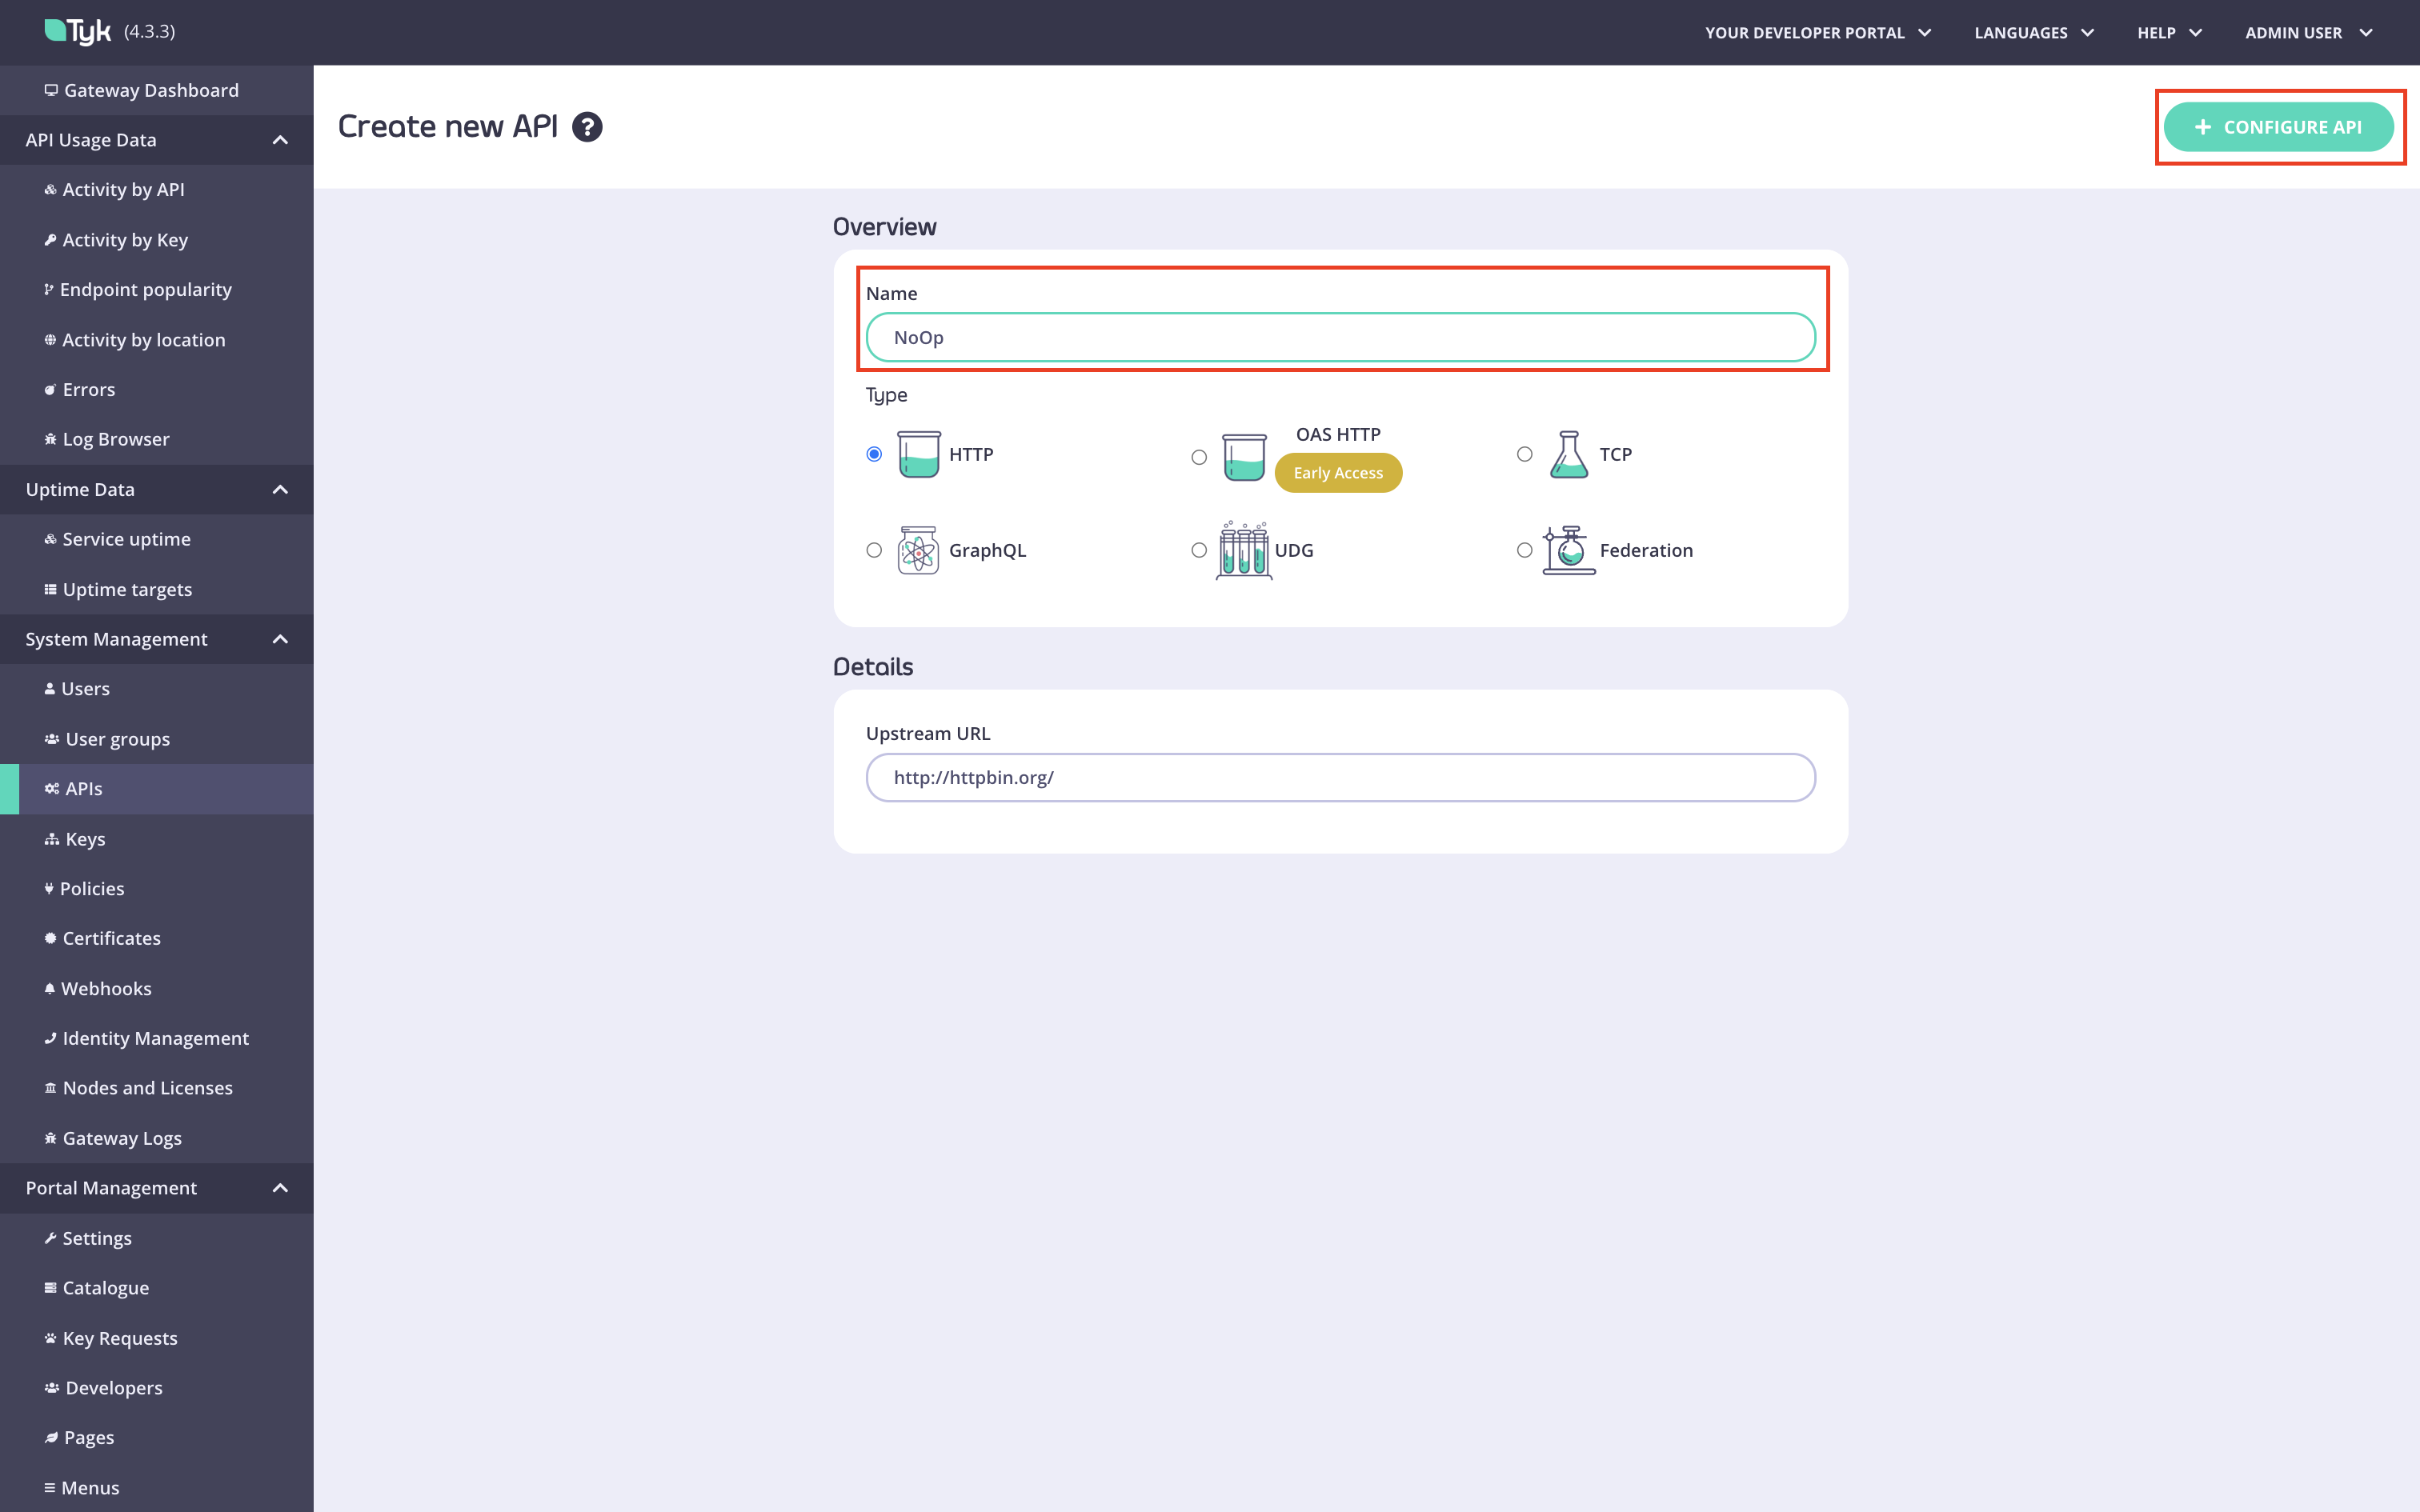
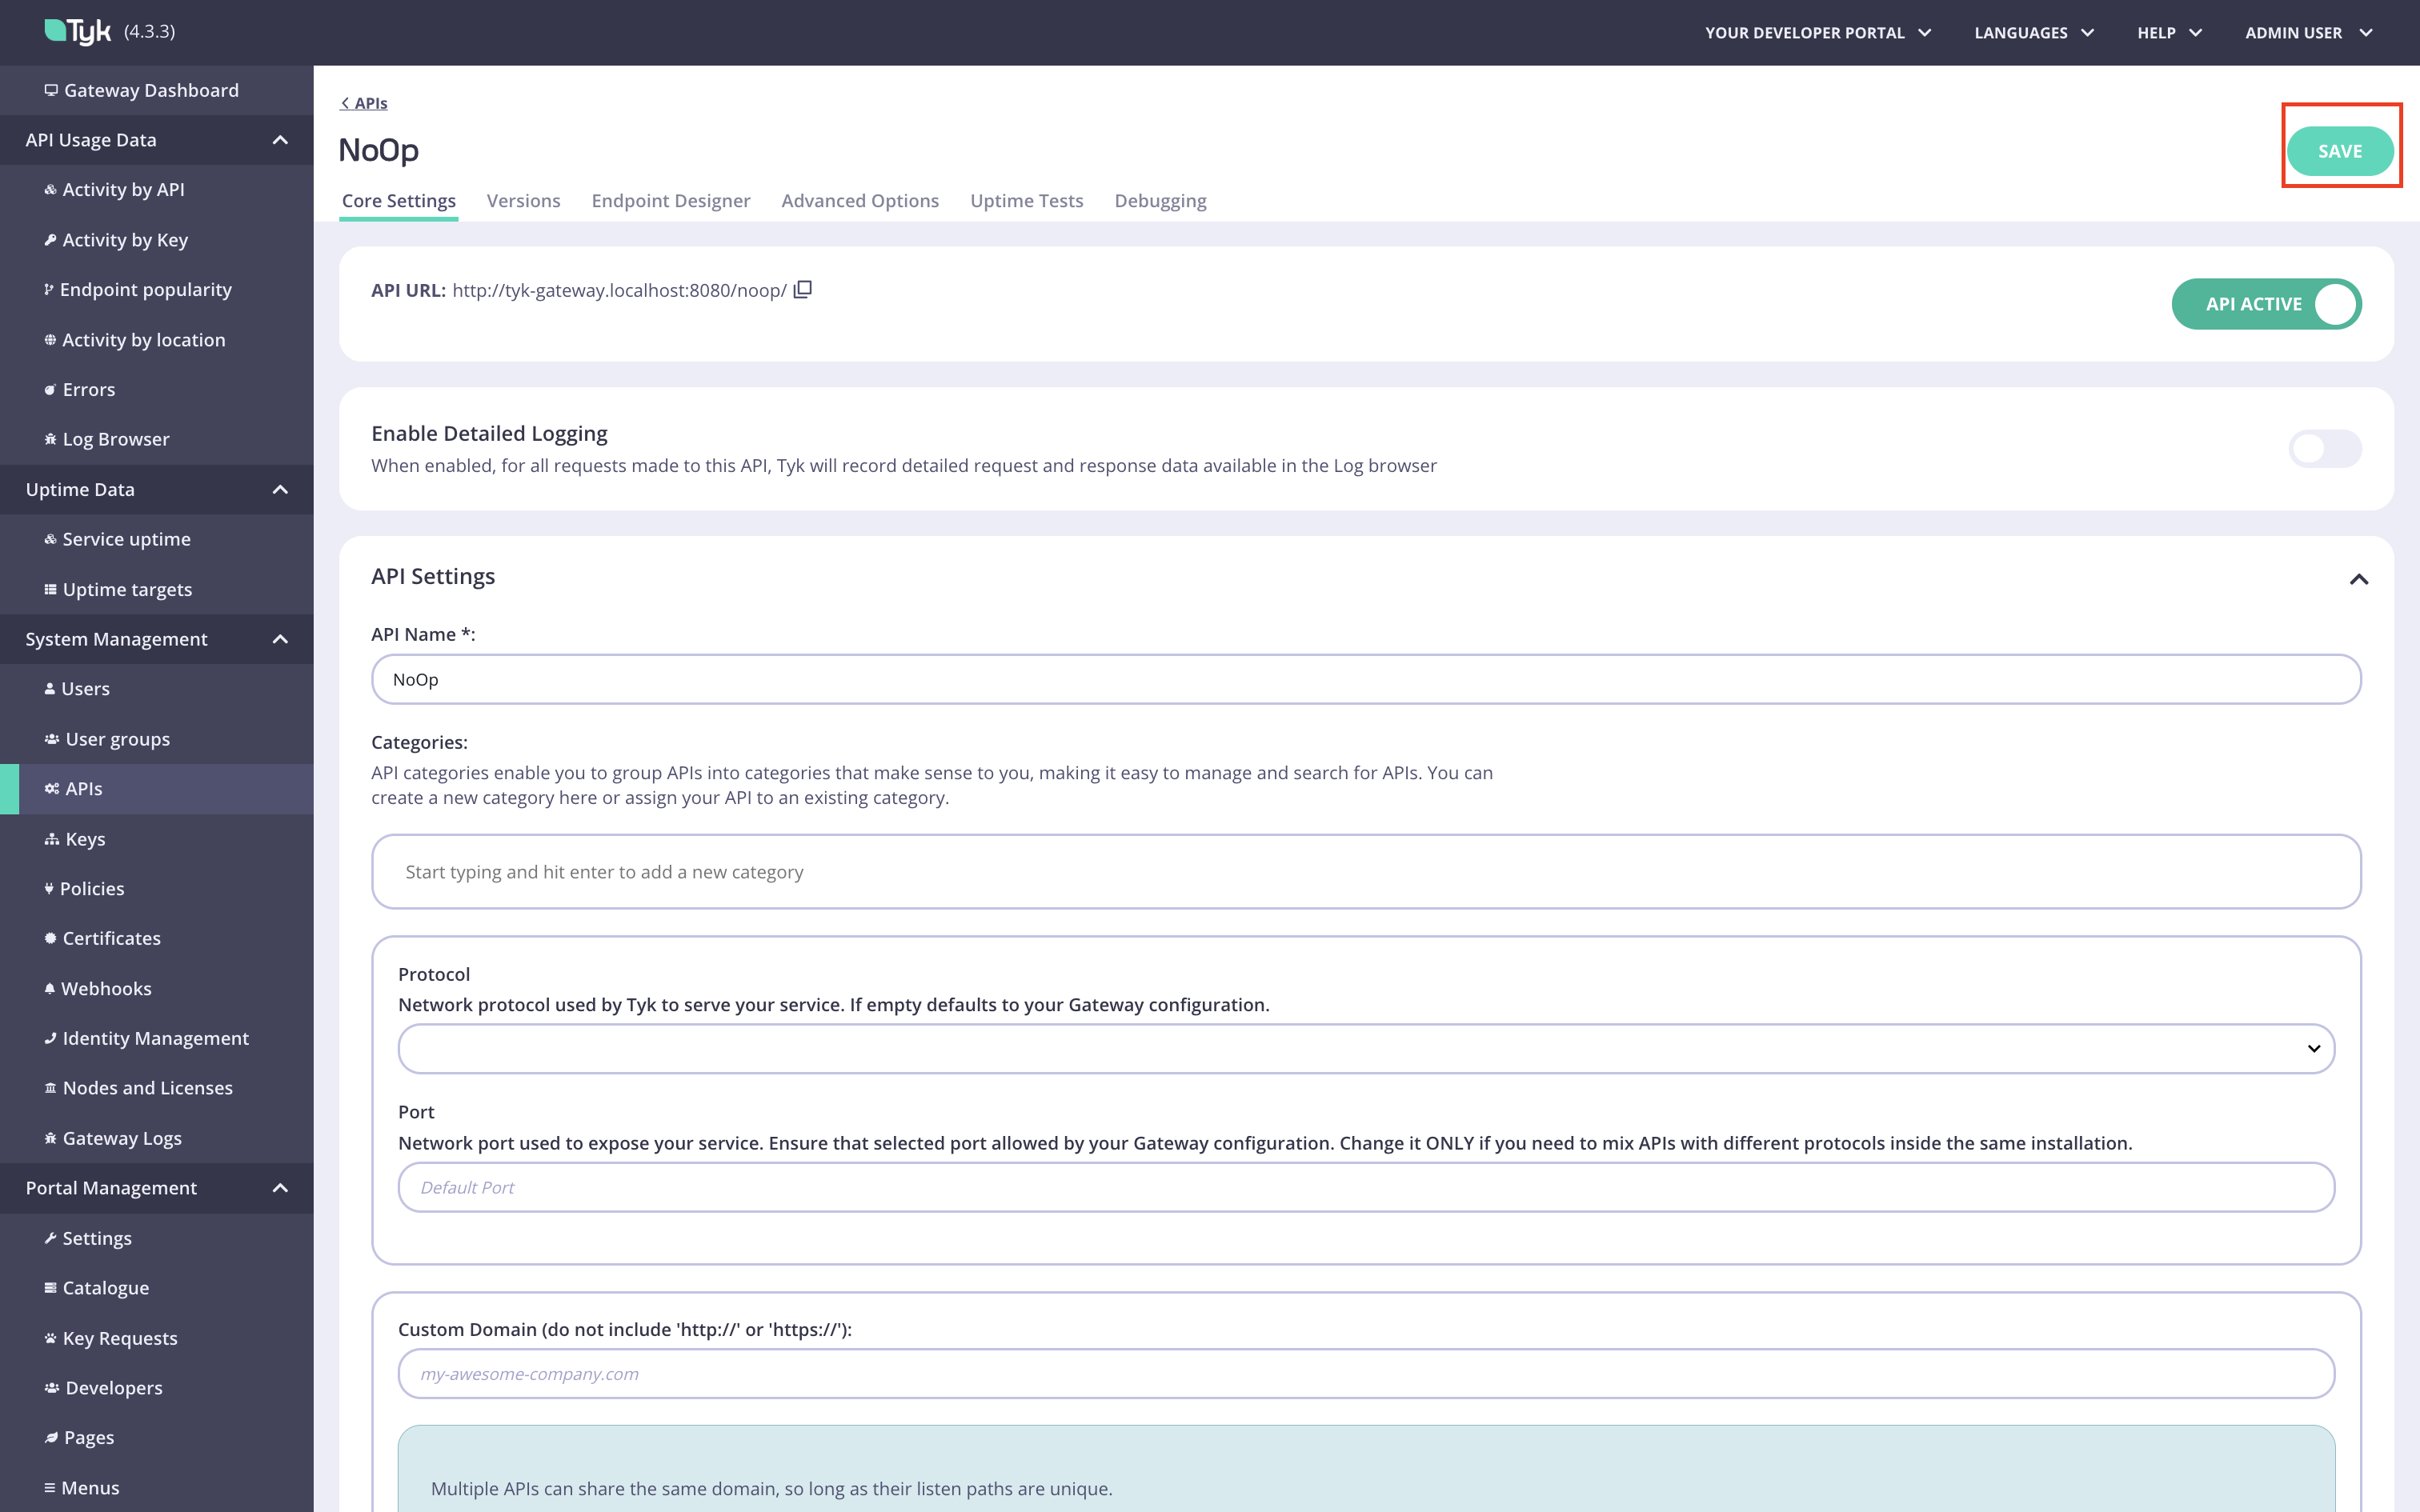
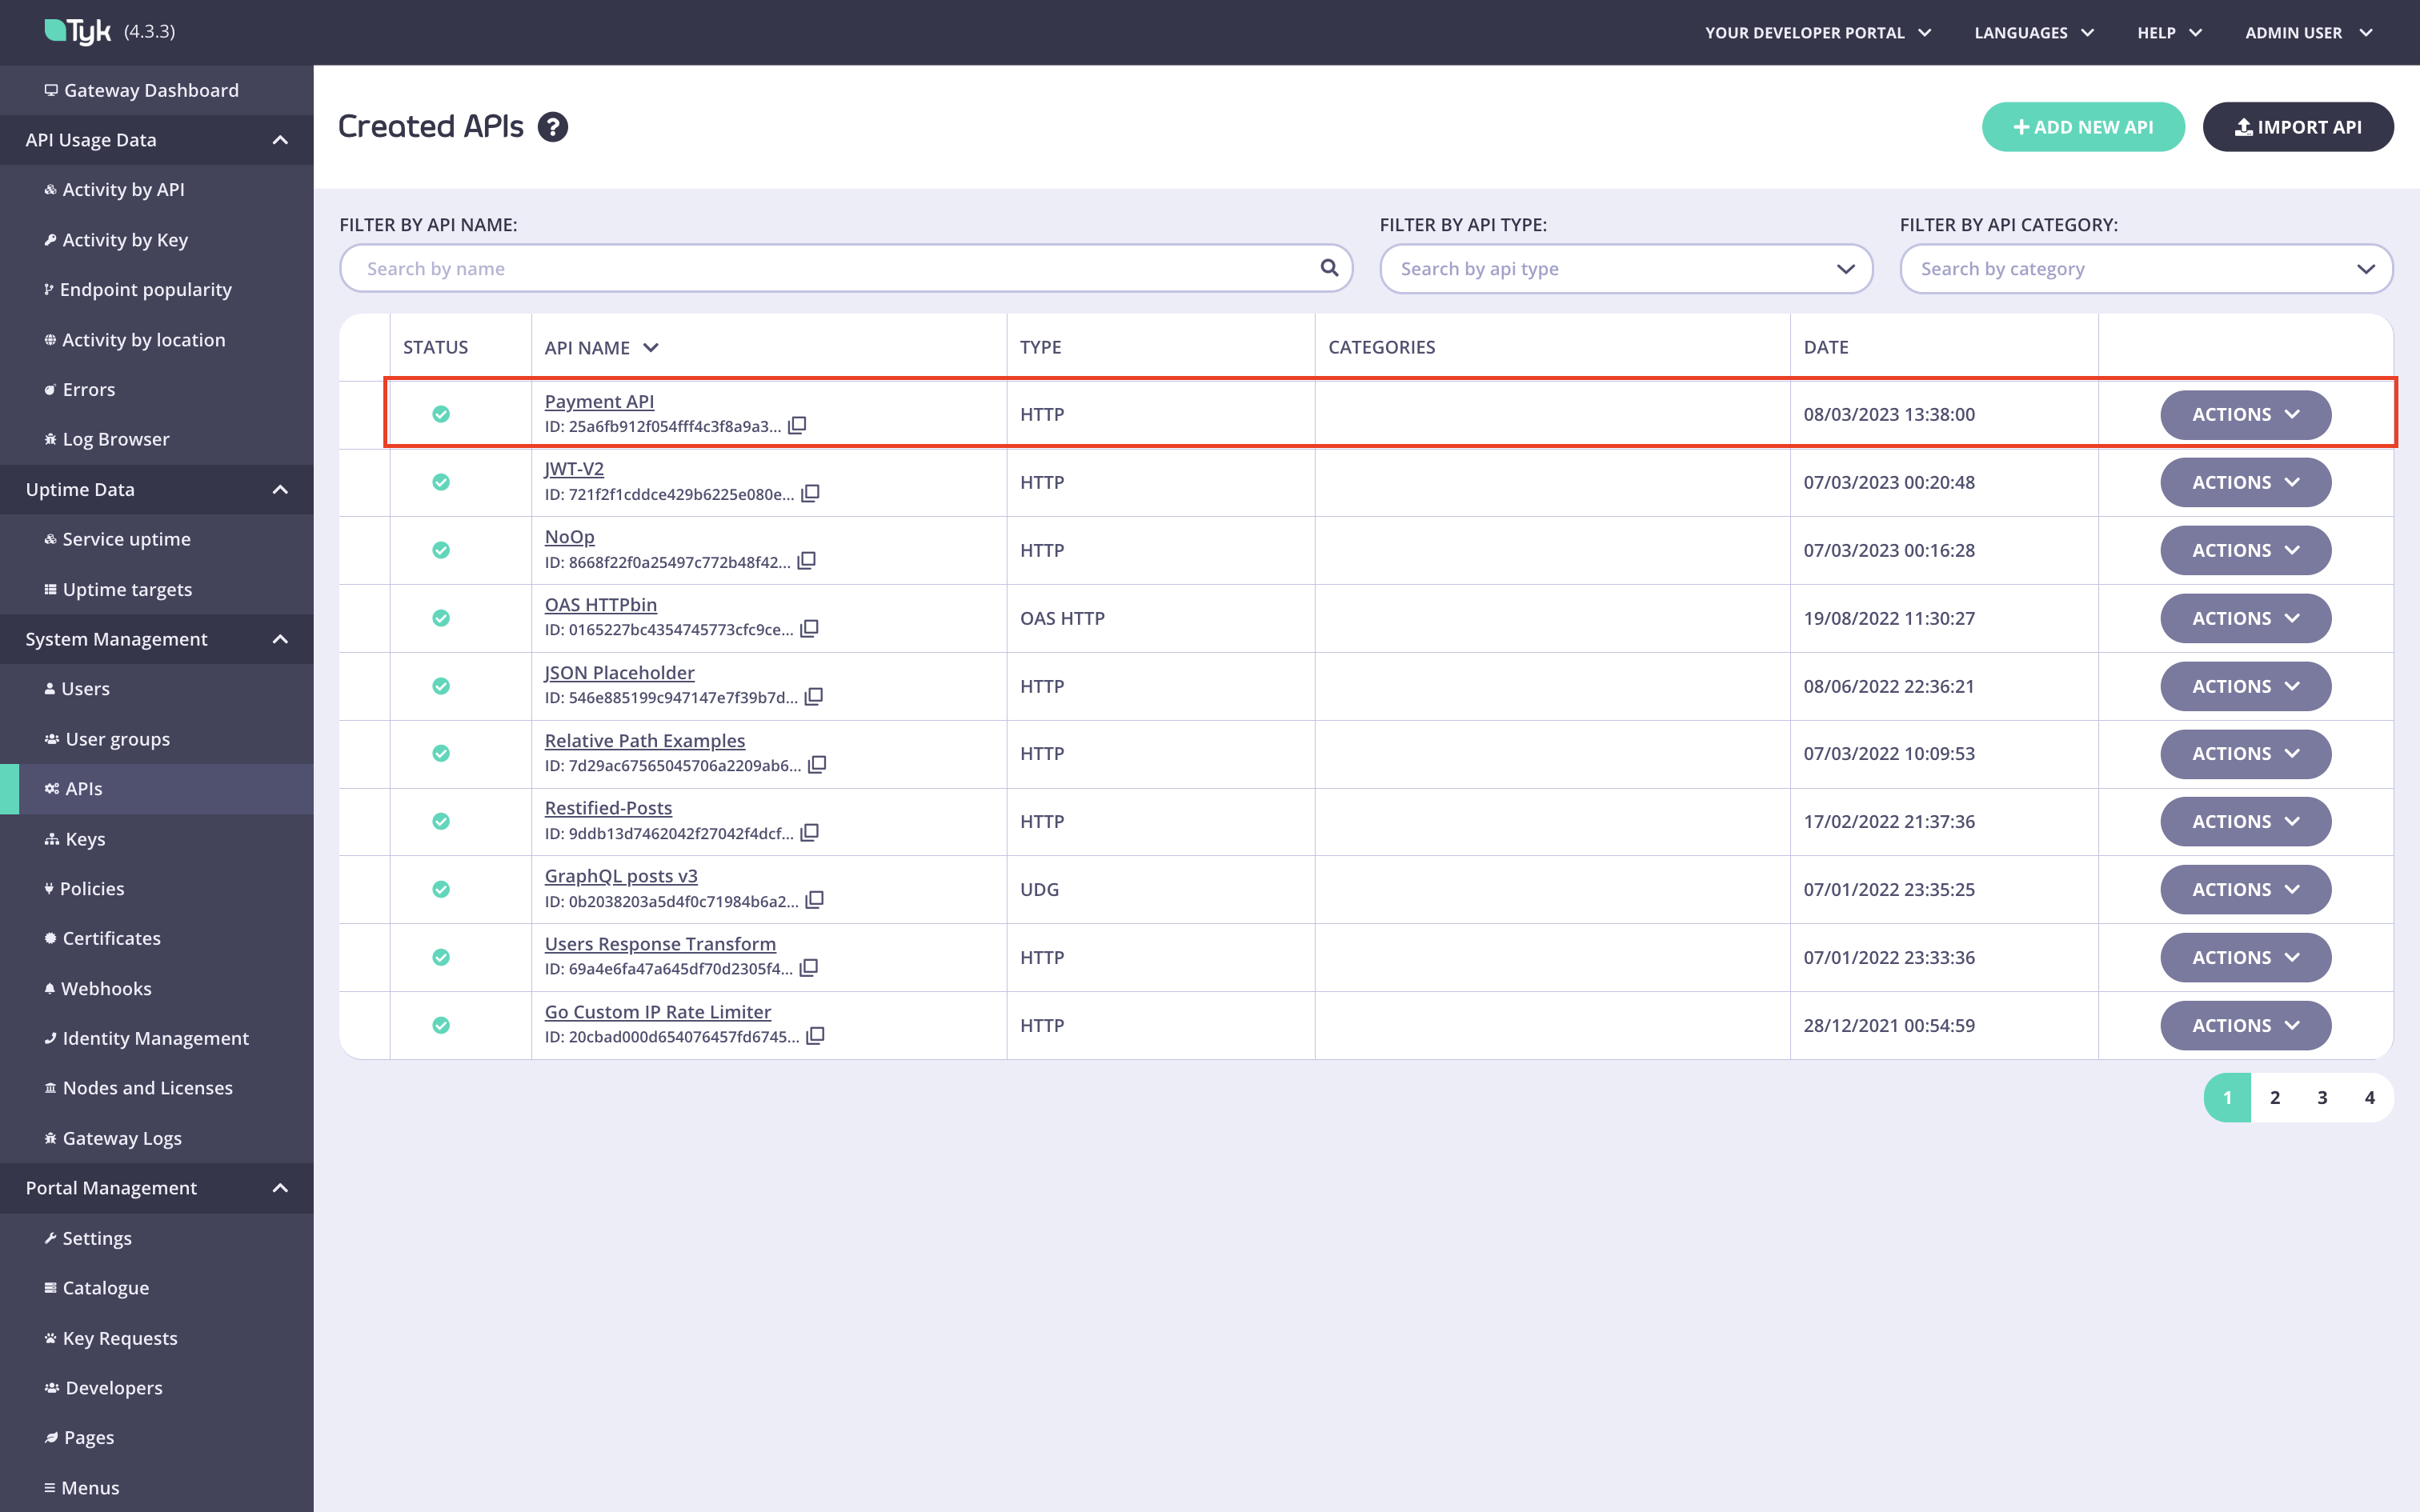
Create the No Operation API.
Navigate to the
APIsmenu in the Tyk Dashboard:
-
Create the No Operation policy.
Navigate to the
Policiesmenu in the Tyk Dashboard: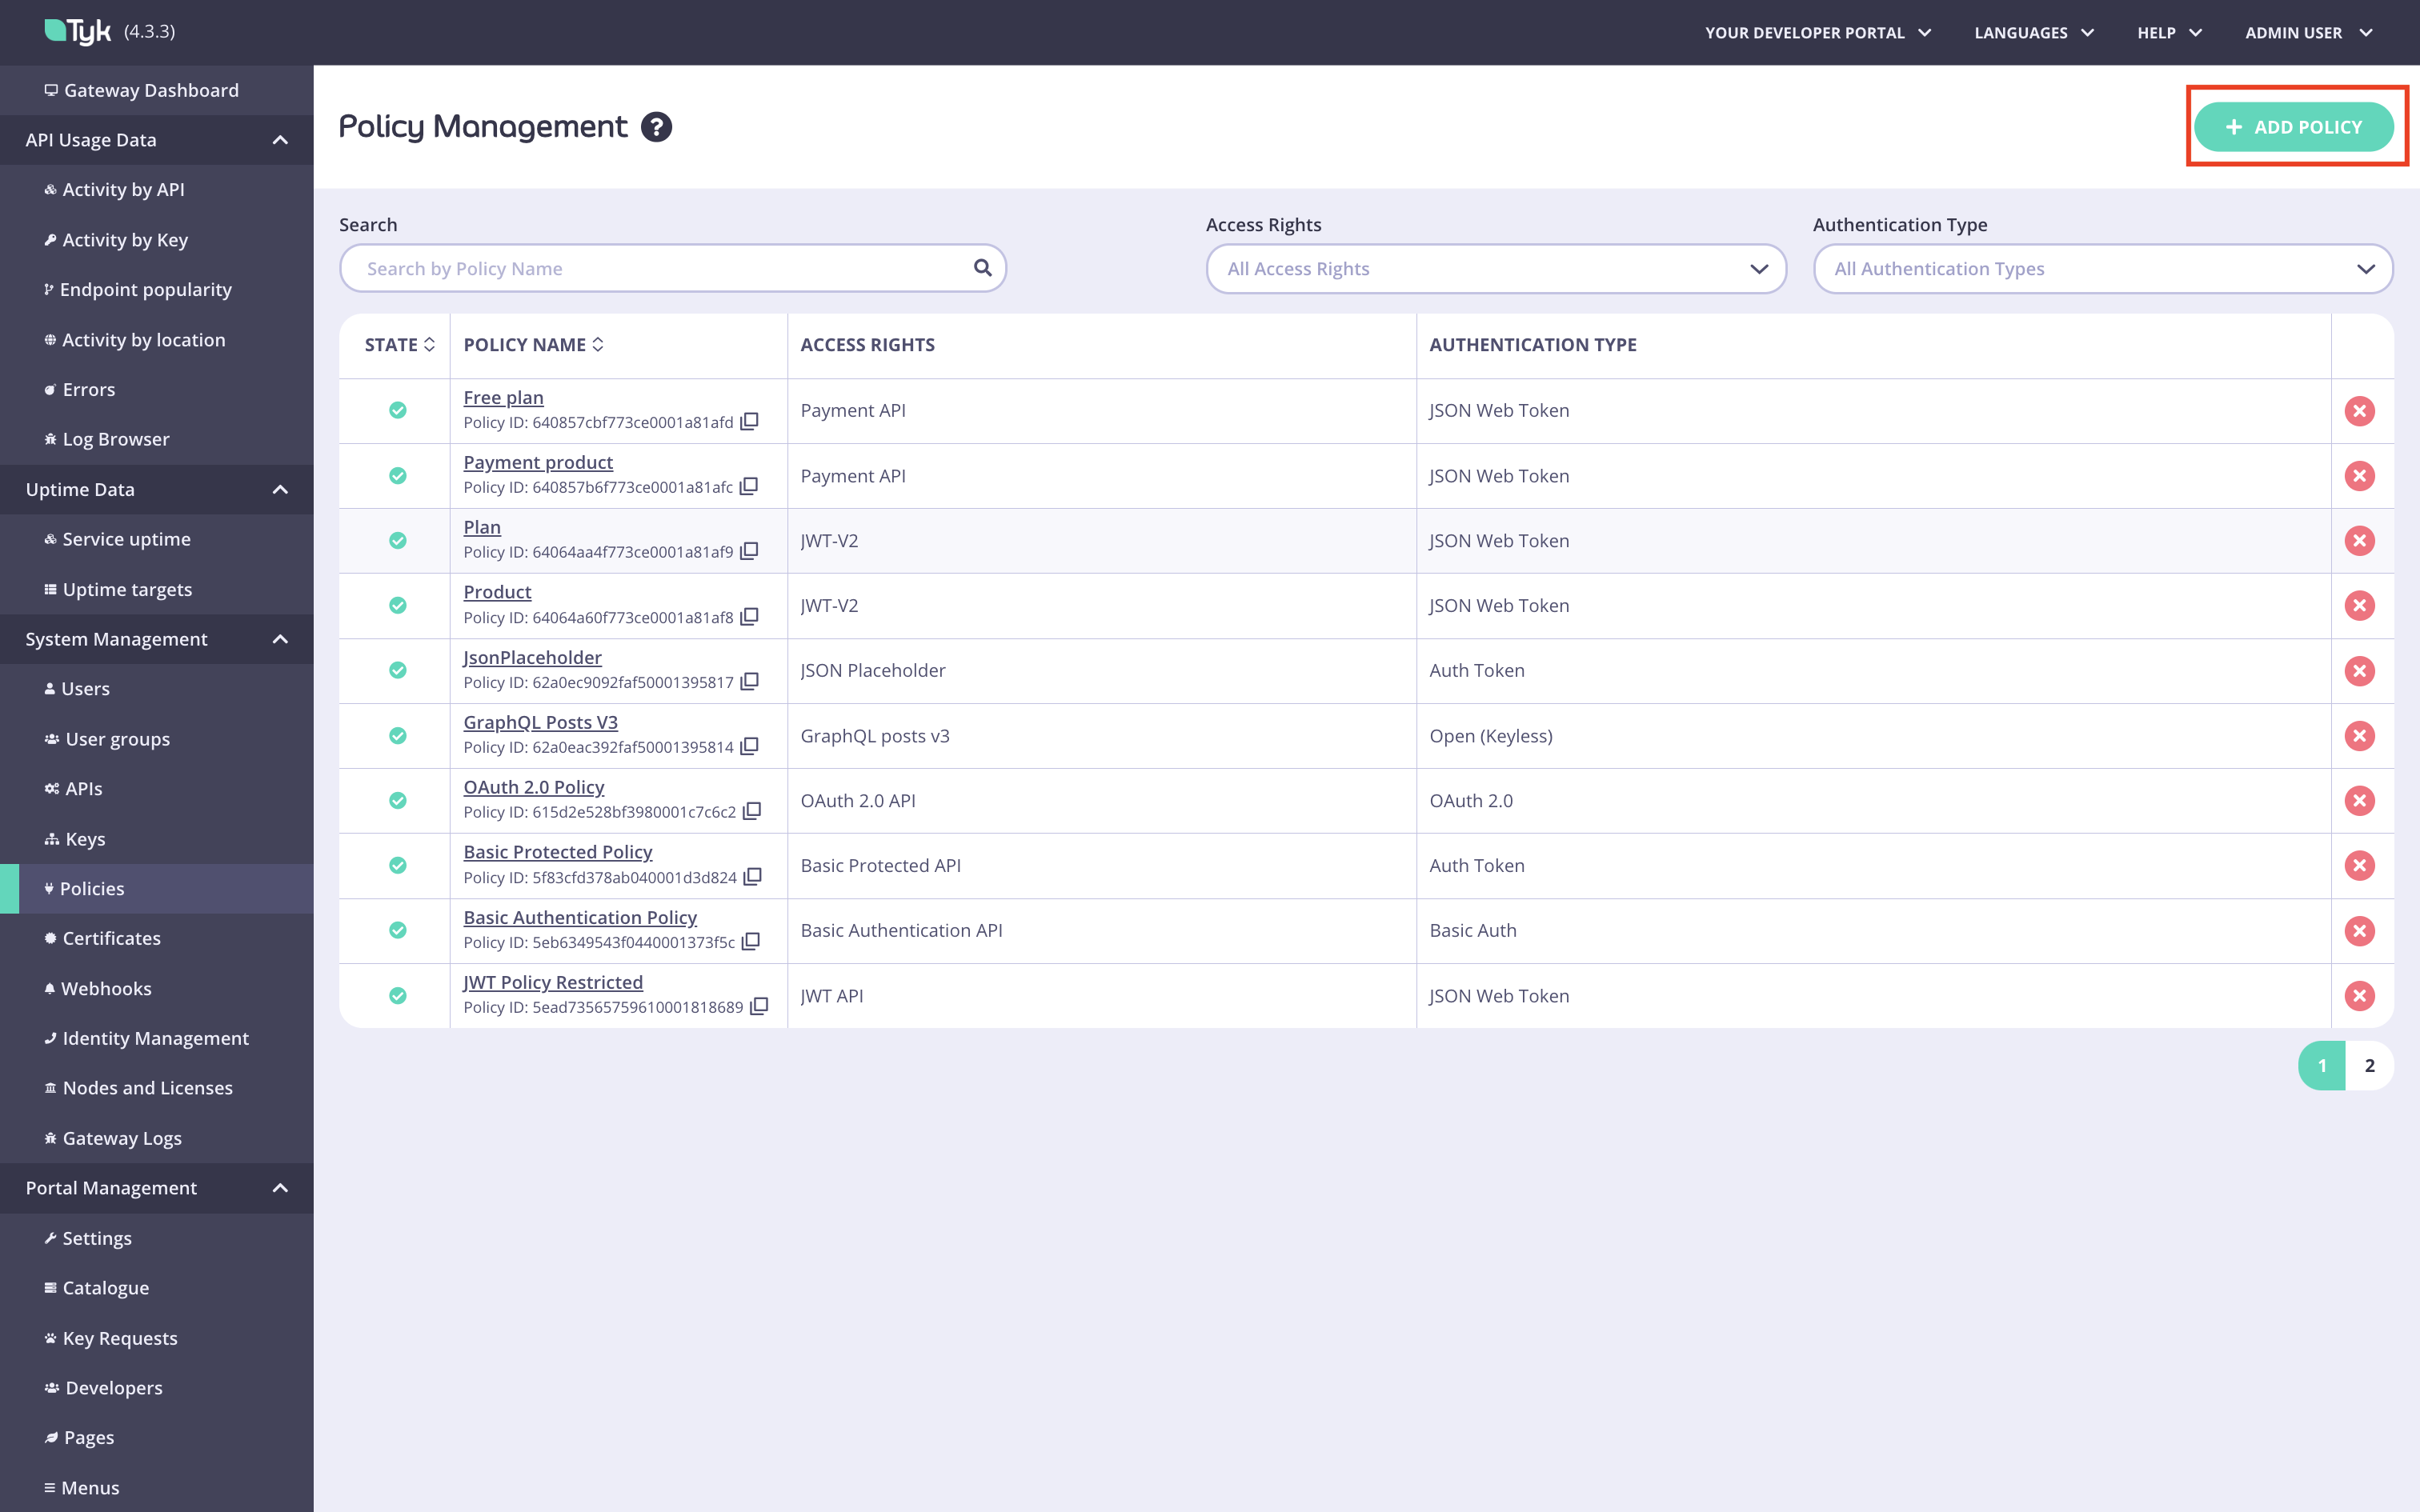
Add API Access Rightssection: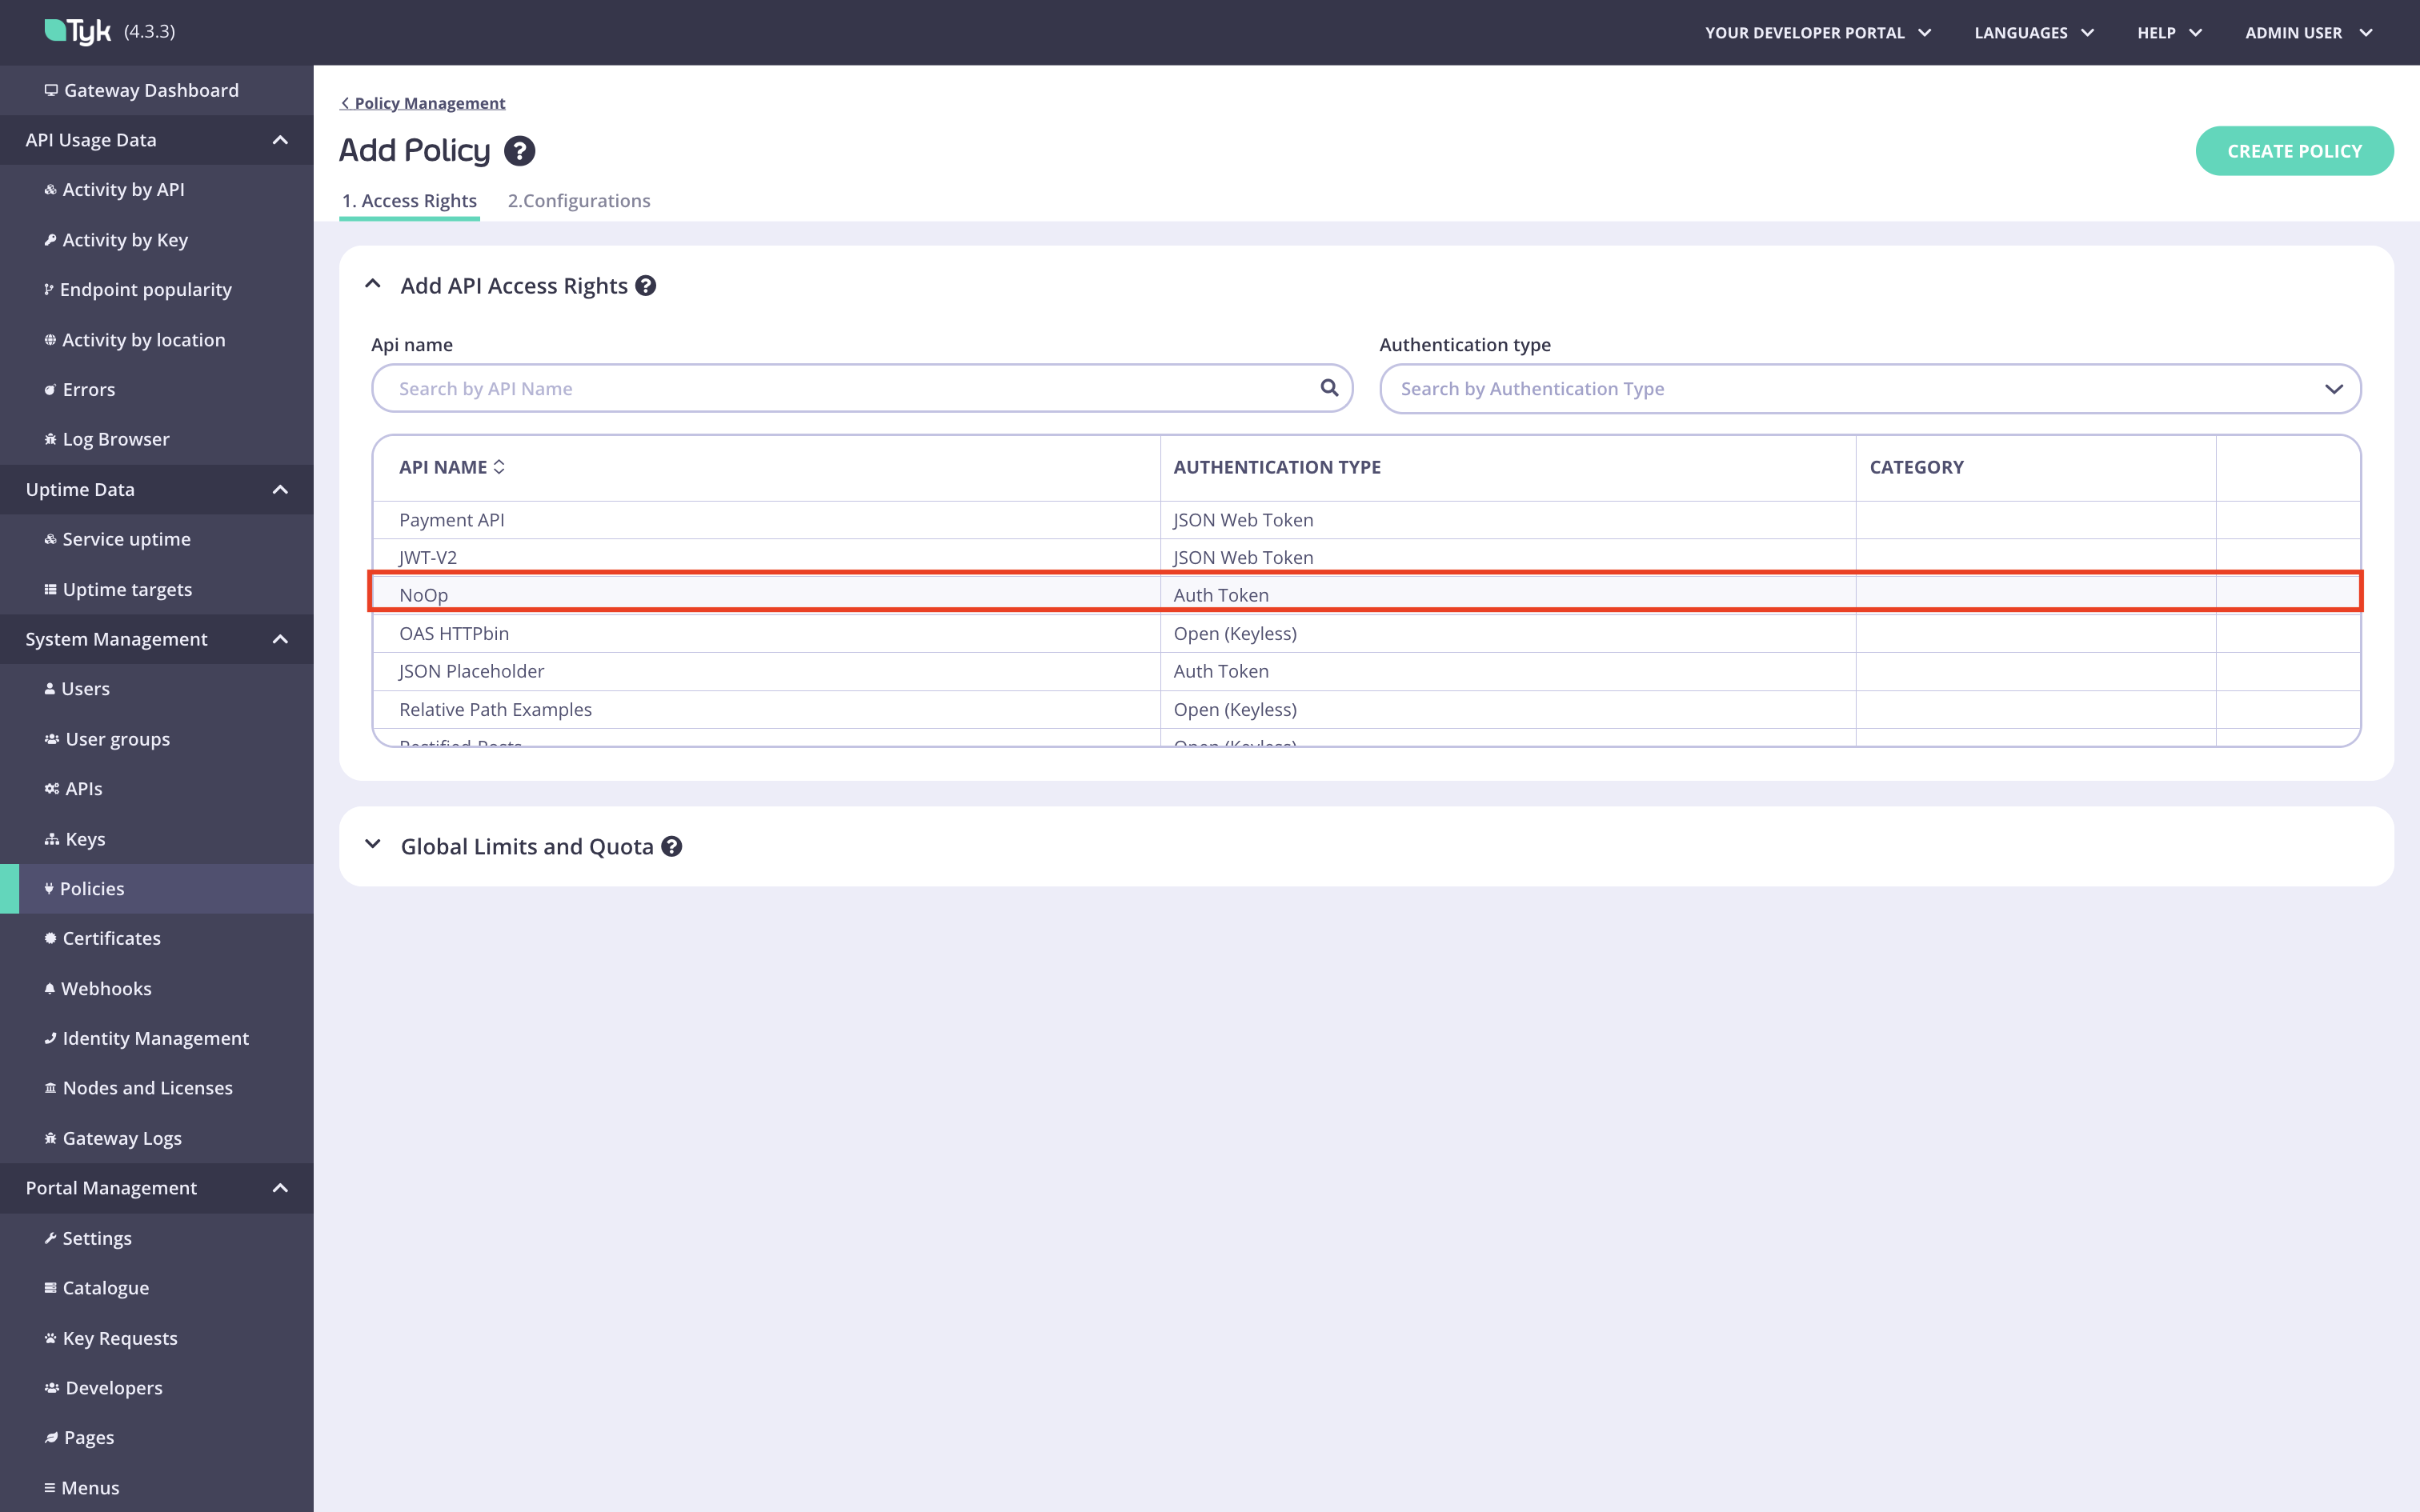
Configure scope to policy mapping
You can skip this step if you are using Tyk Developer Portal version 1.13.0 or later.
Go directly to Configure Tyk Enterprise Developer Portal to work with an identity provider.
-
Navigate to the API.
-
Select the required JWT signing method. In this example, we use RSA. Leave the
Public keyandpolfields blank, they will be filled automatically by the Enterprise portal.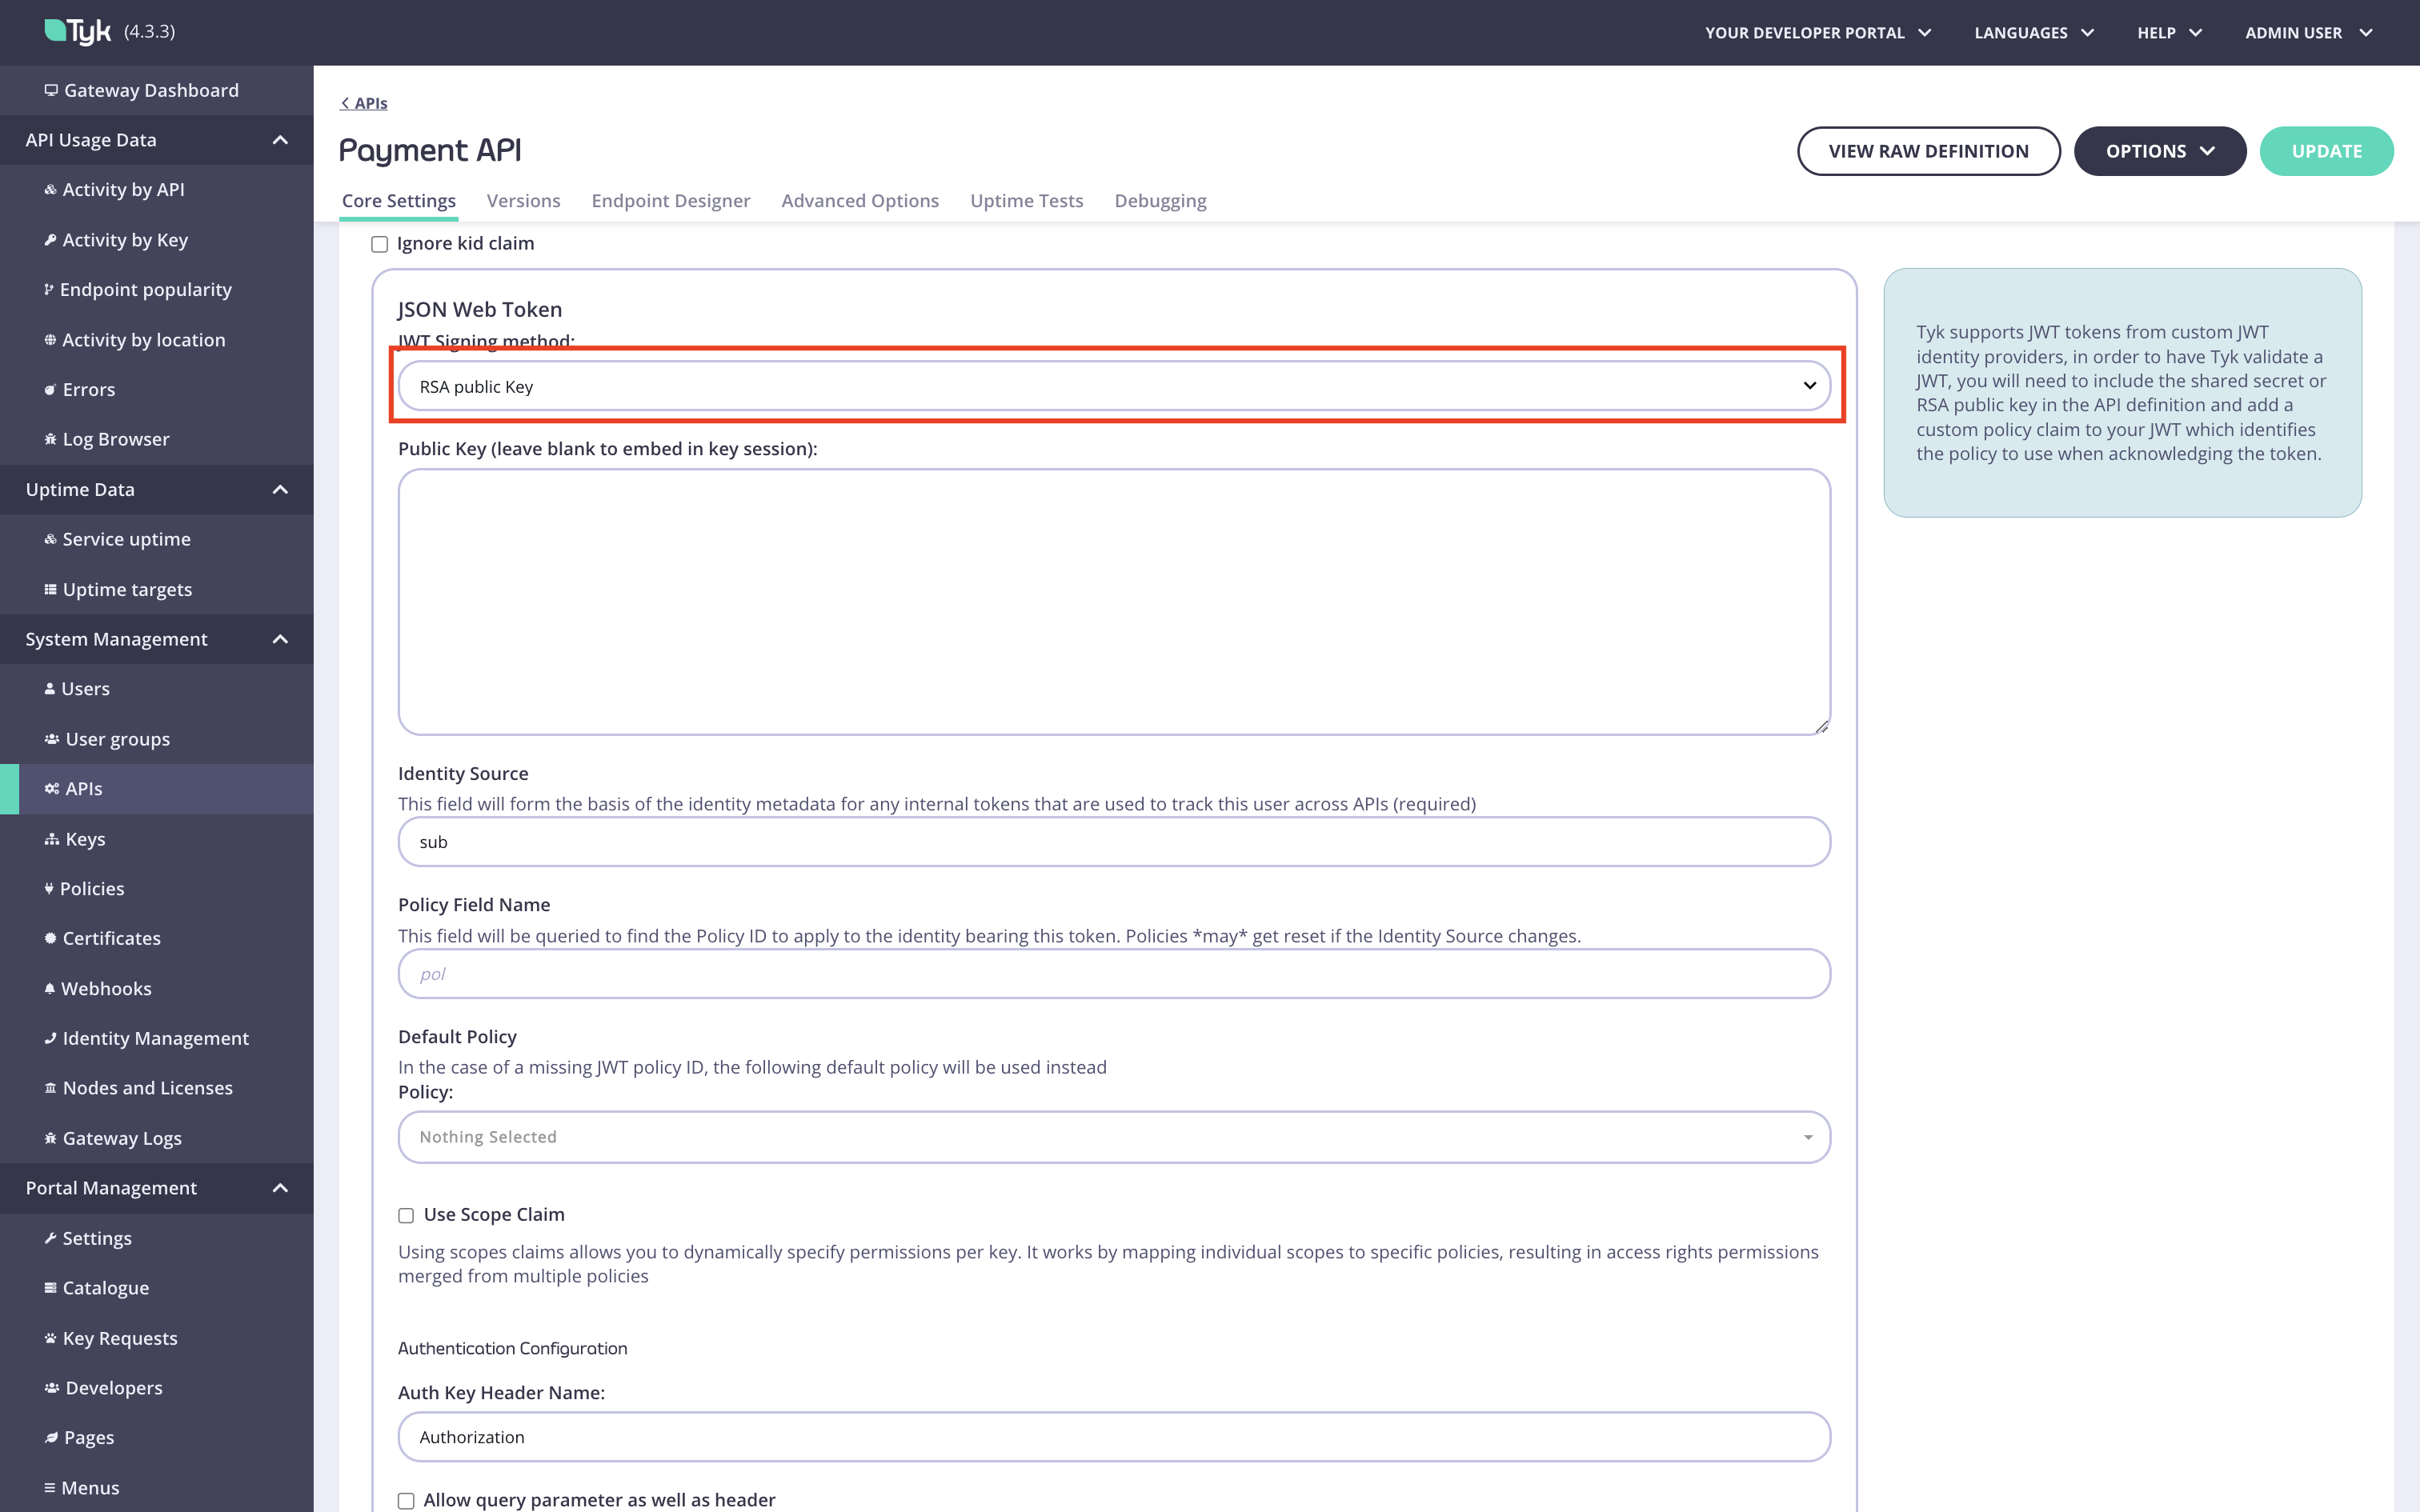
-
Select the No Operation policy as the default policy for this API.
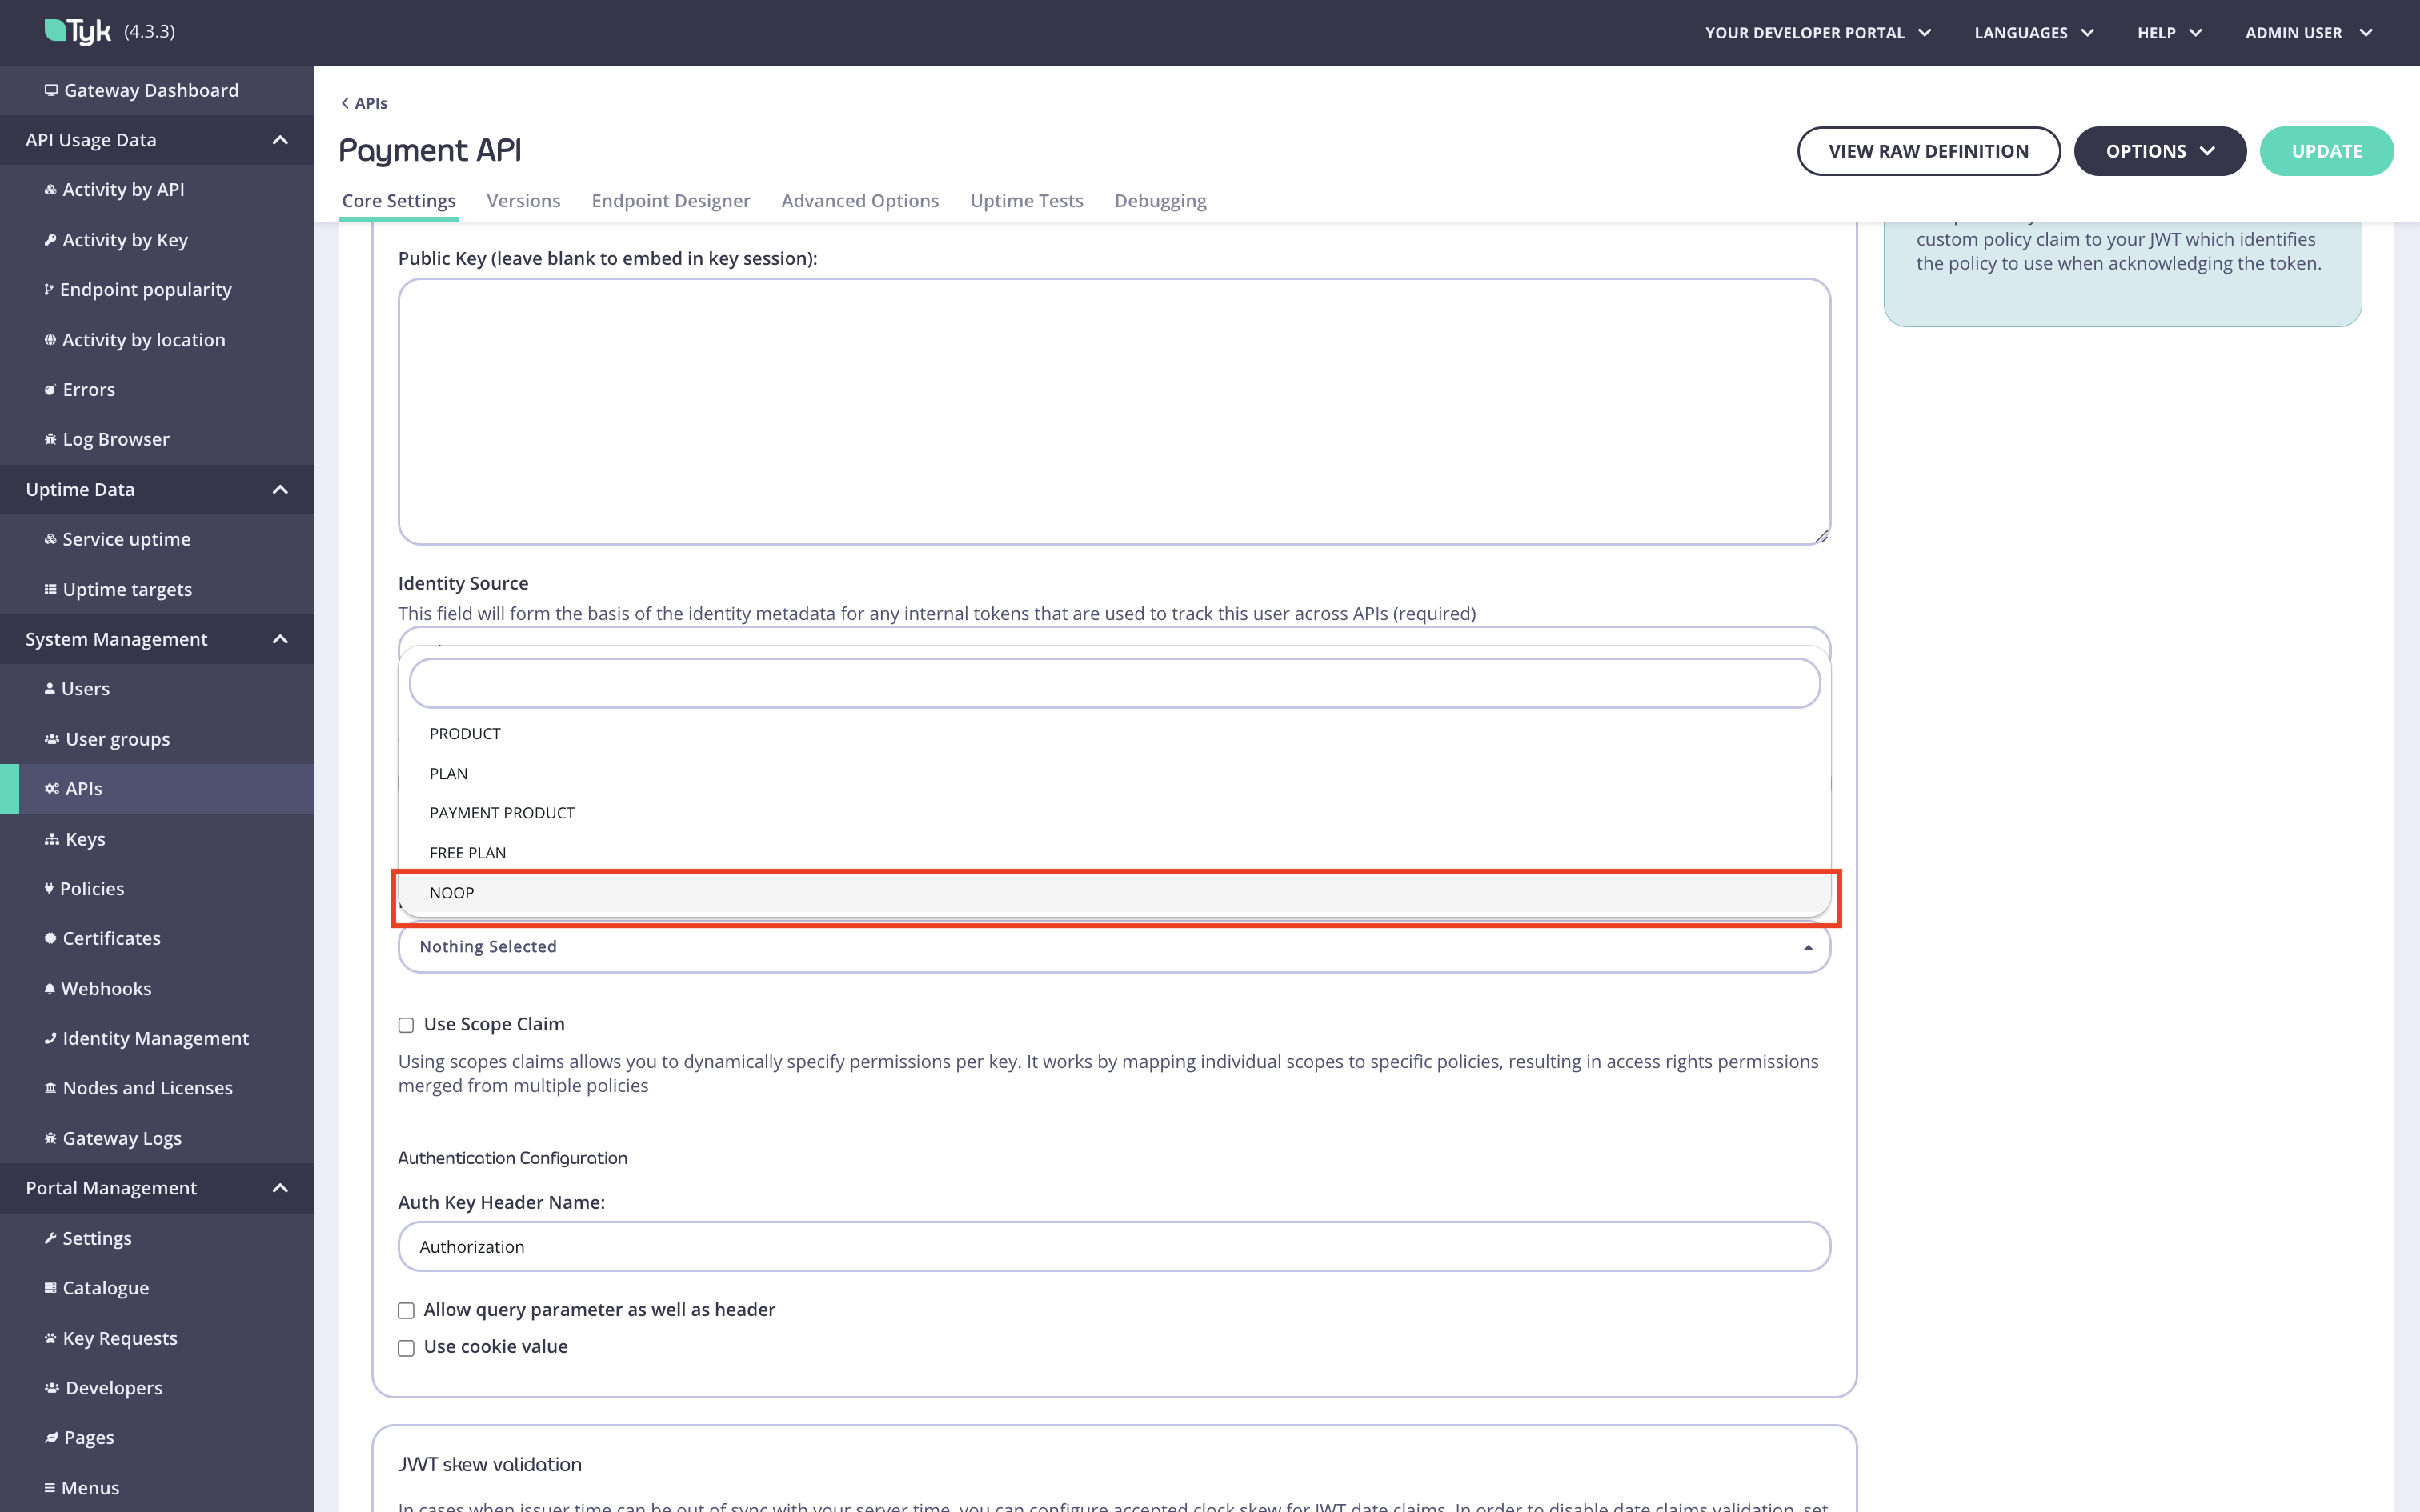
-
Enable scope to policy mapping and specify the value of the JWT claim used to extract scopes in the
Scope namefield (the default value is “scope”).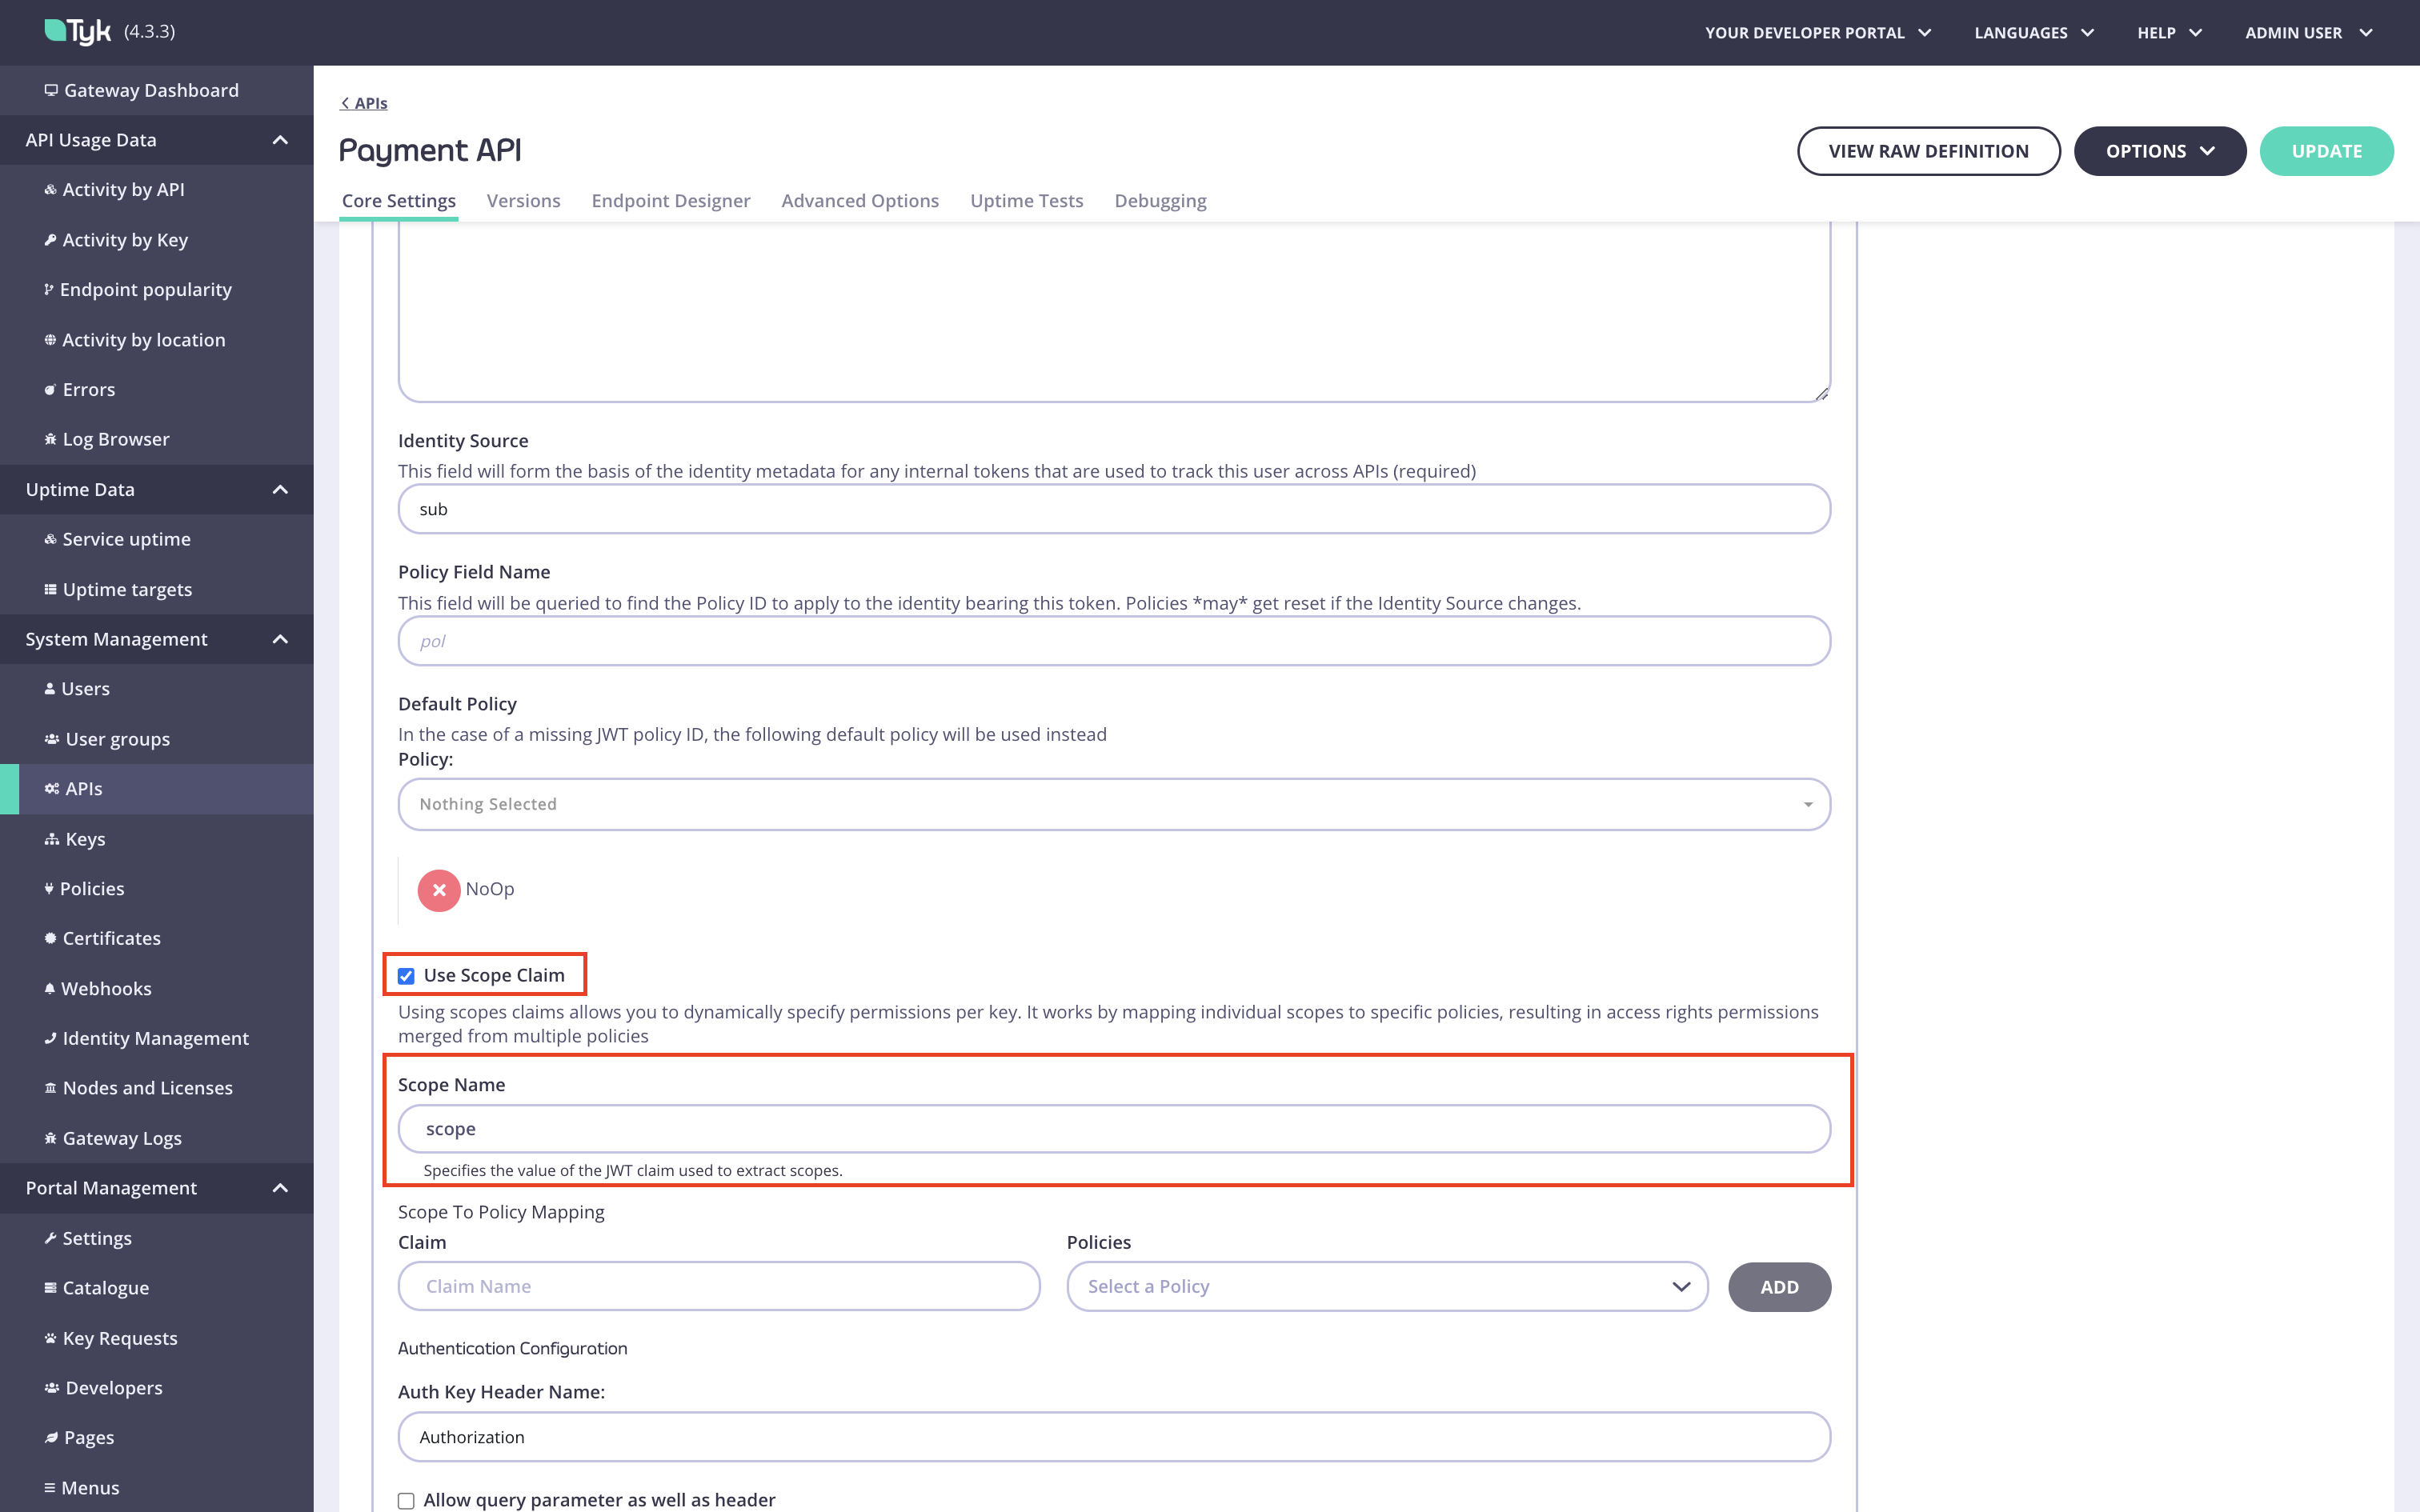
-
Add a scope to policy mapping for the product scope. Type the product scope in the
Claim fieldand select the product policy.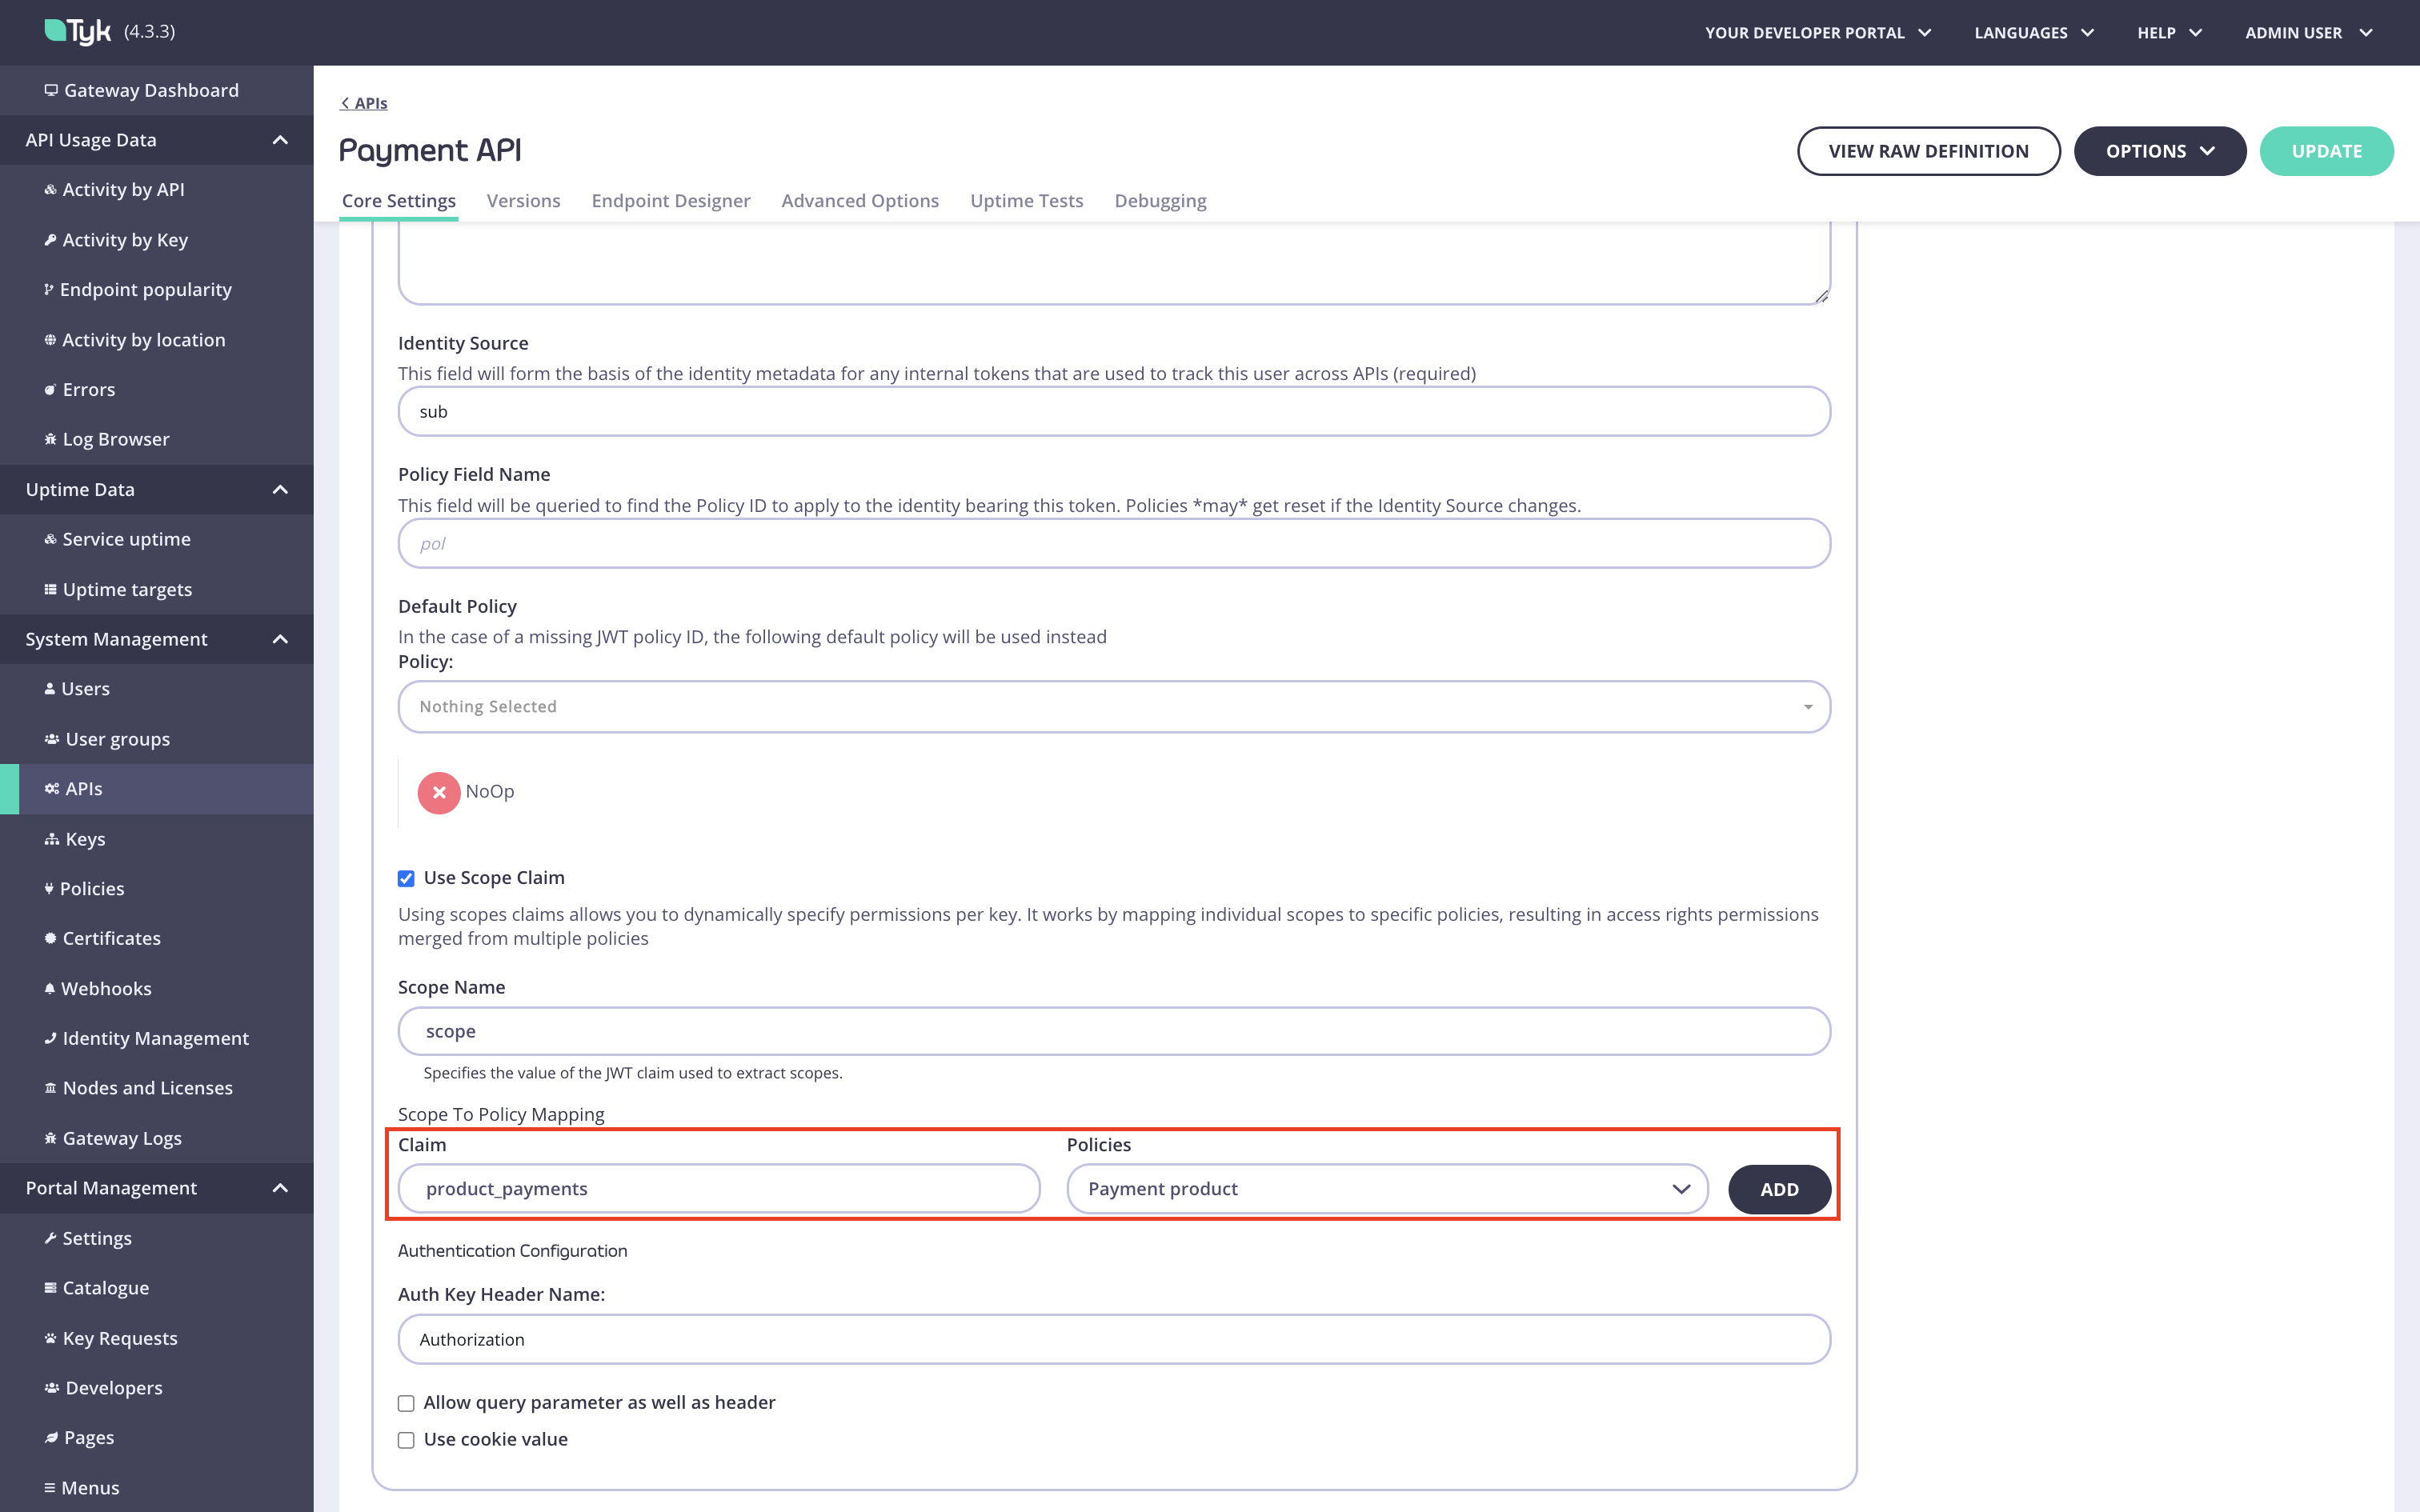
-
Add a scope to policy mapping for the plan scope. Type the plan scope in the
Claim fieldand select the plan policy, then save the API.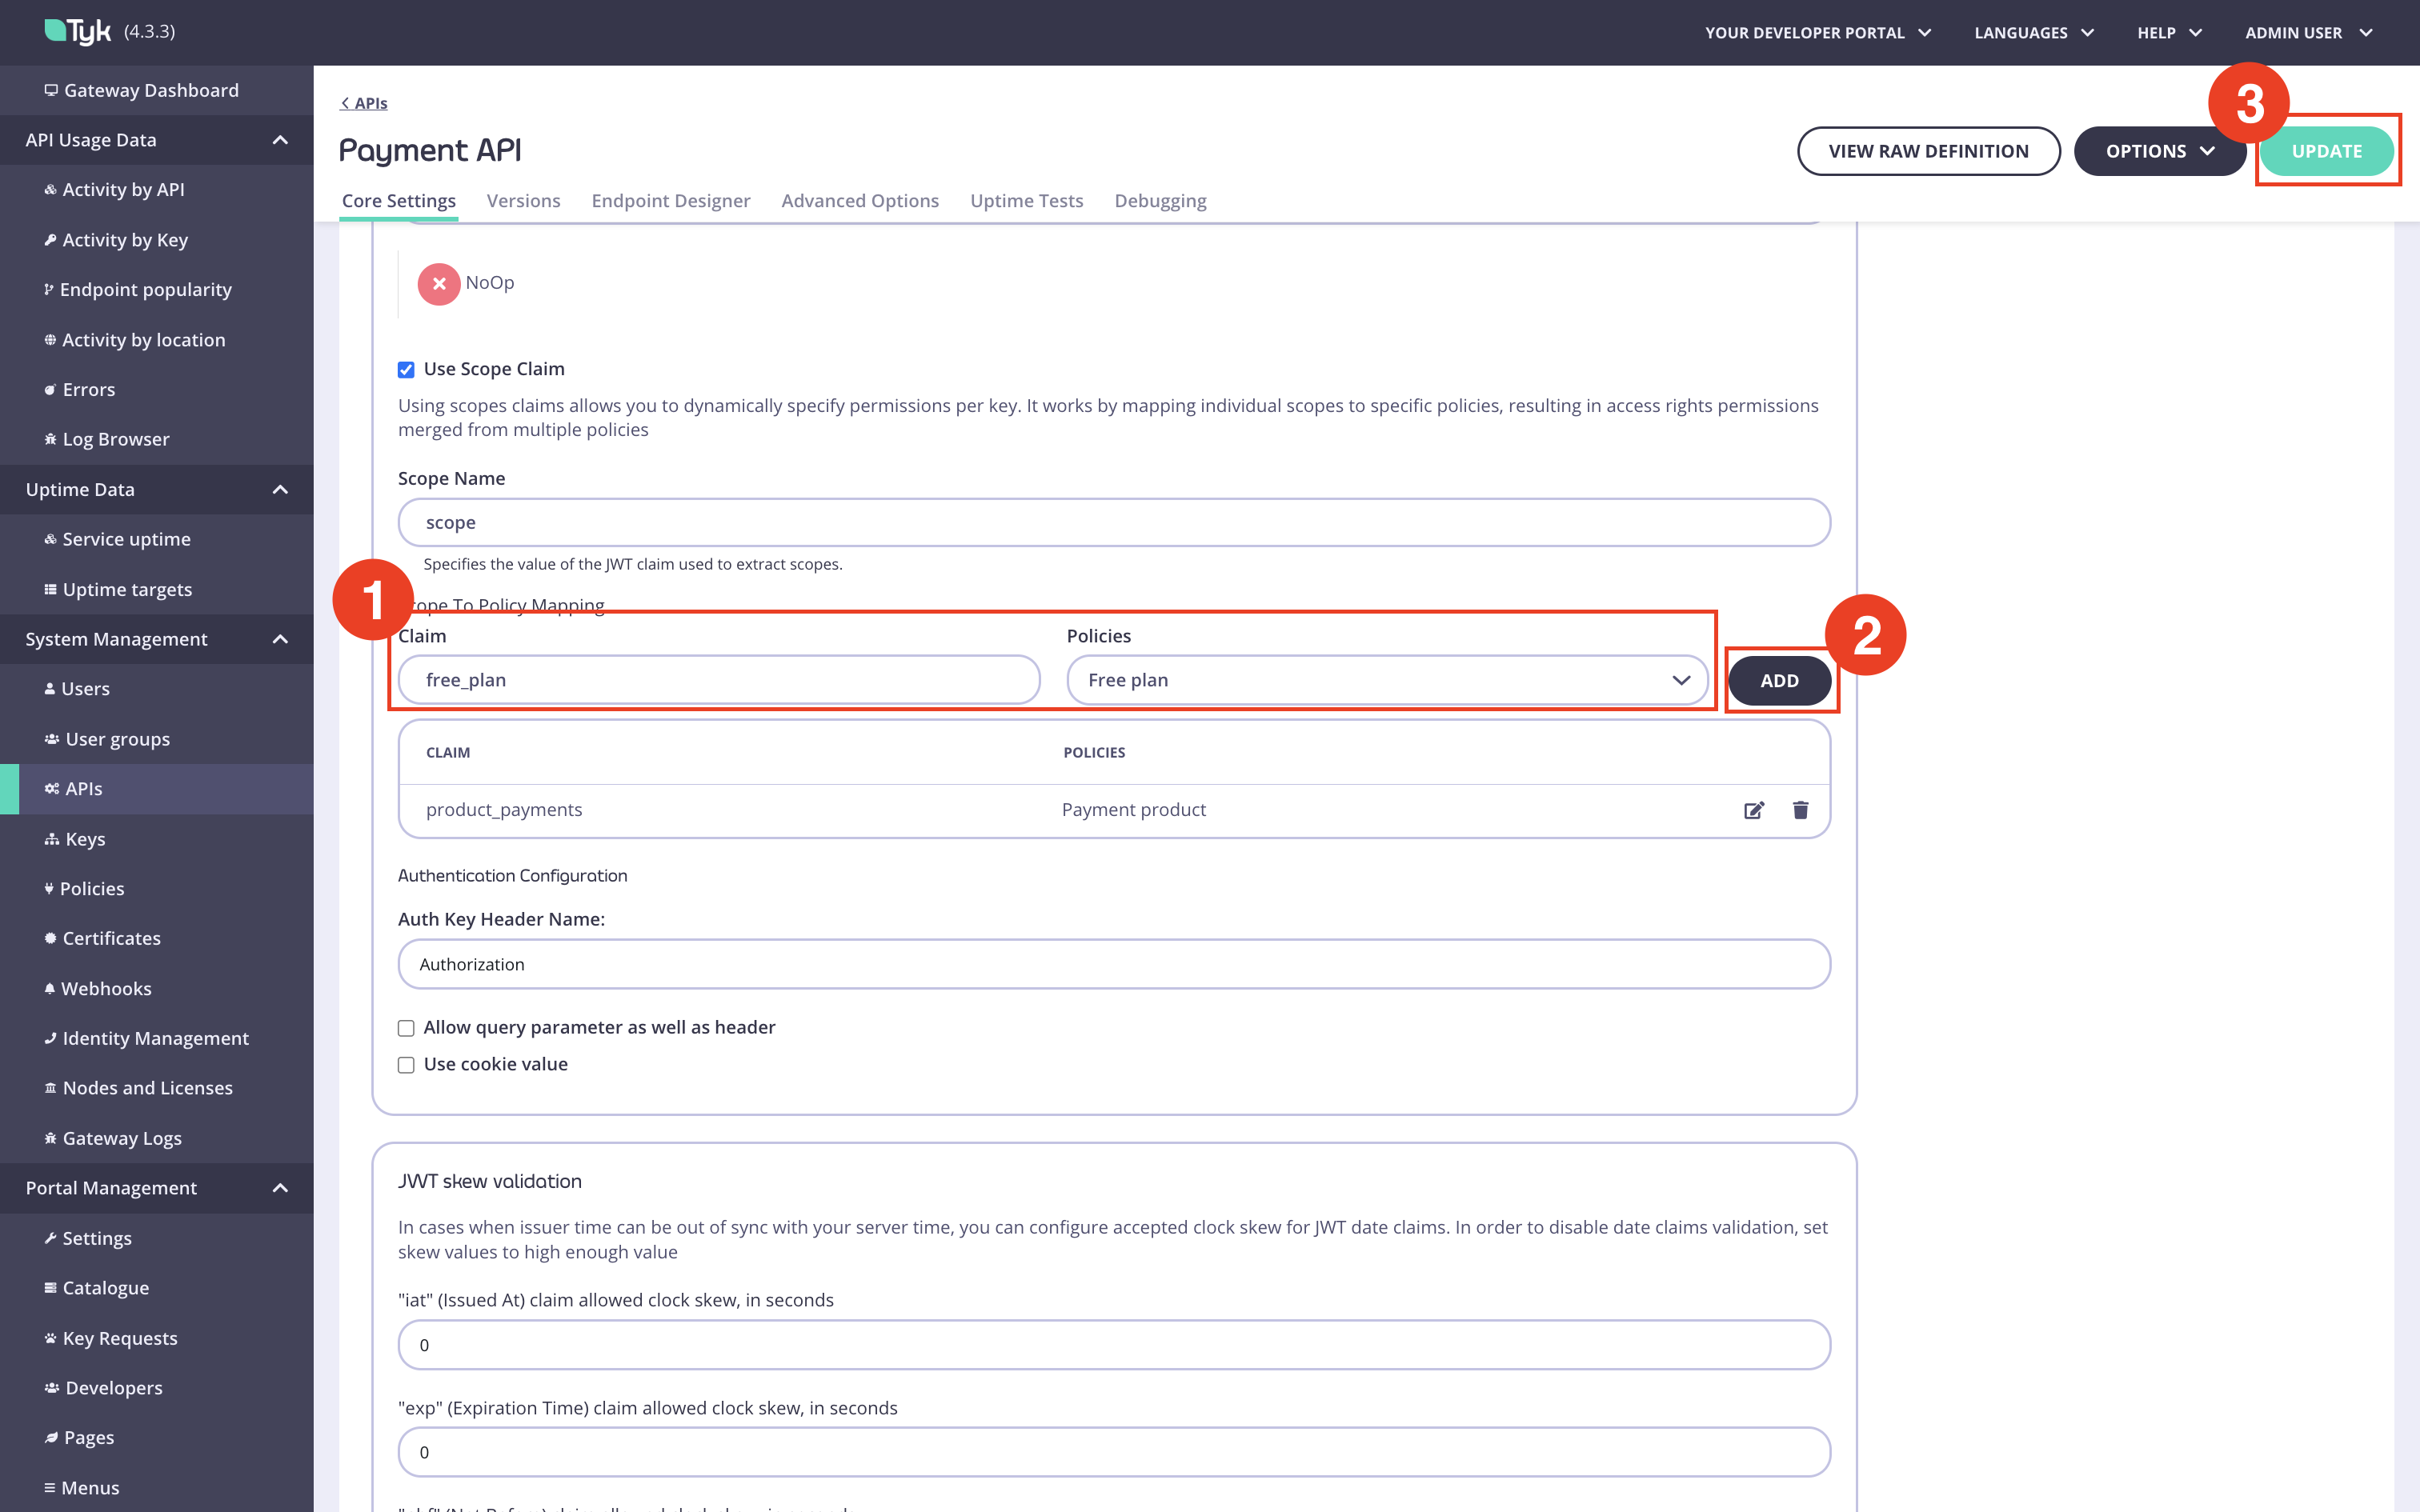
Configure Tyk Enterprise Developer Portal to work with an identity provider
Set up the portal to work with your IdP.Configure the App registration settings
In the portal, navigate to theOAuth2.0 Providers menu section. In that section, you need to configure the connection settings to the IdP and define one or more types (configurations) of OAuth 2.0 clients. For instance, you can define two types of OAuth 2.0 clients:
- A confidential client that supports the Client credential grant type for backend integrations;
- A web client that supports the Authorization code grant type for integration with web applications that can’t keep the client secret confidential.
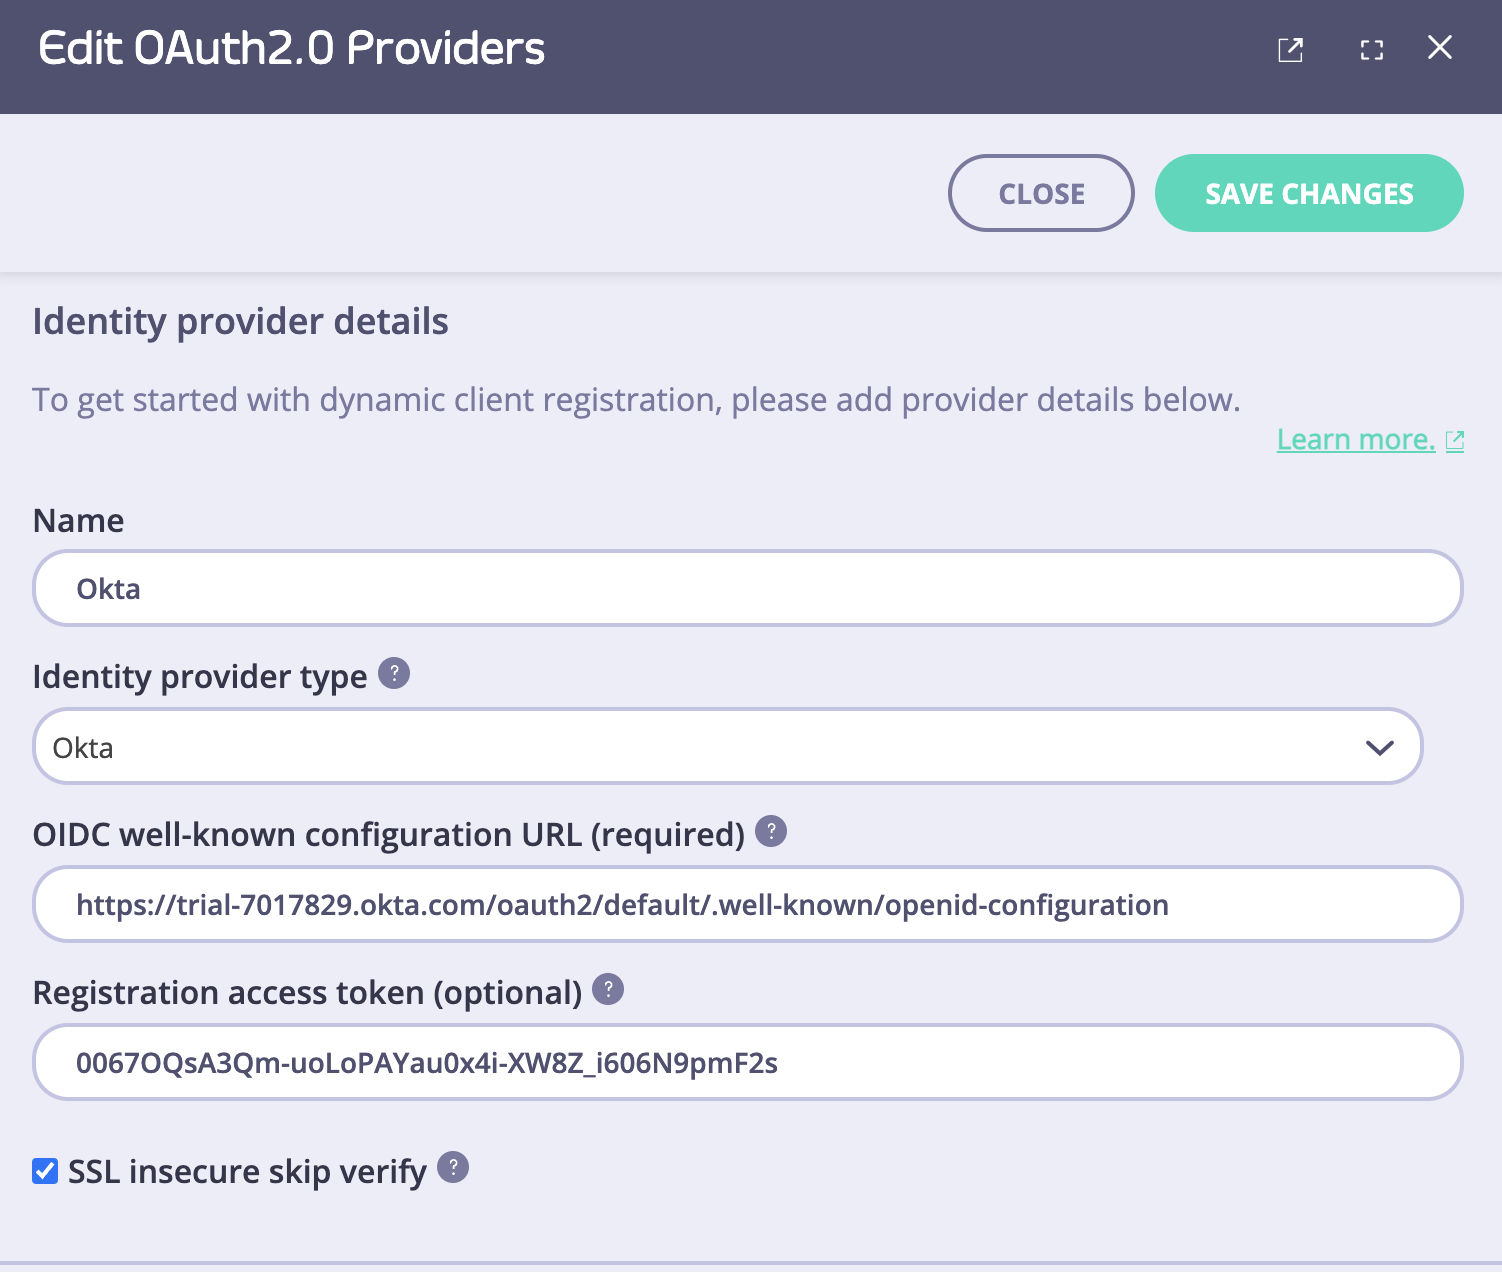
Specify connection setting to your IdP
To connect the portal to the IdP, you need to specify the following settings:- OIDC well-known configuration URL.
- Initial access token.
Identity provider dropdown list. Different IdPs have slightly different approaches to DCR implementation, so the portal will use a driver that is specific to your IdP. If your IdP is not present in the dropdown list, select the Other option. In that case, the portal will use the most standard implementation of the DCR driver, which implements the DCR flow as defined in the RFC.
Then you need to specify the connection settings: the initial access token and the well-known endpoint. If your Identity Provider uses certificates that are not trusted, the portal will not work with it by default. To bypass certificate verification, you can select the SSL secure skip verify checkbox.
The below example demonstrates how to achieve that with Curity, Keycloak and Okta in the tabs below.
- Curity
- Keycloak
- Okta
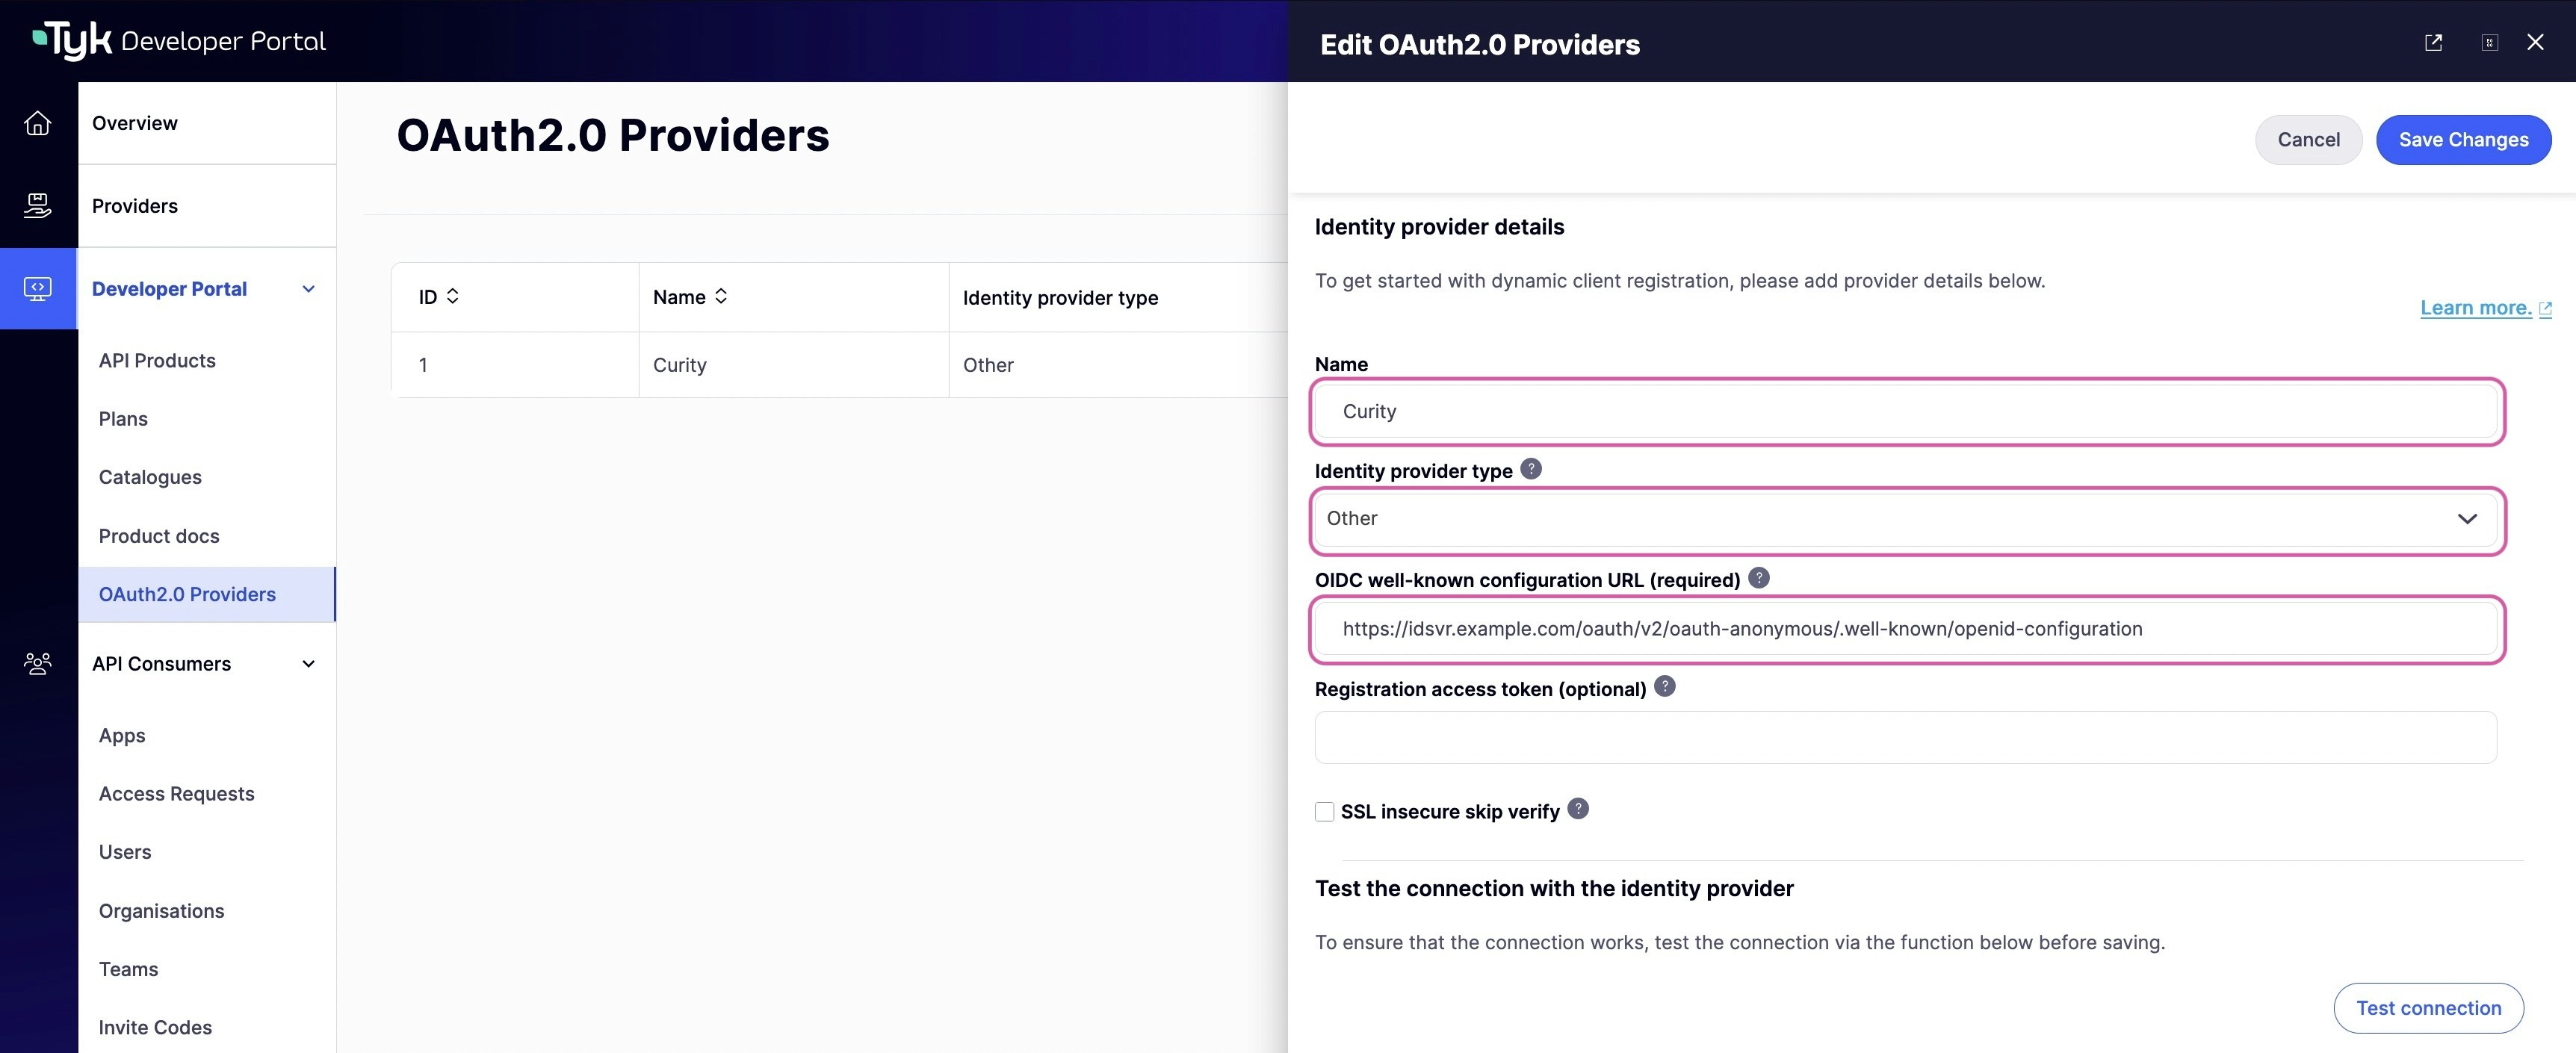
Other, and the OIDC well-known configuration URL aproppriately.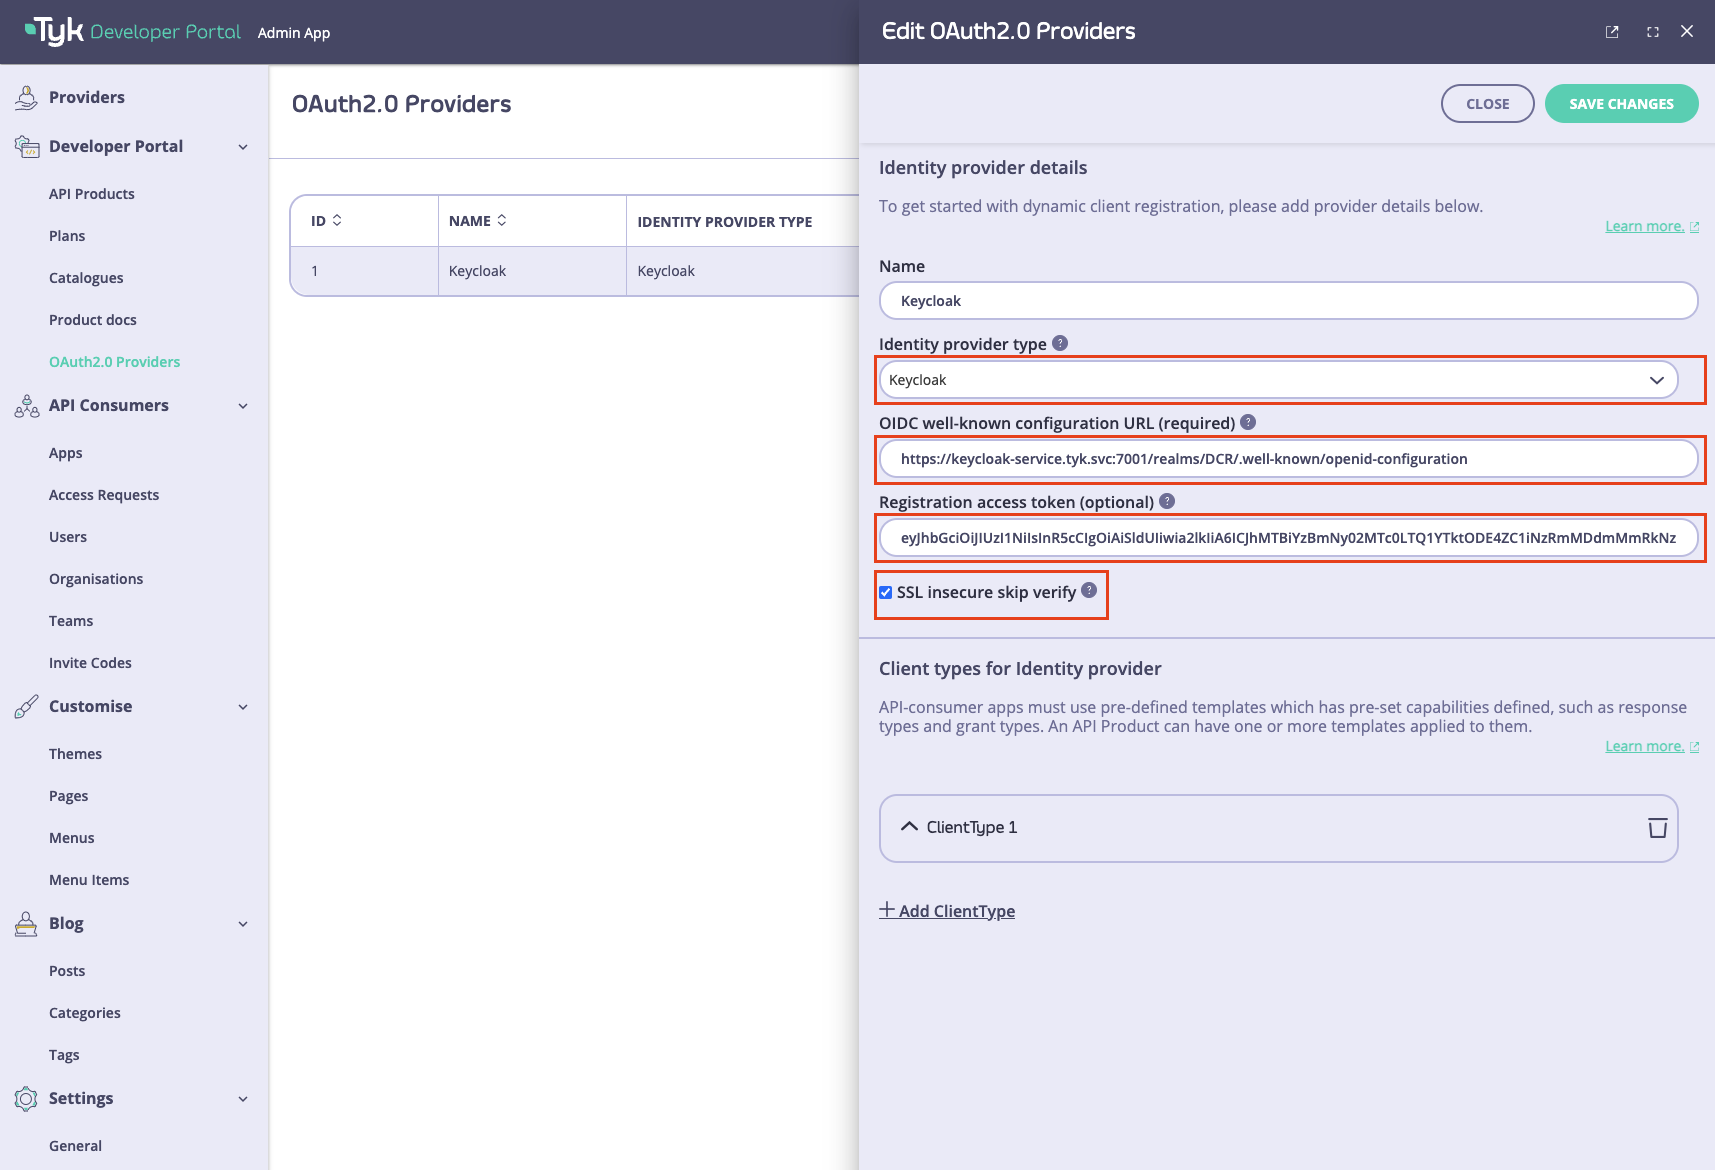
Create client configurations
Once the connection settings are specified, you need to create one or multiple types of clients. You might have multiple types of clients that are suitable for different use cases, such as backend integration or web applications. You need at least one type of client for the DCR flow to work. To add the first client type, scroll down to theClient Types section and click on the Add client type button.
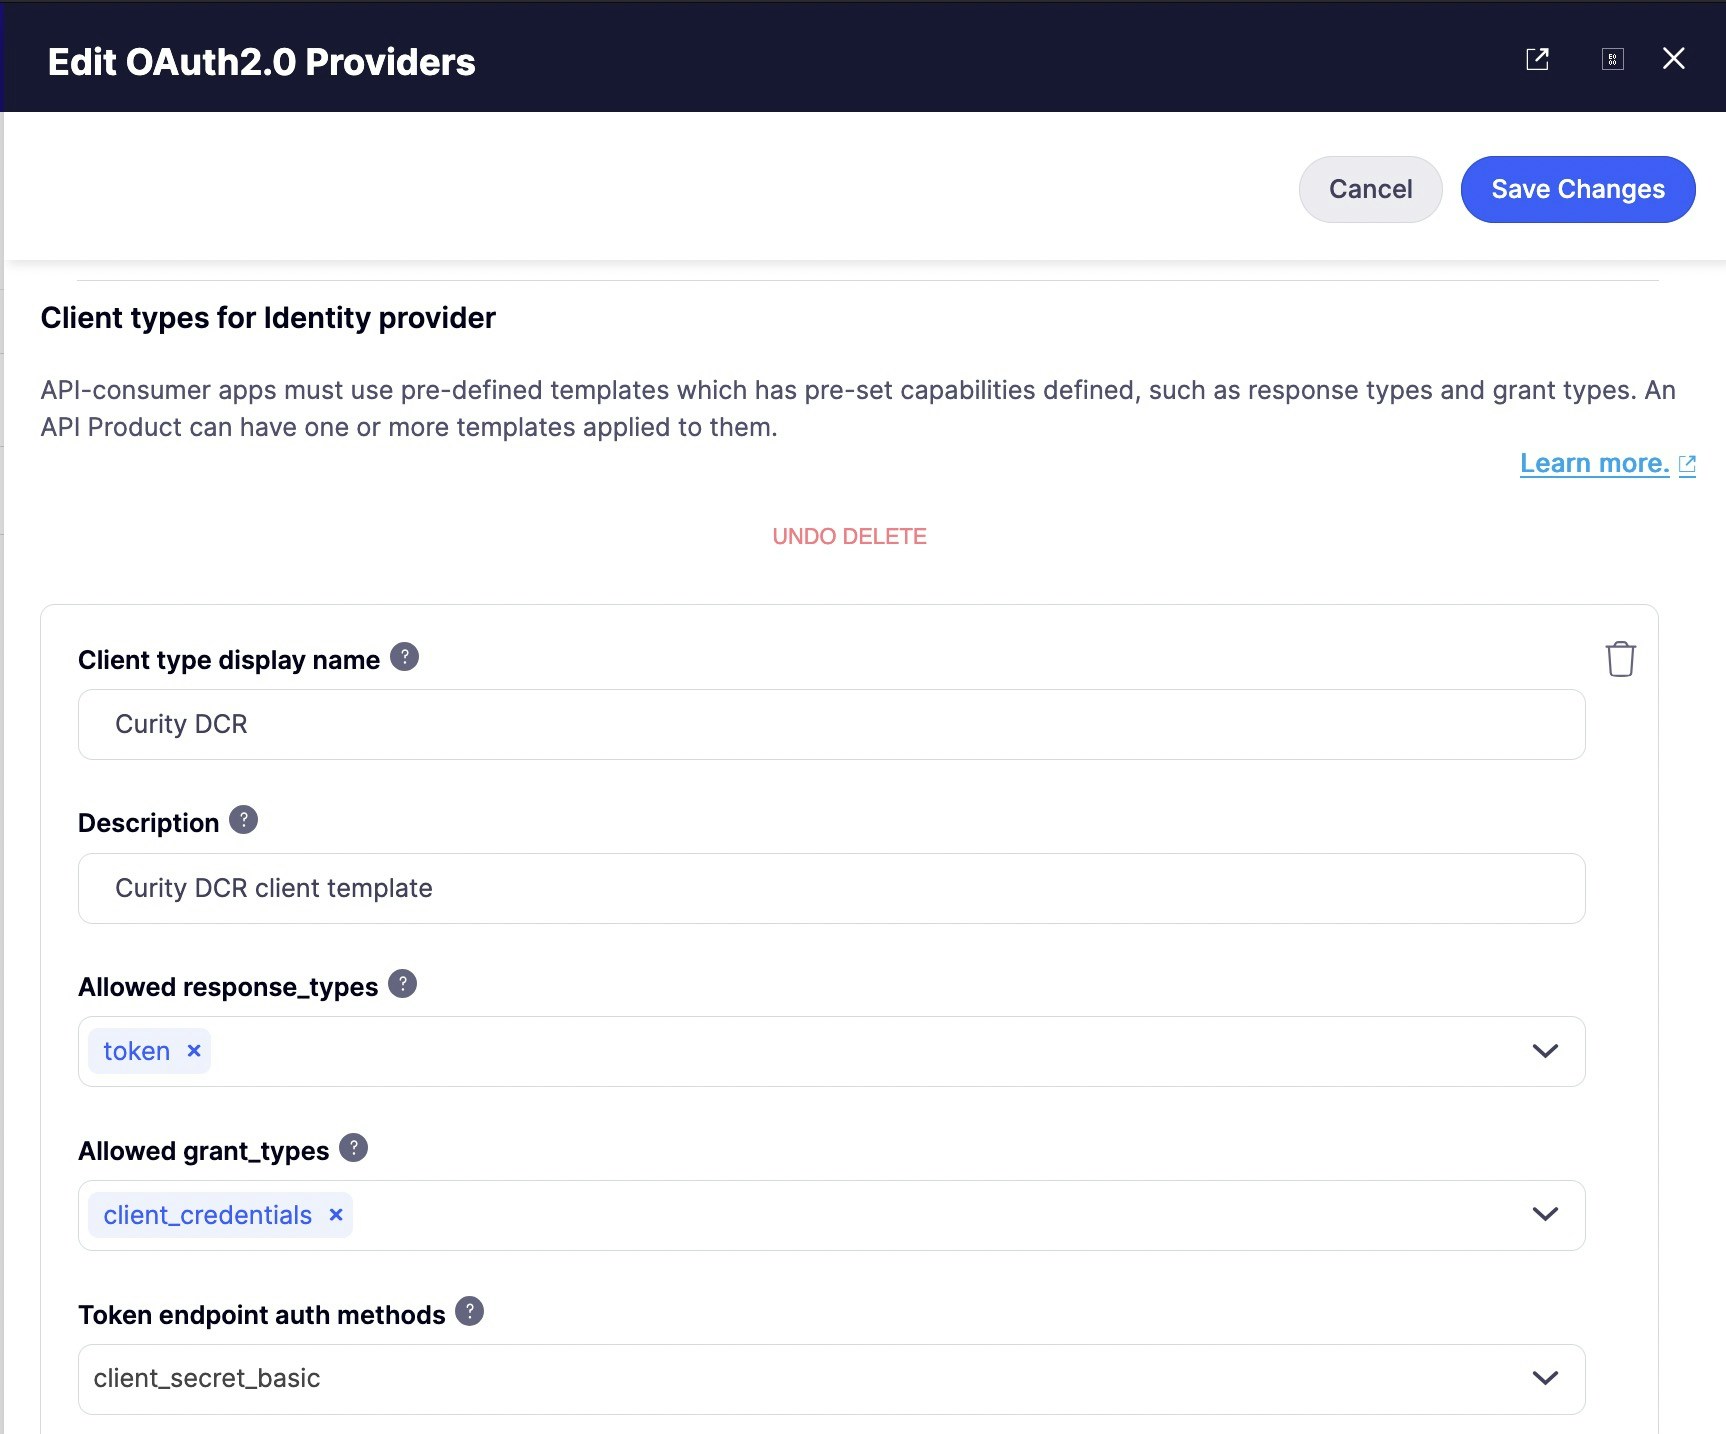
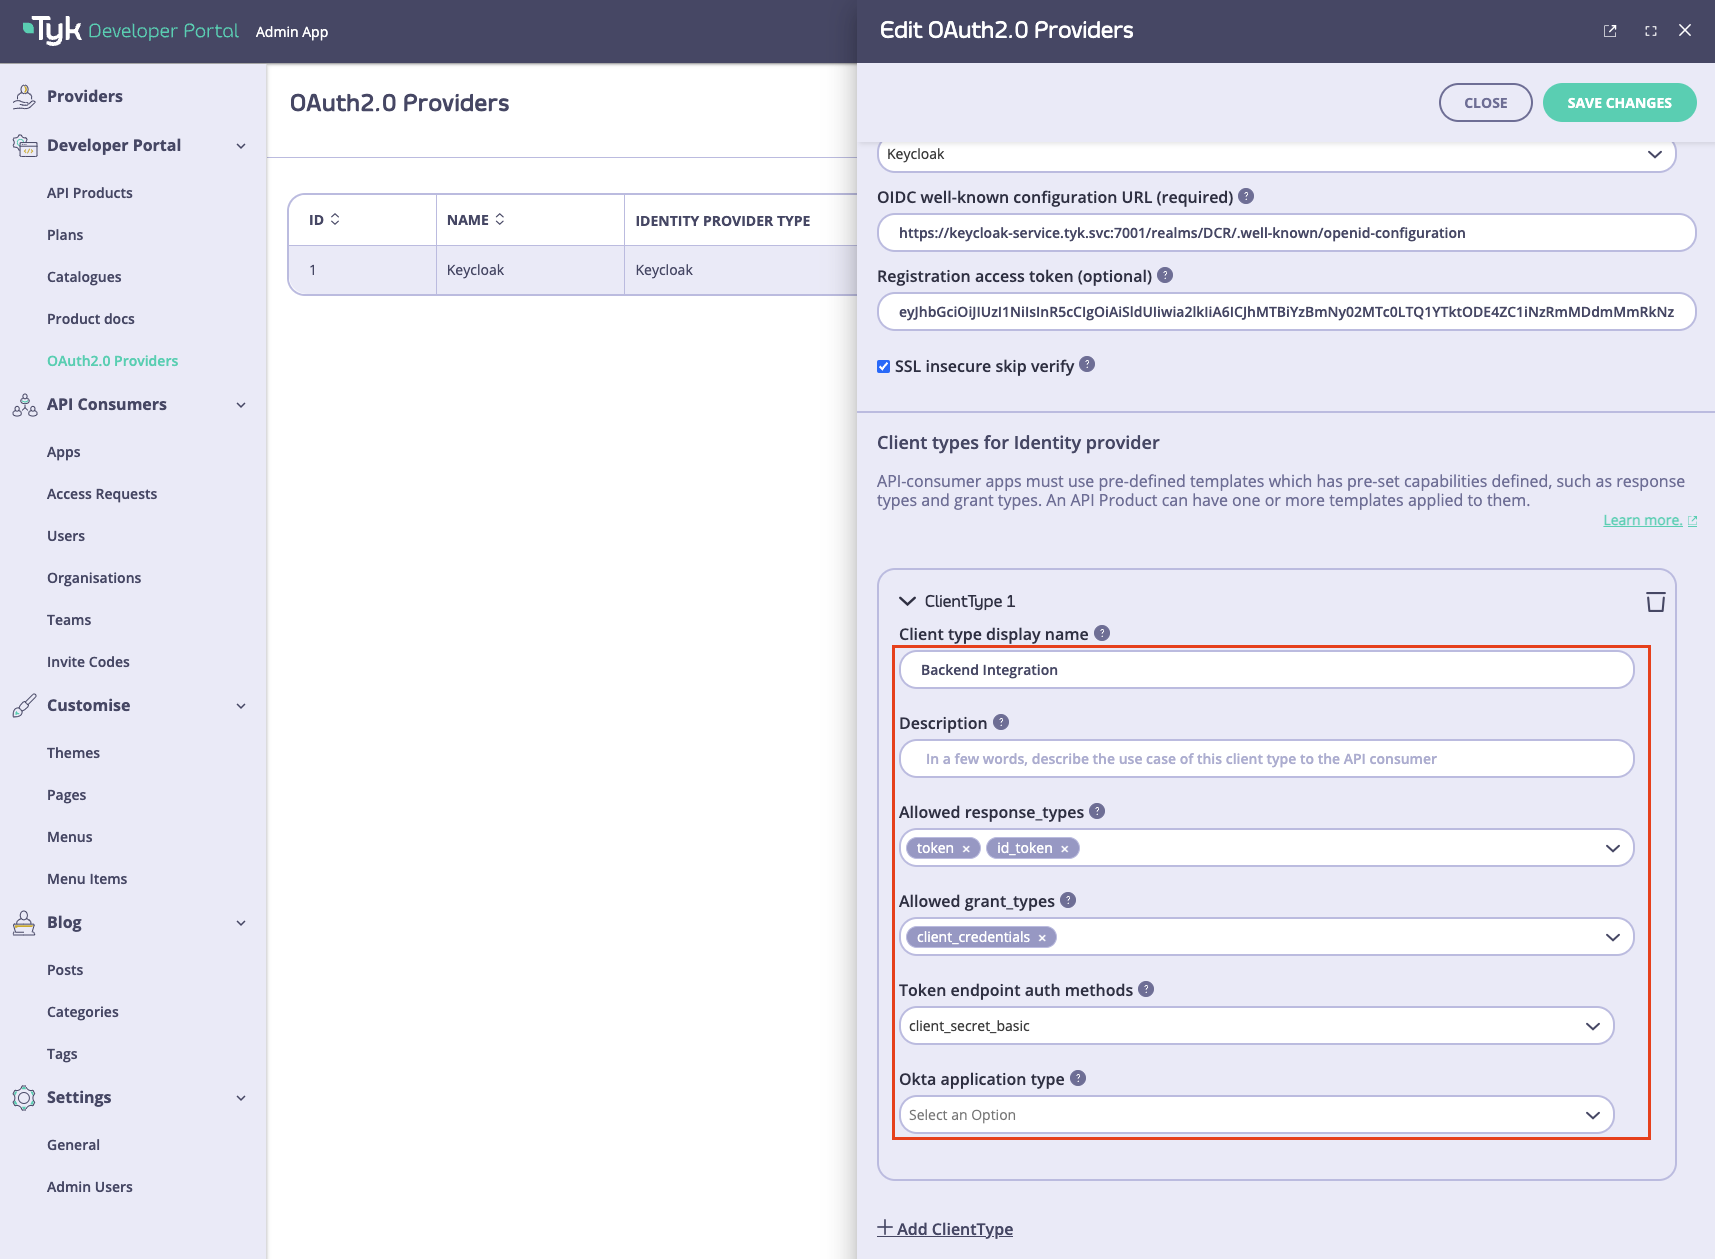
To configure a client type, you need to specify the following settings:
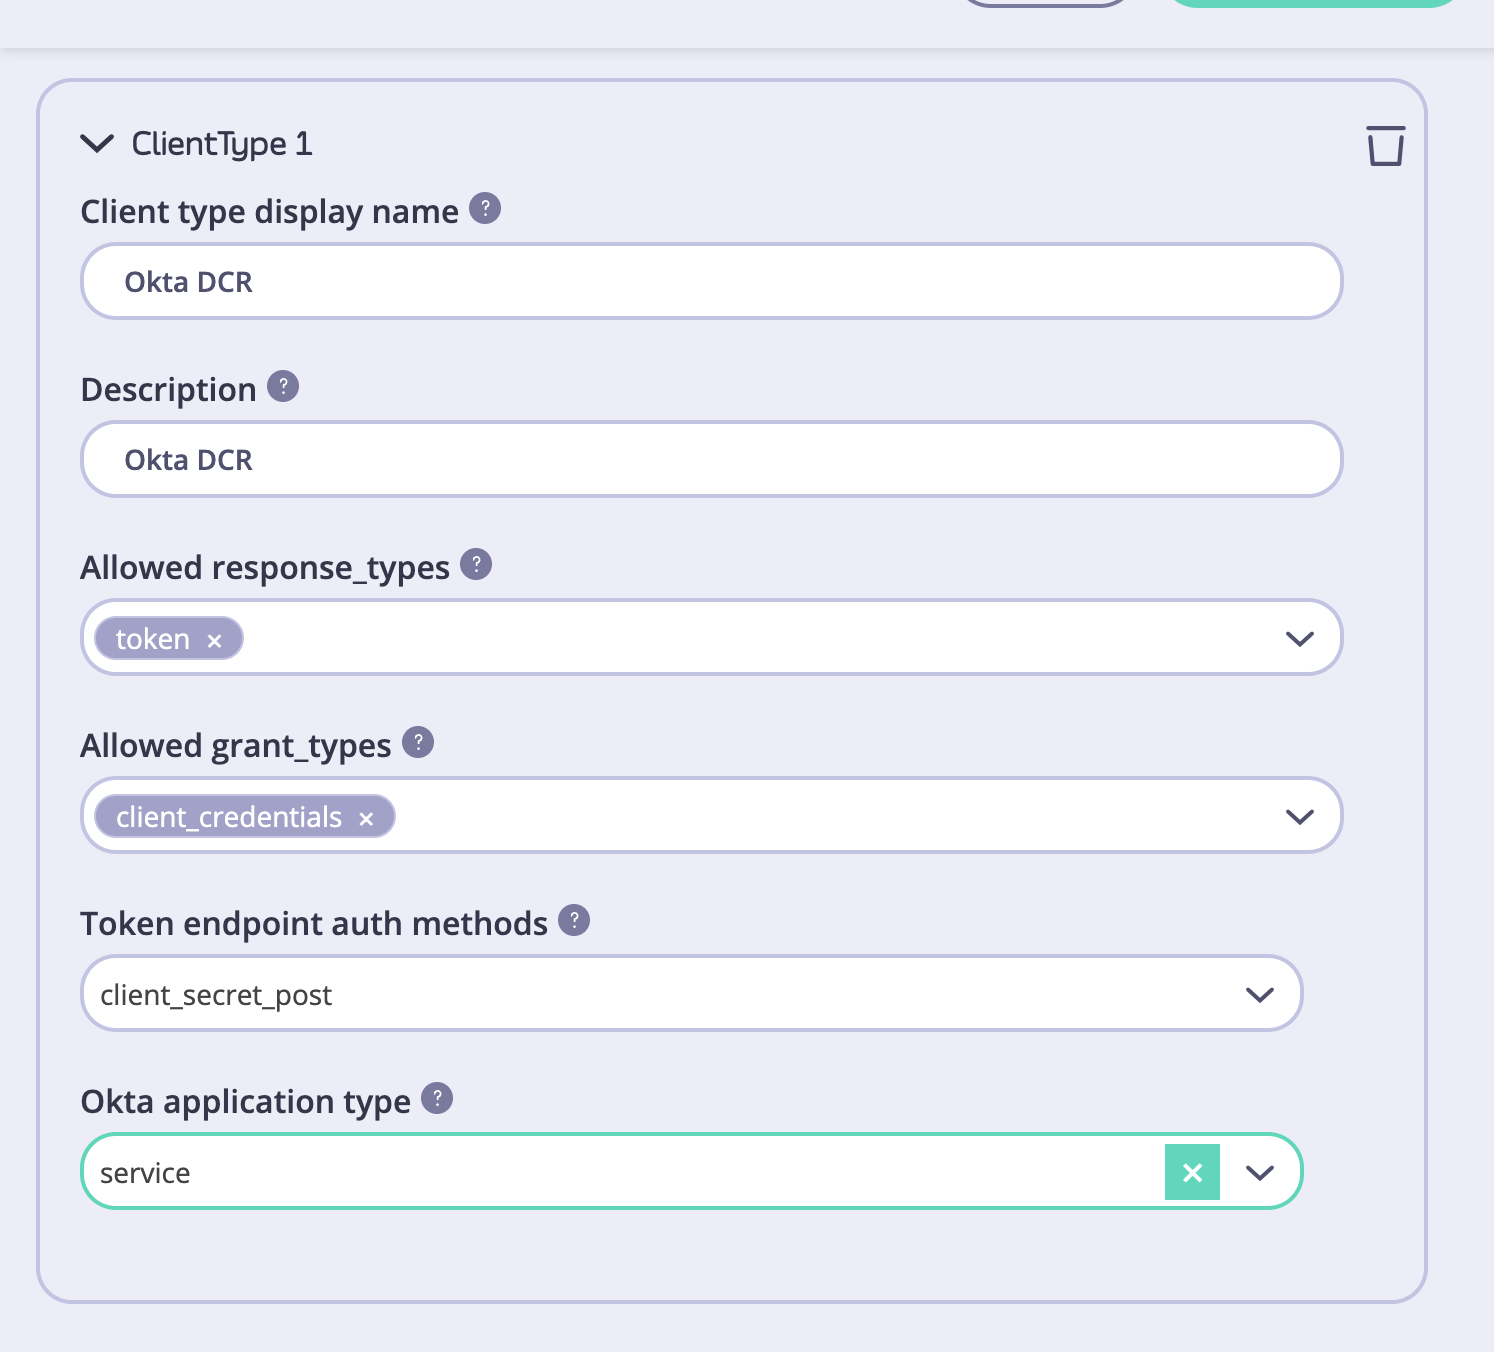
- Client type display name. This name will be displayed to API consumers when they check out API products. Try to make it descriptive and short, so it’s easier for API consumers to understand.
- Description. A more verbose description of a client type can be provided in this field. By default, we do not display this on the checkout page, but you can customize the respective template and make the description visible to API consumers. Please refer to the customization section for guidance.
- Allowed response_types. Response types associated with this type of client as per the OIDC spec.
- Allowed grant_types. Grant types that this type of client will support as per the OIDC spec.
- Token endpoint auth methods. The token endpoint that will be used by this type of client as per the OIDC spec.
- Additionally, there’s an additional field for Okta: Okta application type which defines which type of Okta client should be created. Ignored for all other IdPs.
SAVE CHANGES button.
- Curity
- Keycloak
- Okta
Configure API Products and plans for the DCR flow
Once the App registration settings are configured, it is time for the final step: to configure the API Products and plans to work with the DCR flow.Configure API Products for the DCR flow
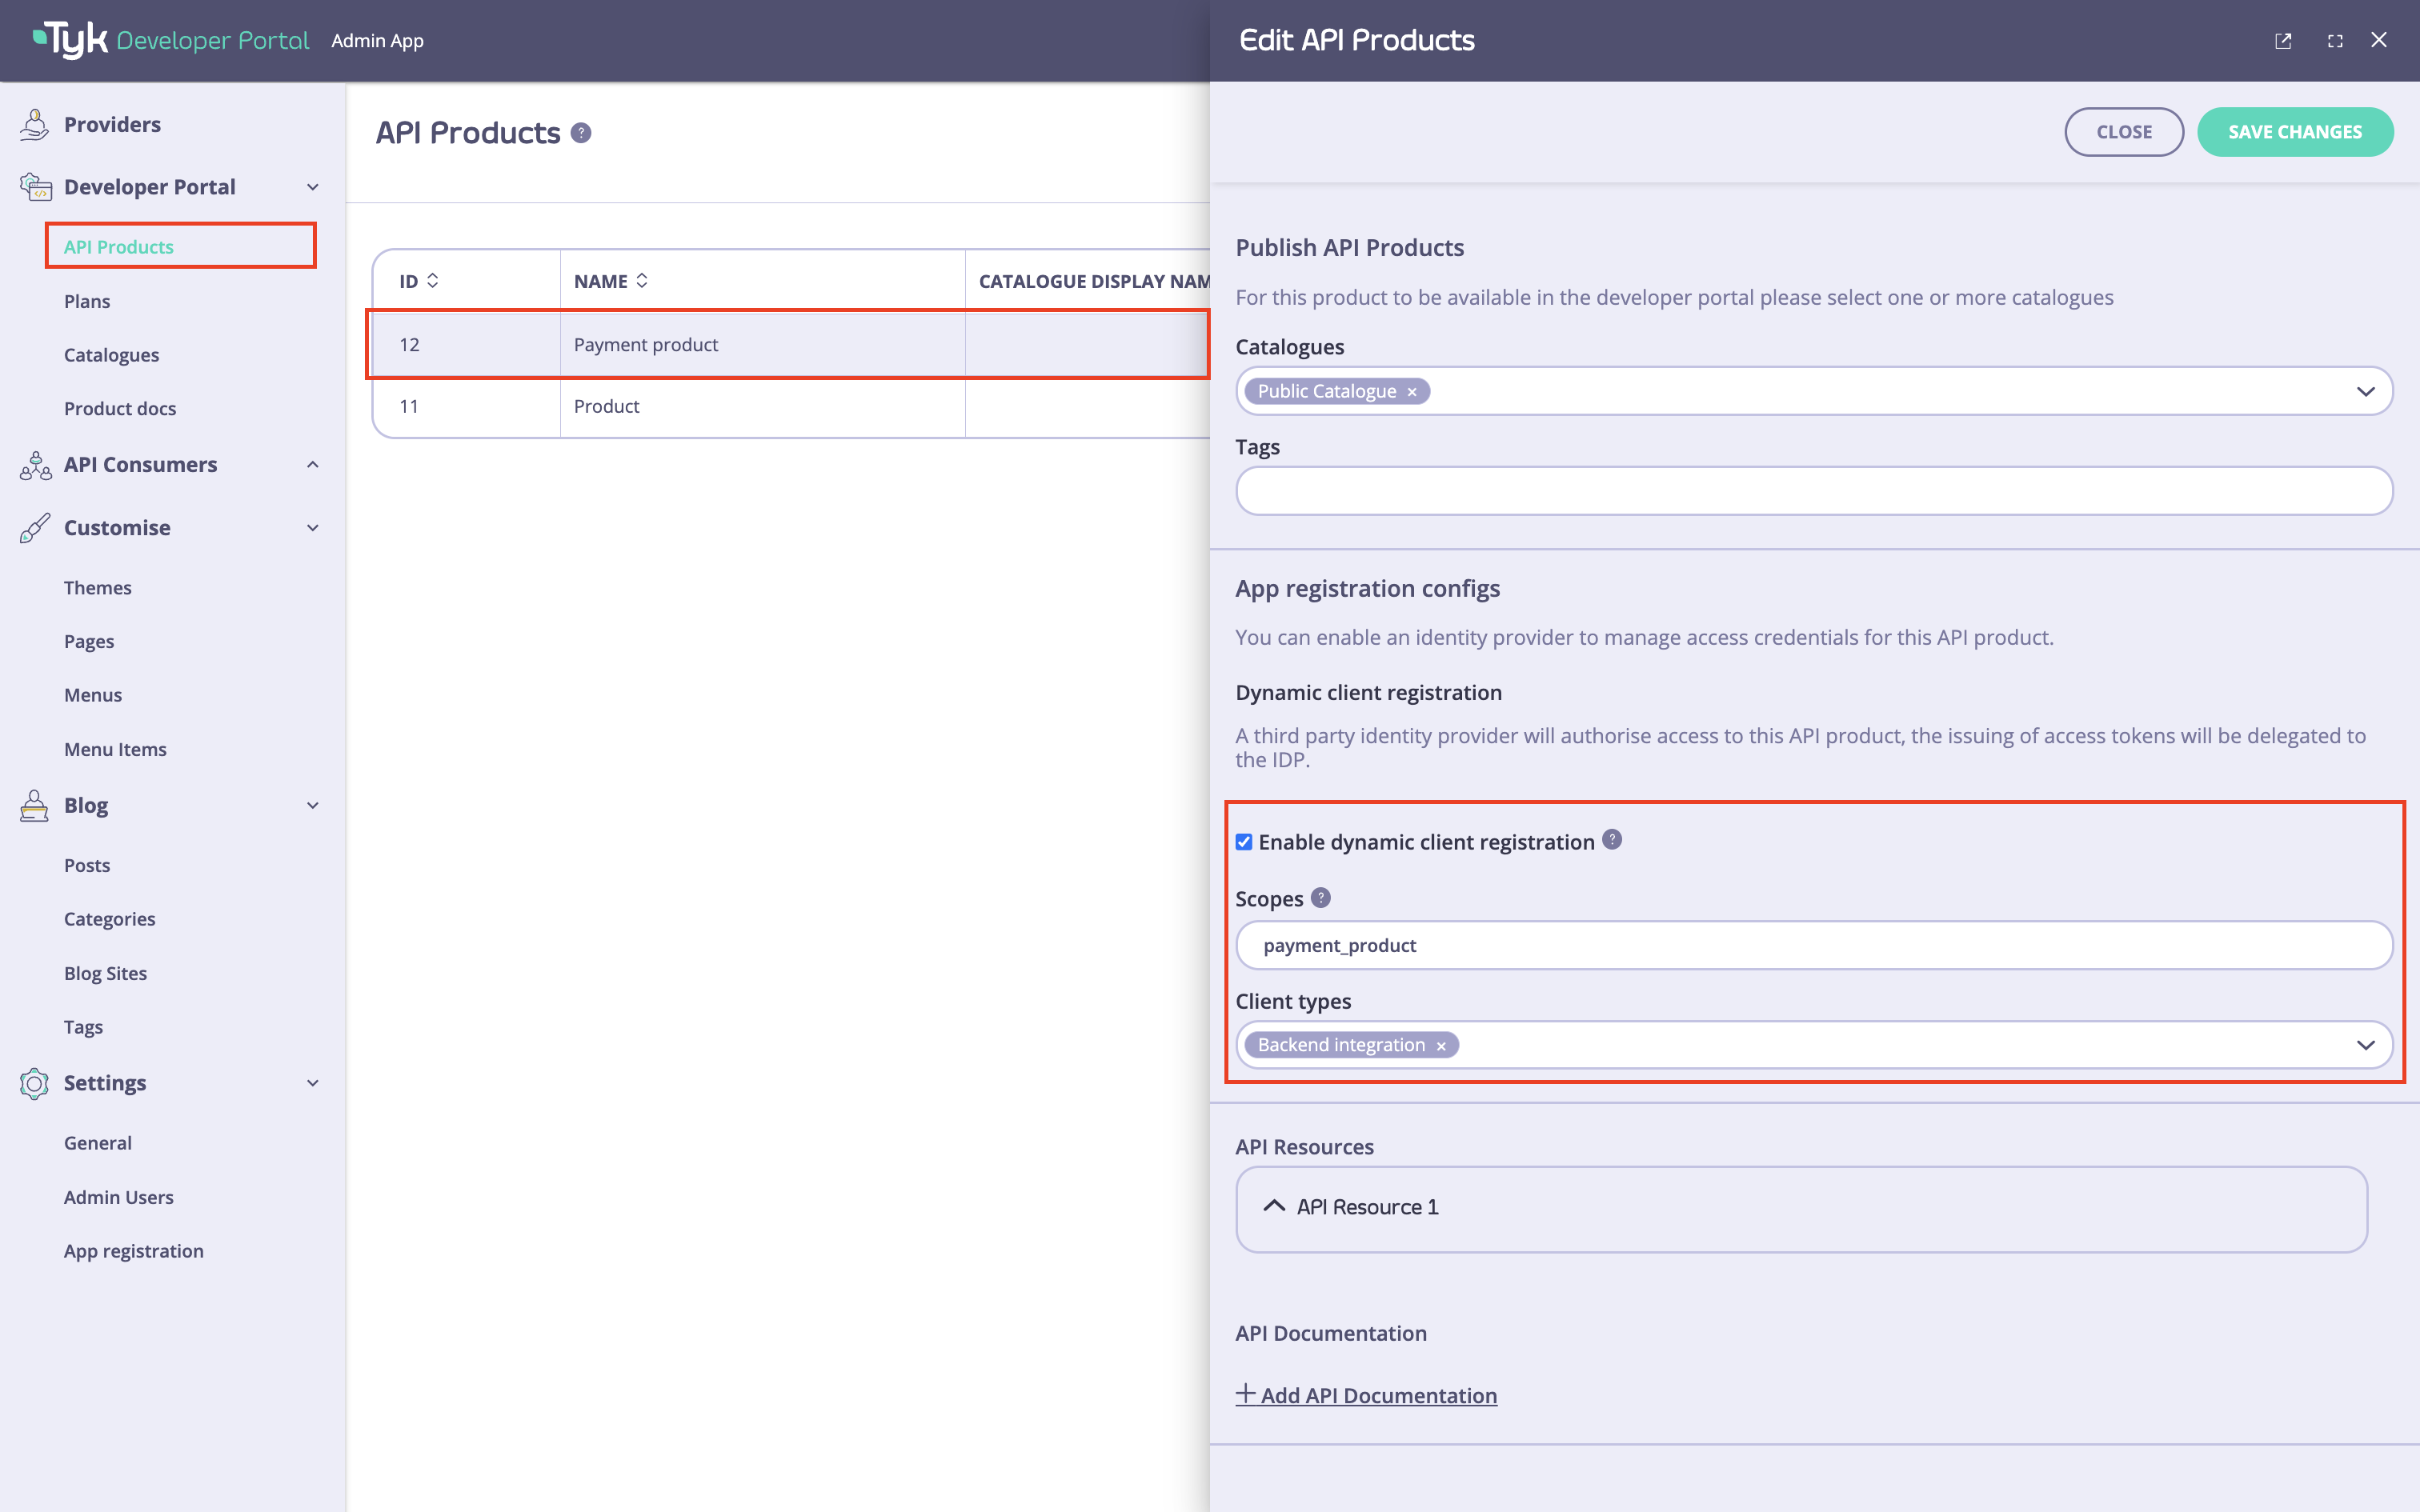
To configure API Products to work with the DCR flow, you need to:- Enable the DCR flow for the products you want to work with the DCR flow.
- Associate each product with one or multiple types of clients that were created in the previous step.
- Specify scopes for this API Product. Note the portal uses the scope to policy mapping to enforce access control to API Products, so there should be at least one scope.
API Products menu and select the particular API product you want to use for the DCR flow. Next, go to the ‘App registration configs’ section and enable the ‘Enable dynamic client registration’ checkbox.
After that, specify the scope for this API product. You should have at least one scope that was created in the Prerequisites for getting started. If you need to specify more than one scope, you can separate them with spaces.
Finally, select one or multiple types of clients that were created in the Create client configurations section of this guide to associate them with that product.
- Curity
- Keycloak
- Okta
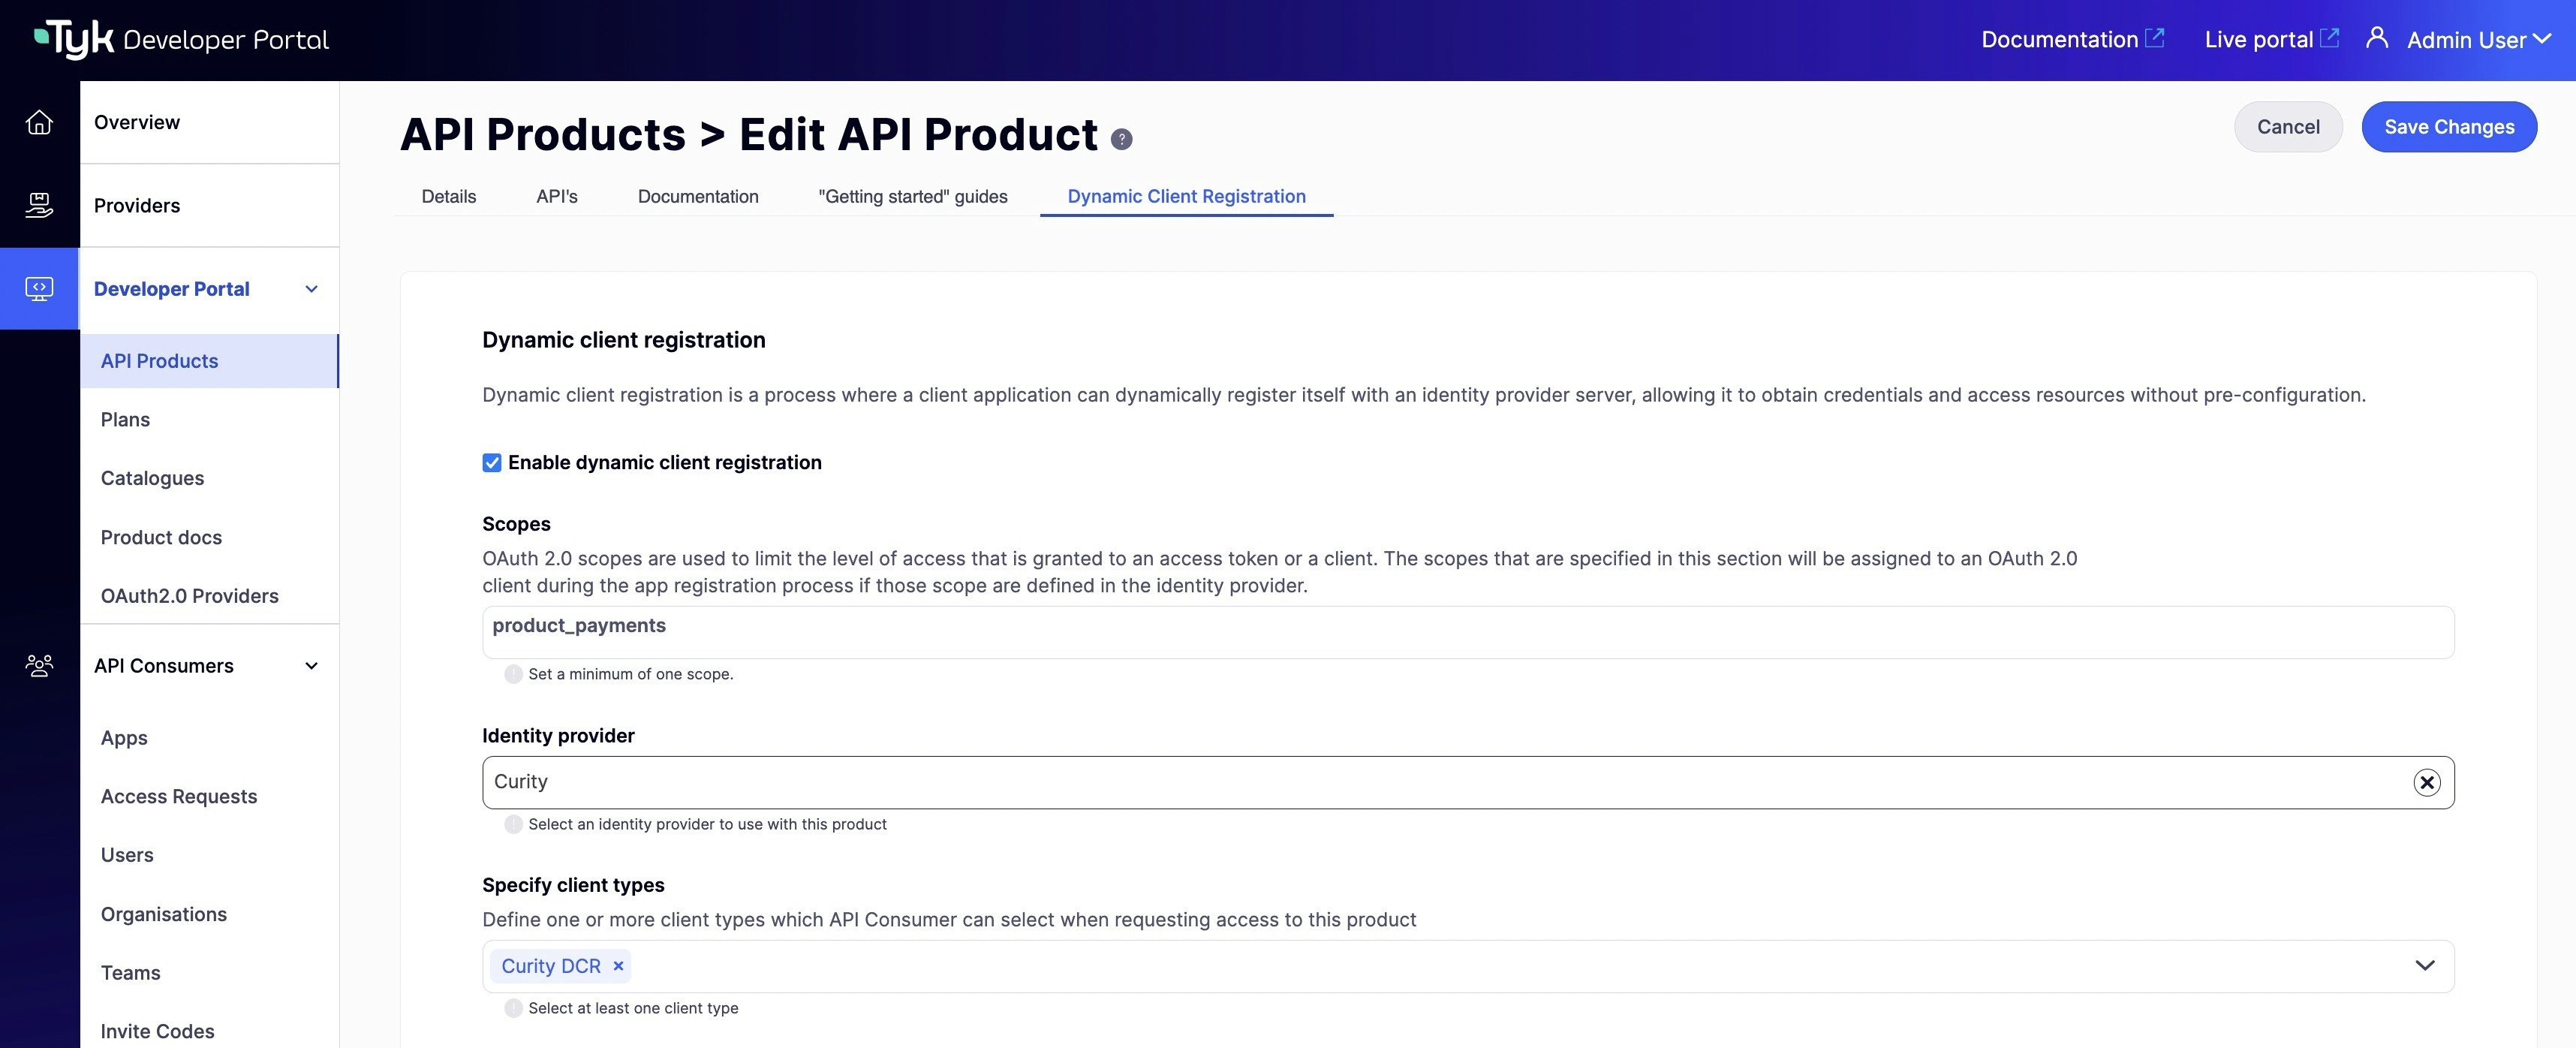
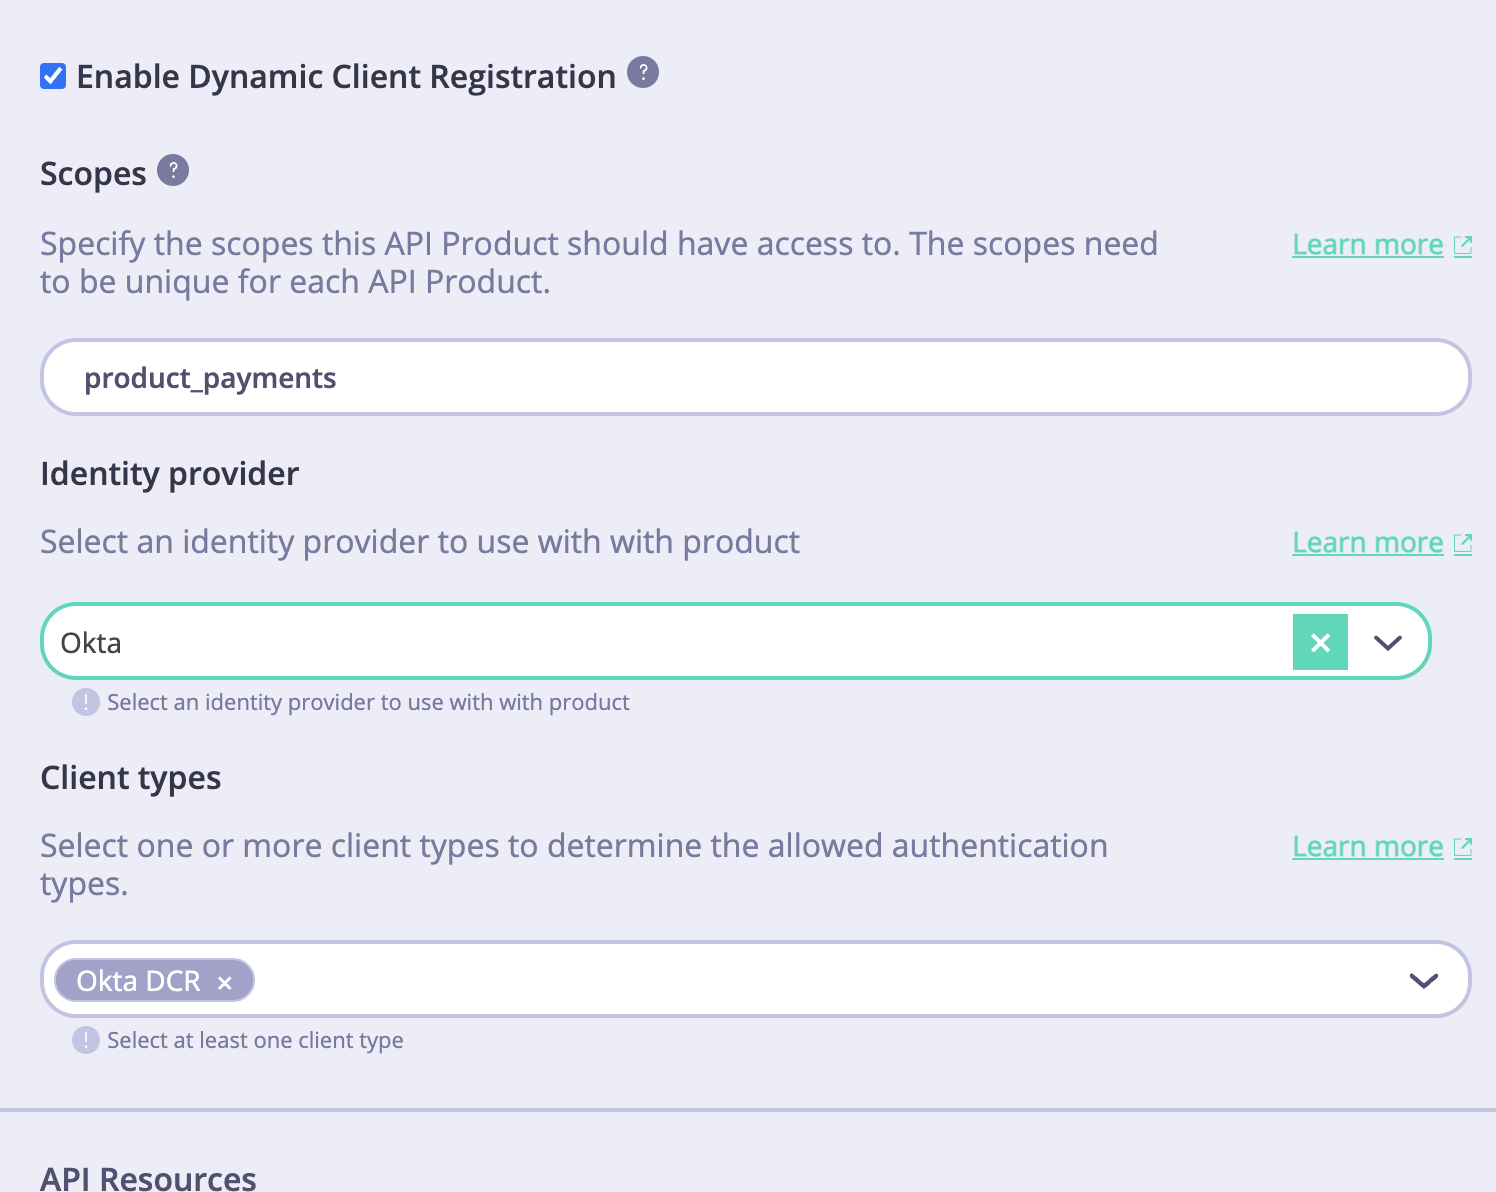
From version 1.13.0, you can complete the DCR configuration for a product under the 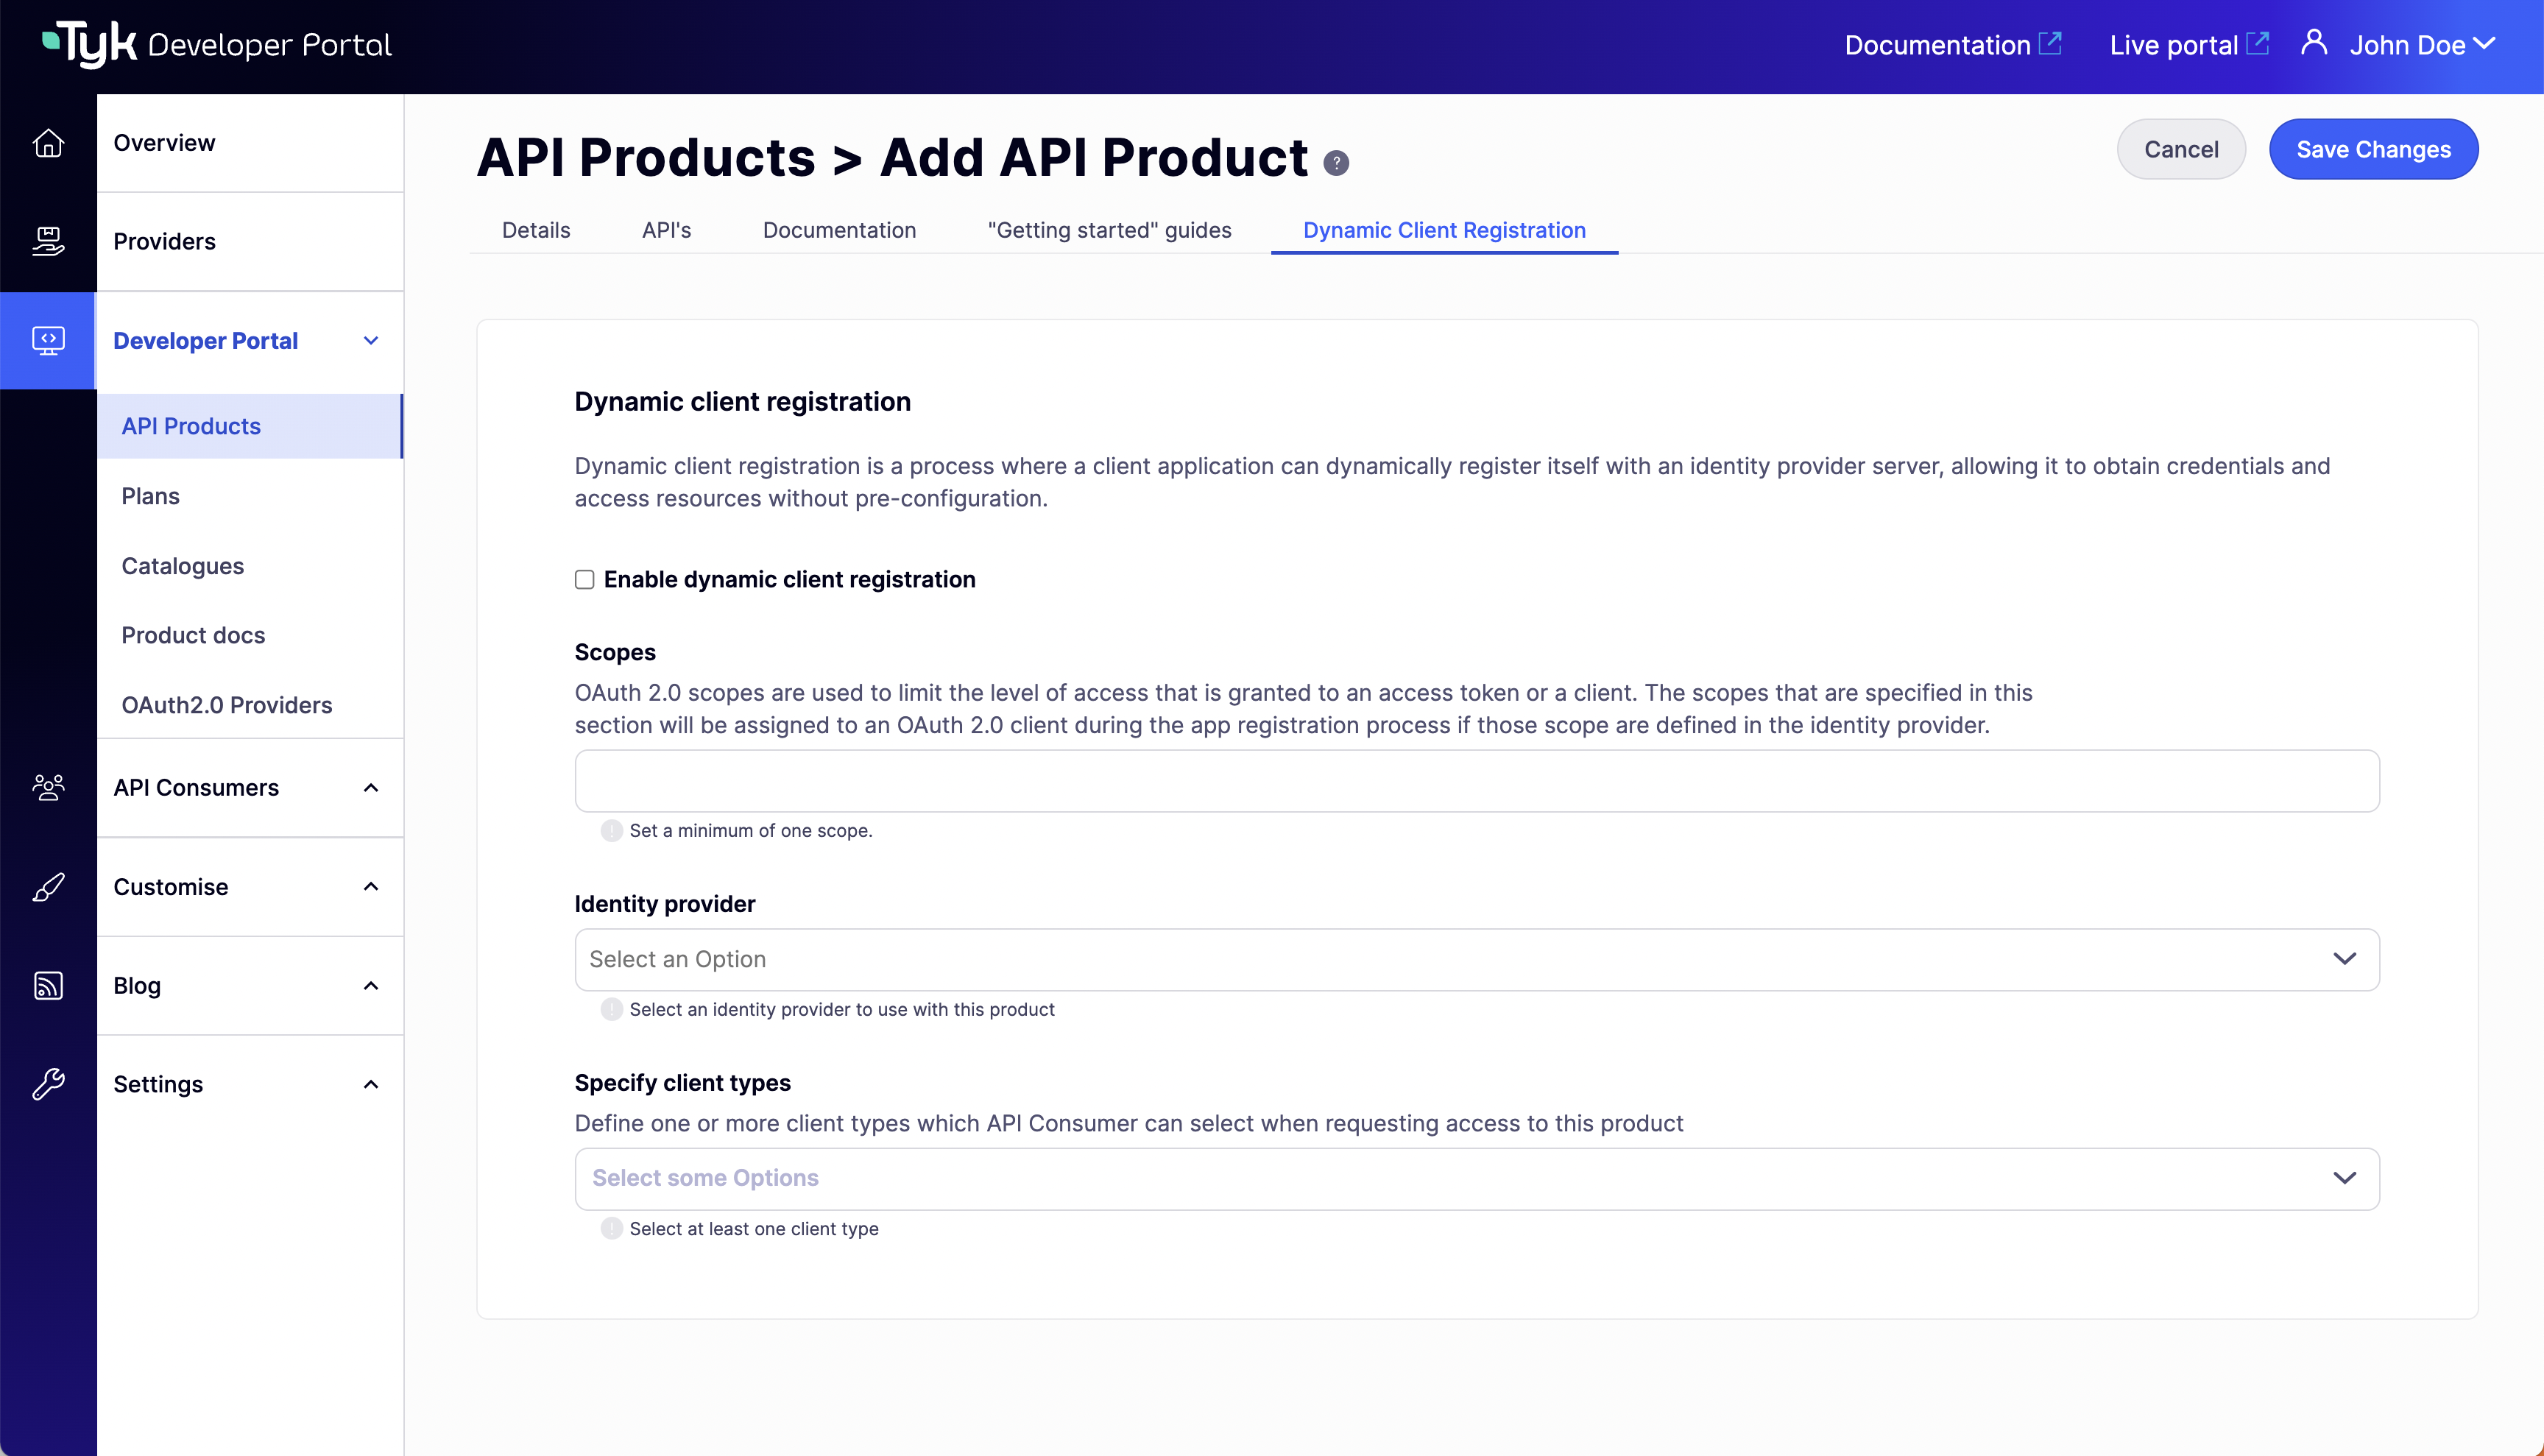
Dynamic Client Registration tab in the product’s view. Scope to policy mapping for the selected API/s will be automatically configured using the scope defined in the Scopes field.Configure plans for the DCR flow
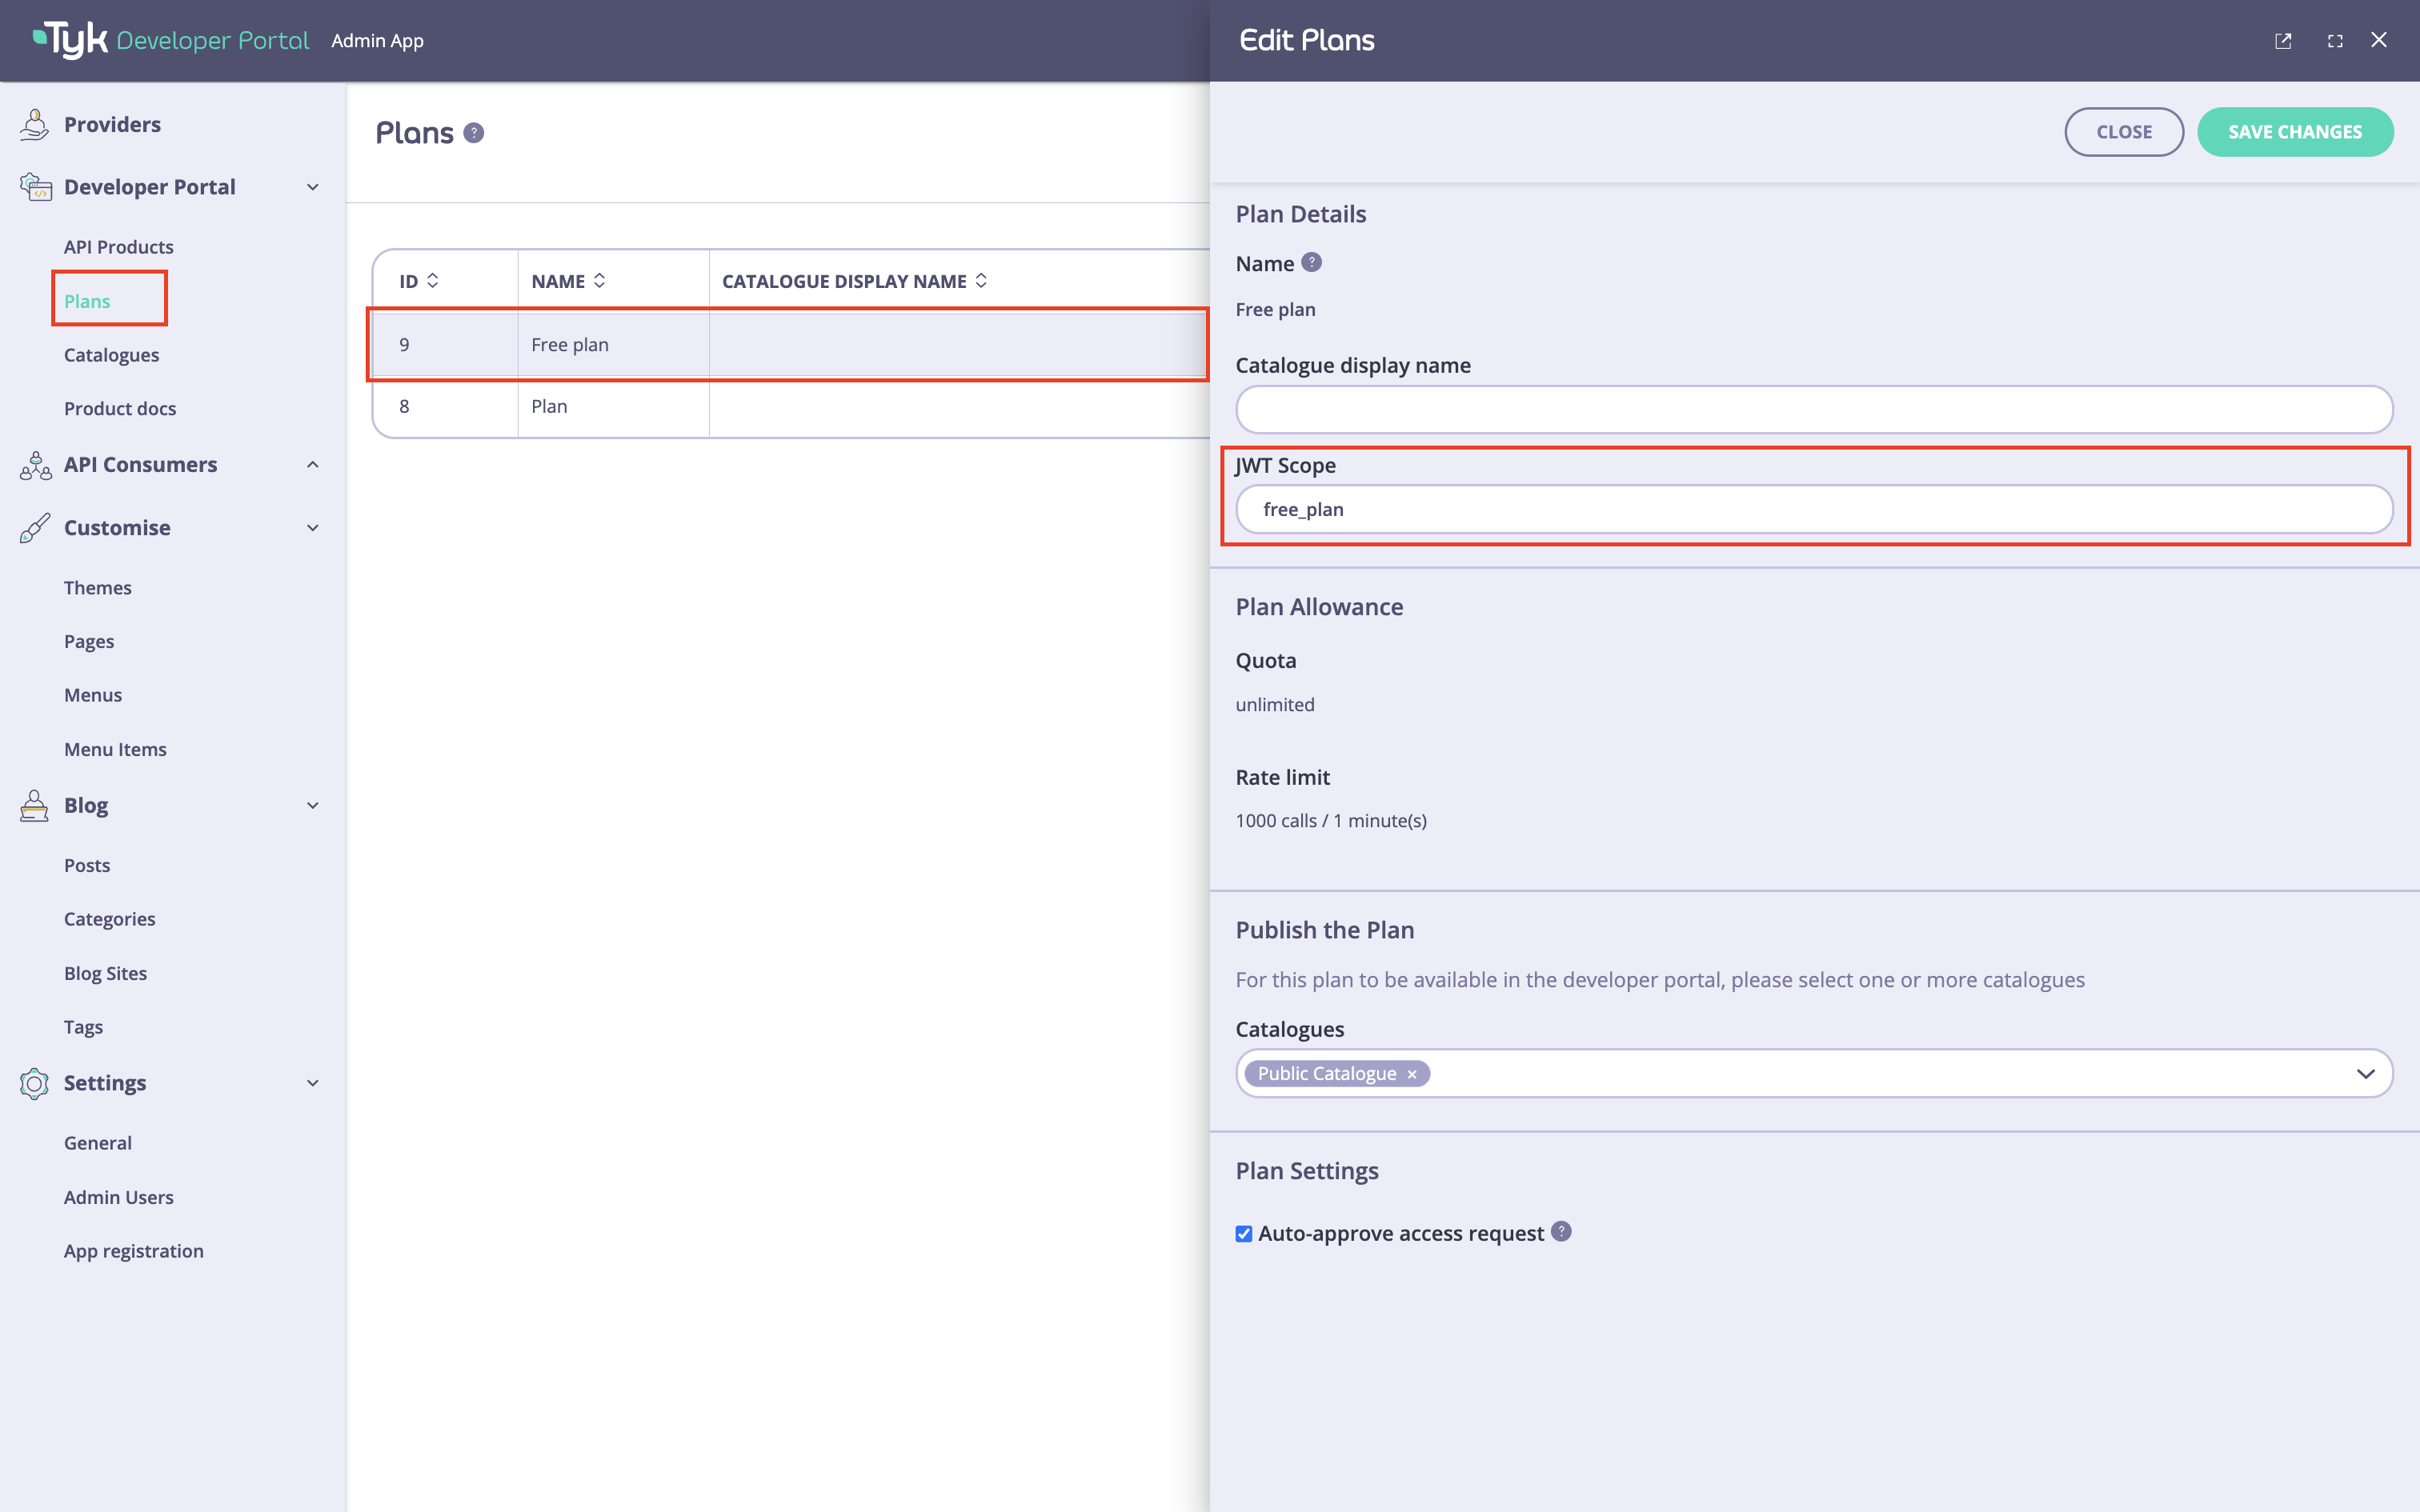
The last step is to configure the plans you want to use with the DCR flow. To do this, go to the portal’sPlans menu section and specify the OAuth2.0 scope to use with each plan. You should have at least one scope that was created in the Prerequisites for getting started. If you need to specify more than one scope, you can separate them with spaces.
From version 1.13.0, you can complete the DCR configuration for a plan under the 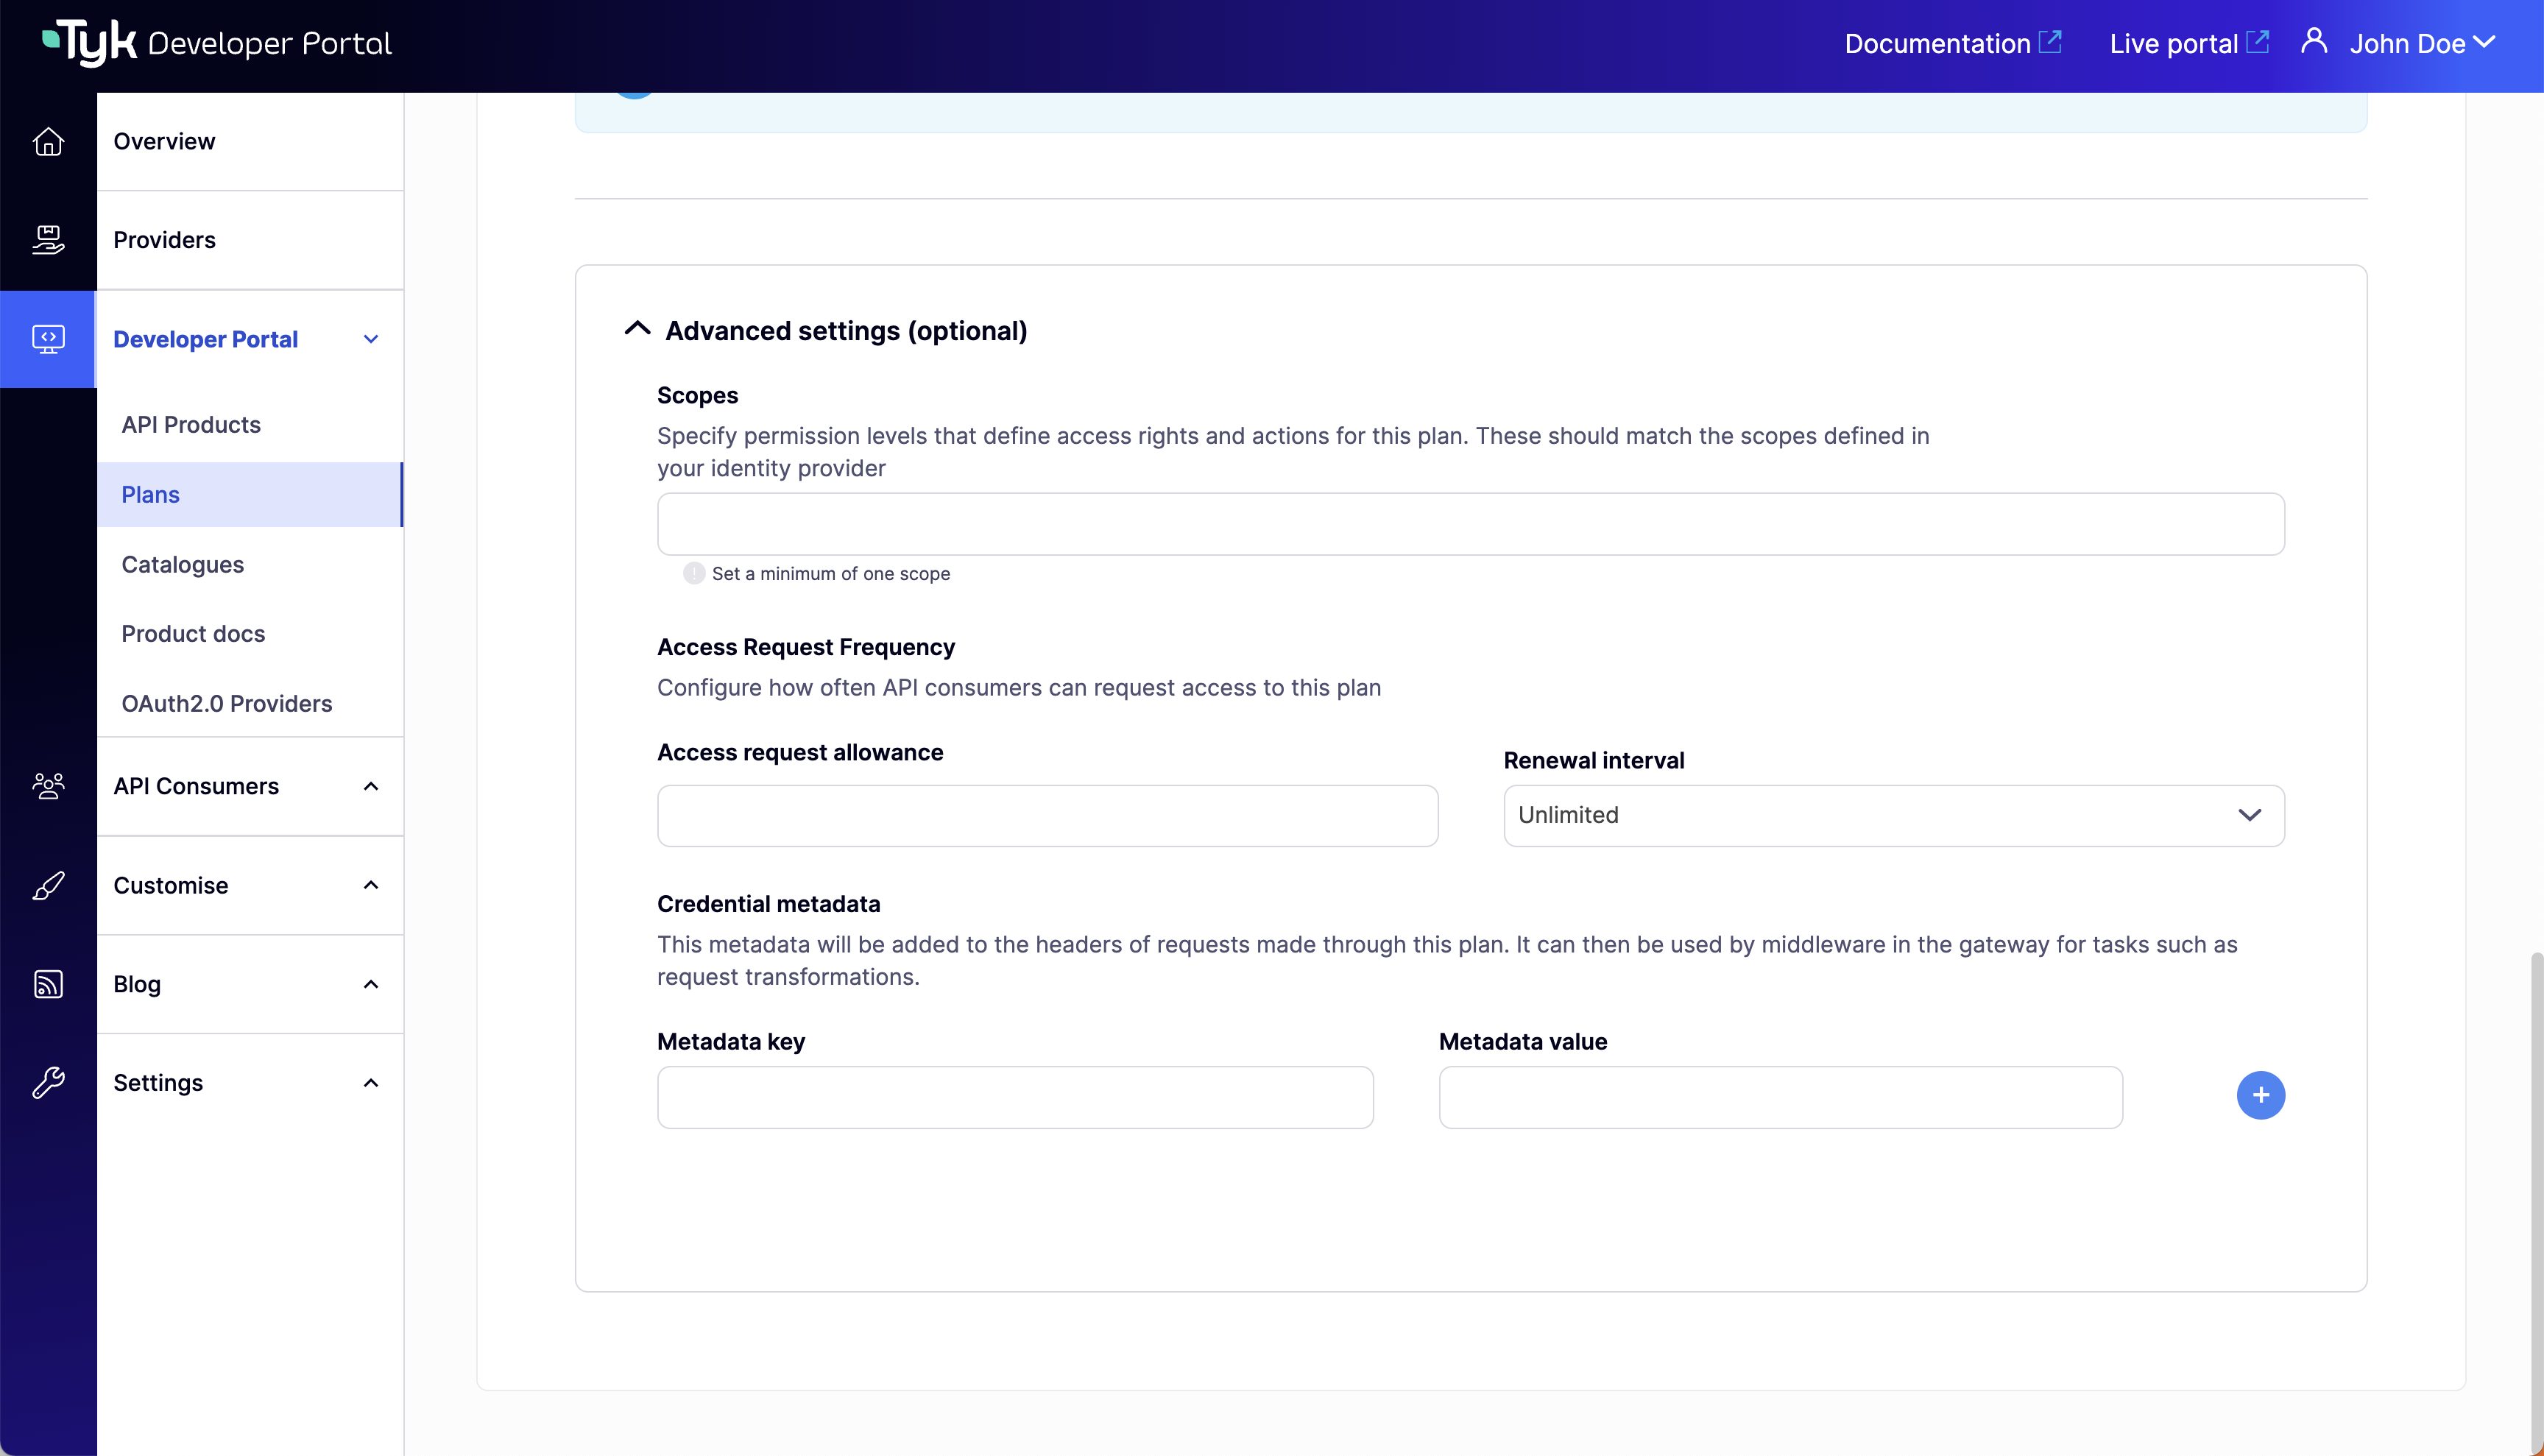
Advanced settings (optional) colapsible section in the plan’s view. Scope to policy mapping for the plan will be automatically configured using the scope defined in the Scopes field.Test the DCR flow
To test the DCR flow, you need to perform the following actions:- Request access to the API product and plan you have selected for the DCR flow as a developer.
- Approve the access request as an admin.
- As a developer, copy the access credentials and obtain an access token.
- As a developer, make an API call to verify the flow’s functionality.
Request access to the API Product
To request access to the DCR enabled API Product:- Log in as a developer and navigate to the catalog page.
- Select the DCR enabled API Product and add it to the shopping cart (if using cart-based flow) or proceed directly to checkout (if using direct access flow).
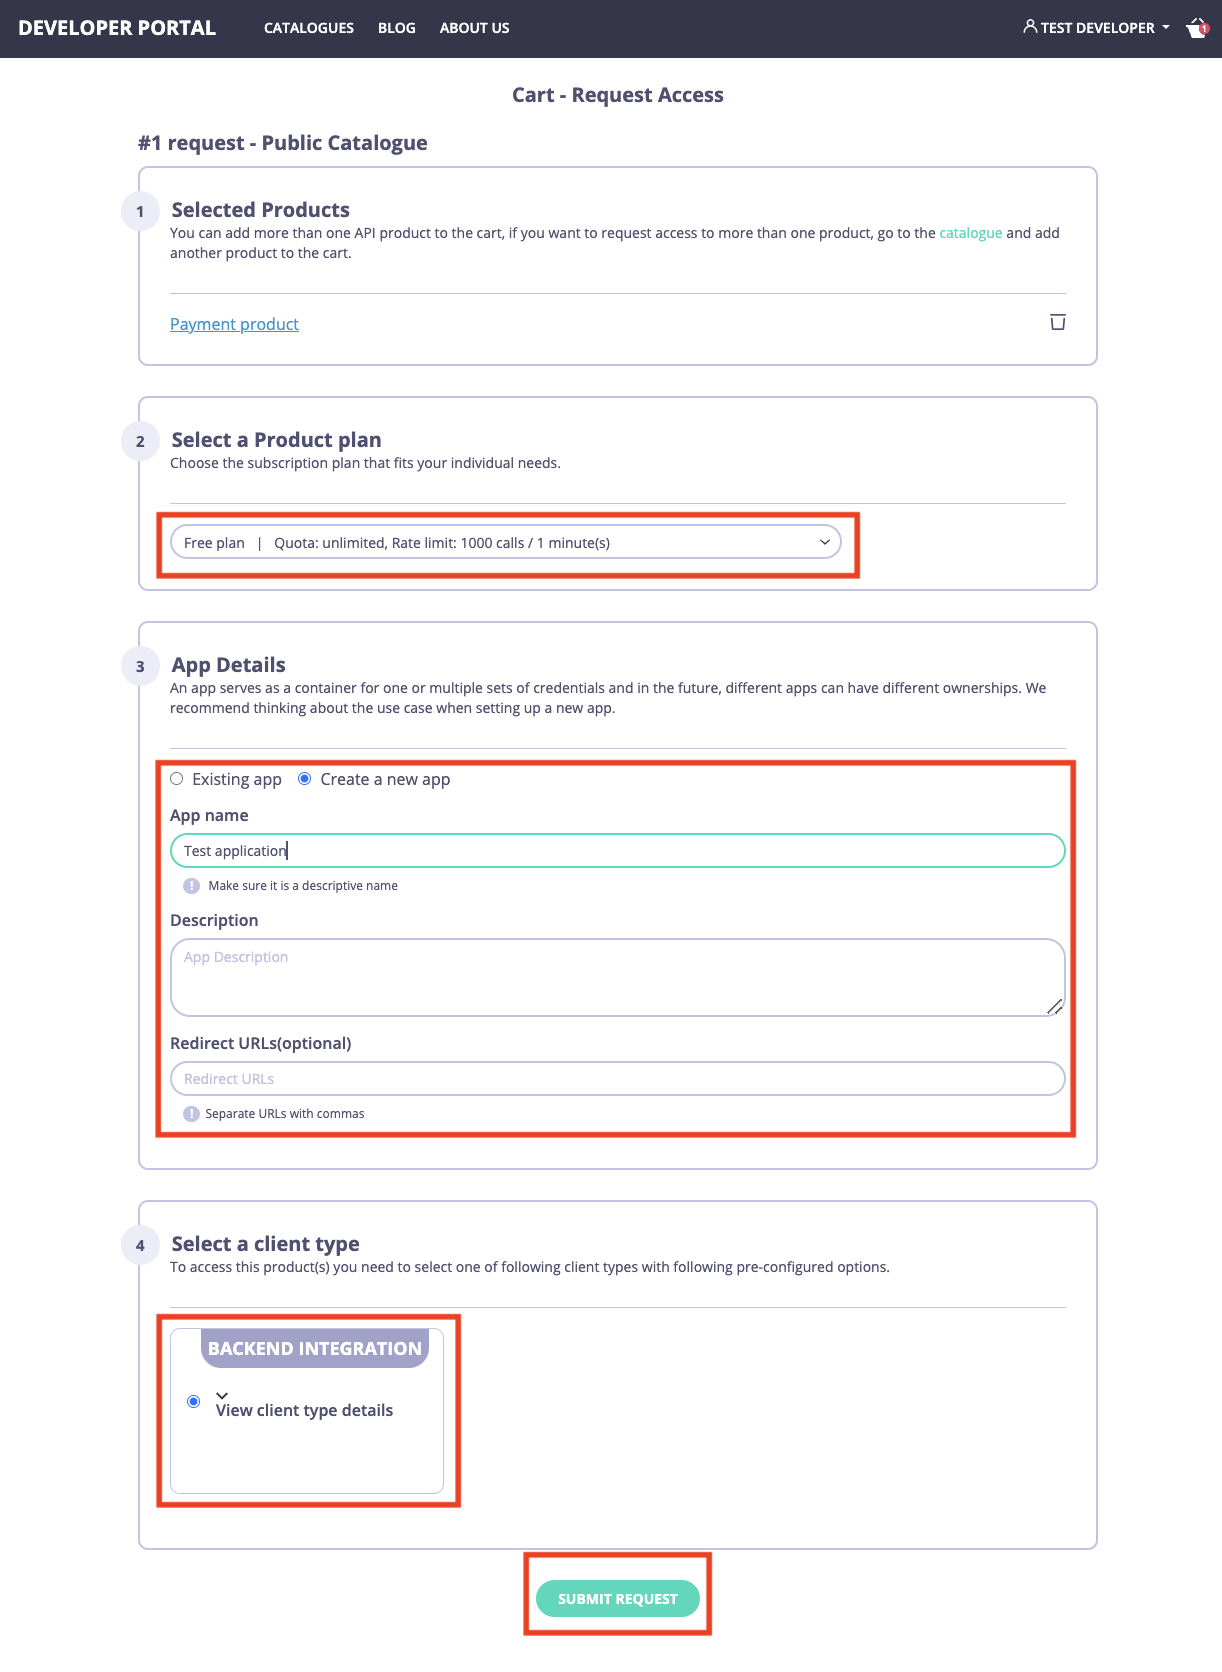
- Navigate to the checkout page.
- On the checkout page, select a plan to use with that product, select an existing application, or create a new one. If you plan to build an application that uses the Authorization code grant type, you also need to specify redirect URI of your application in the
Redirect URLsfield. If you have multiple redirect URI, you can separate them with commas. - Select a client type which is more suitable for your use case in the
Select a client typesection. - Finally, select the applicable type of client and click on the
Submit requestbutton.
Approve the access request
To approve the access request, navigate to theAccess requests menu in the portal, select the access request and approve it by clicking on the Approve button.
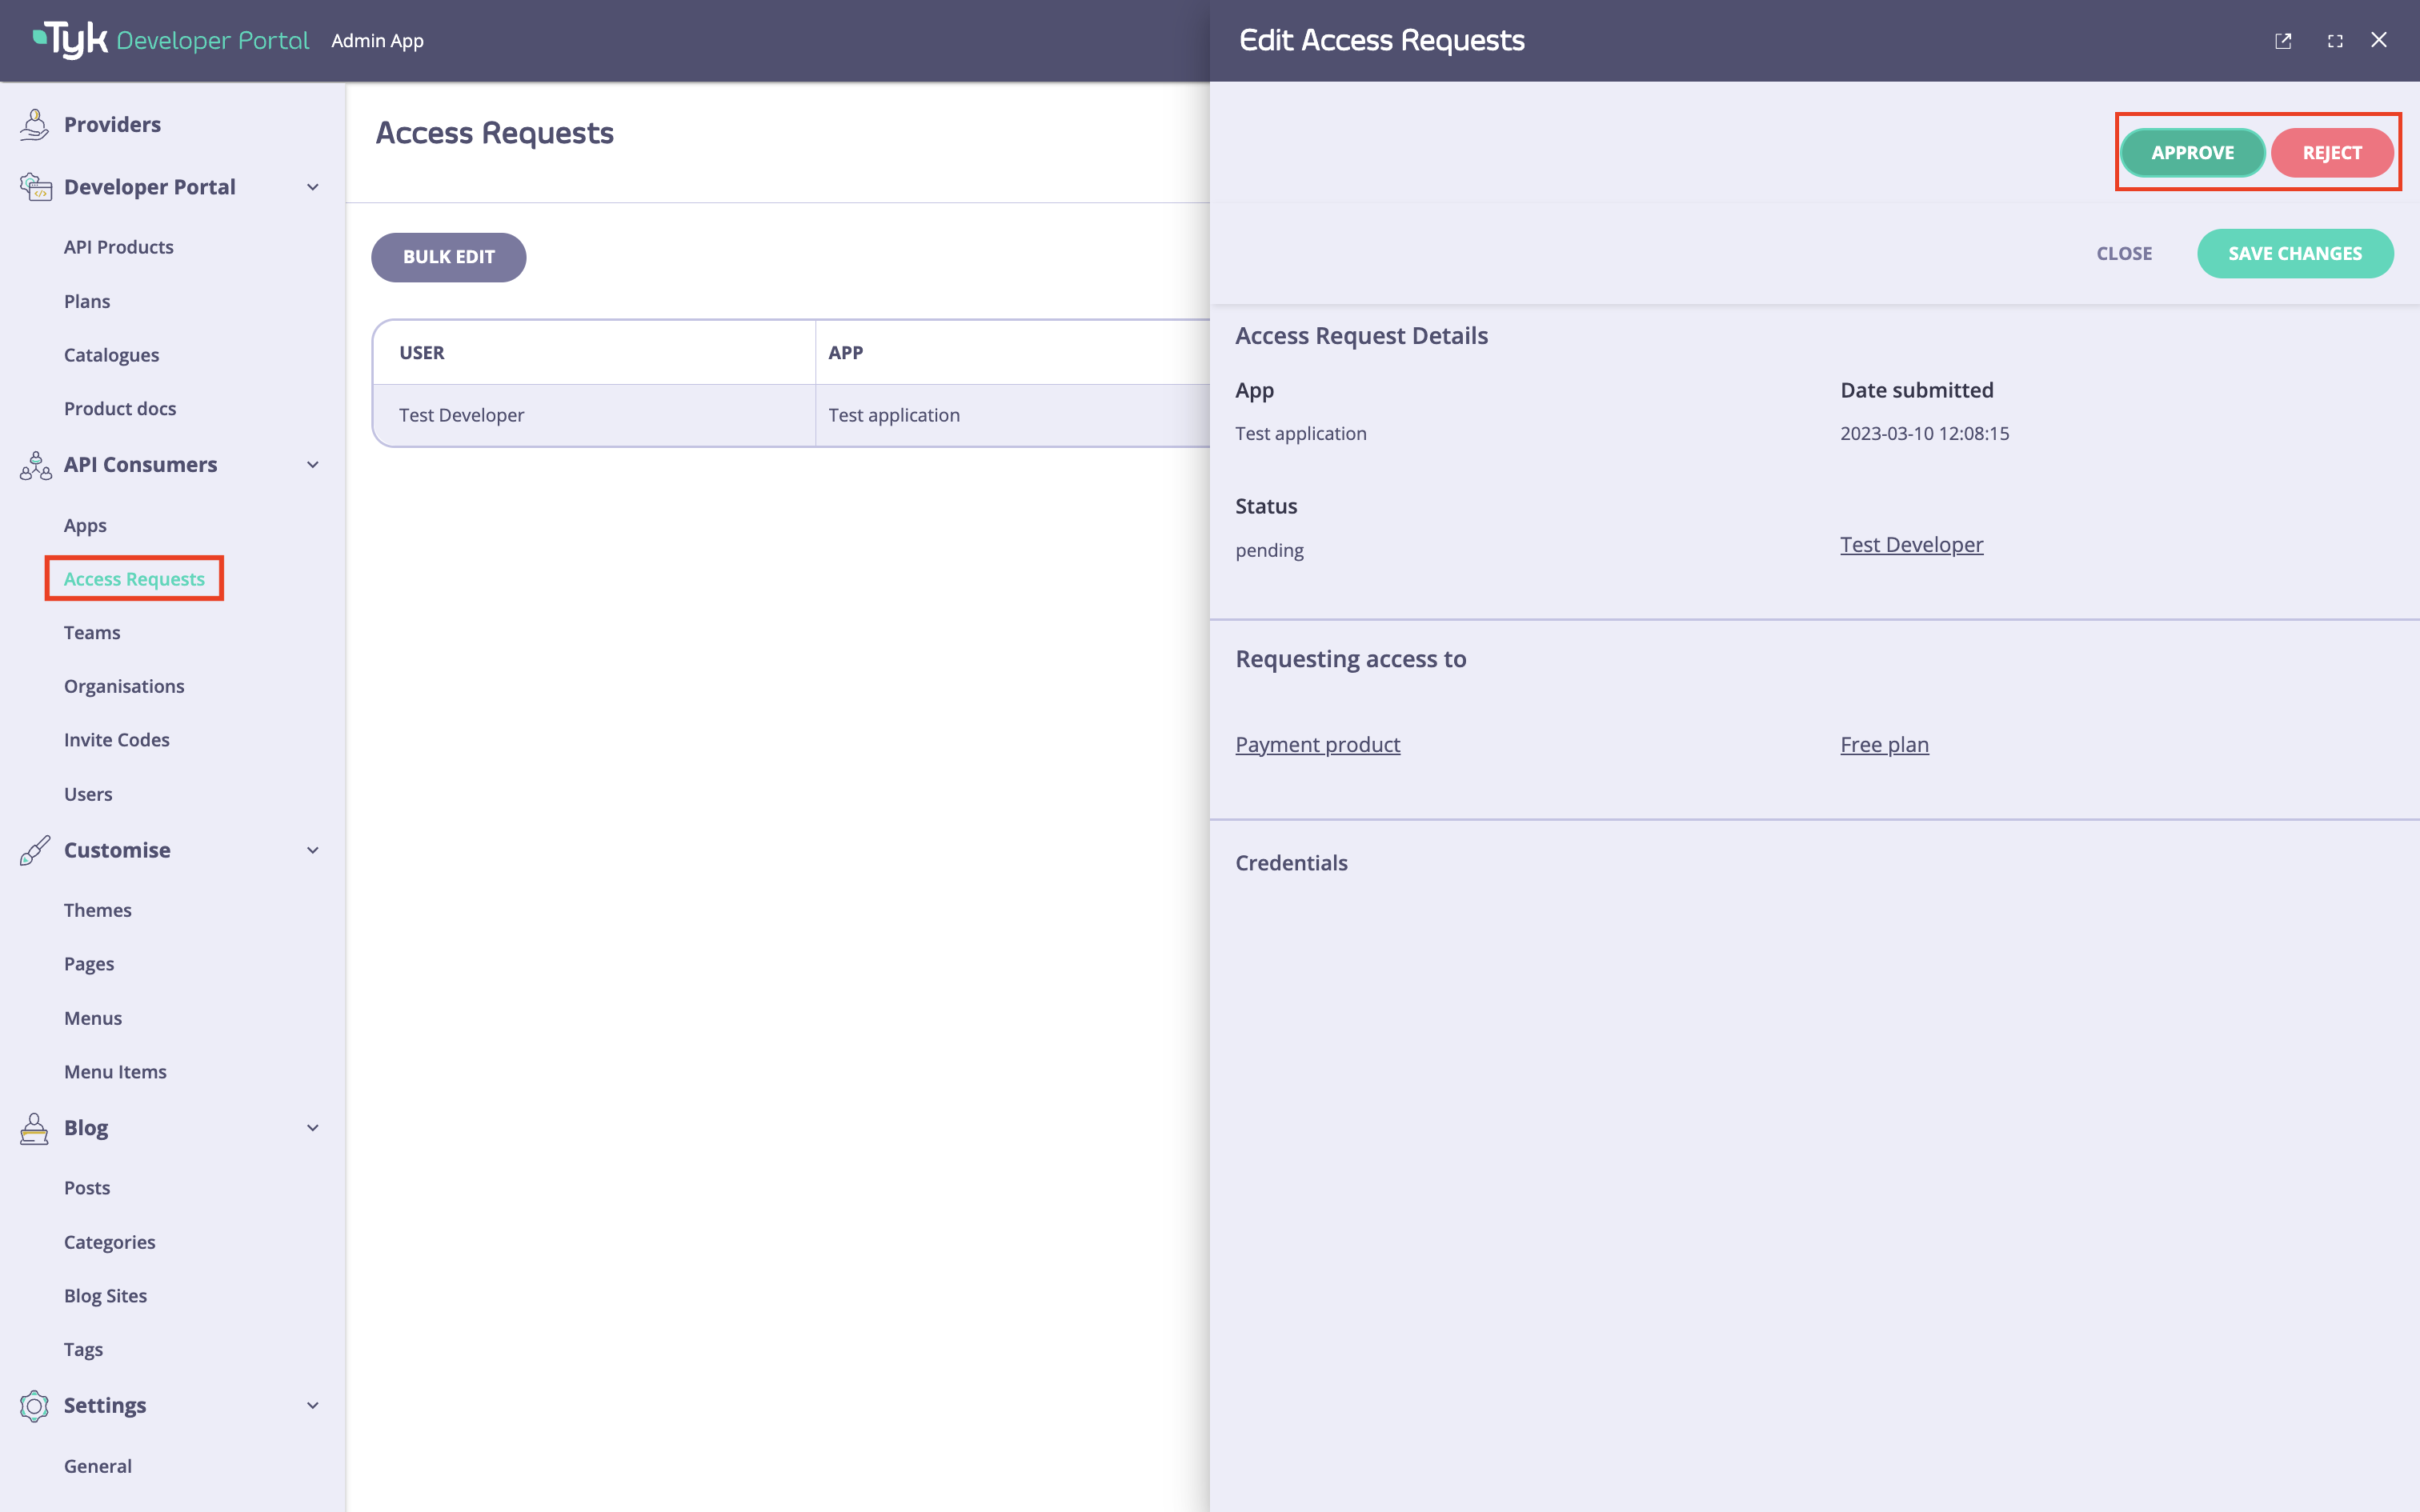
When approving an access request, if the Plan scope is not already present in the API Product’s scope mappings the Portal will append it in the scope-to-policy mapping declared in the API definition, mapping it to the Id of the Tyk Dashboard consumption policy that relates to the Plan. This will ensure that when the JWT is presented to Tyk, the Plan will be applied to the session.
Obtain an access token
Once the access request is approved, the developer should receive an email informing them of the approval. Please refer to the email customization section if you wish to change the email template. As a developer, navigate to theMy Dashboard section in the developer portal, select the application, and copy the OAuth 2.0 credentials.
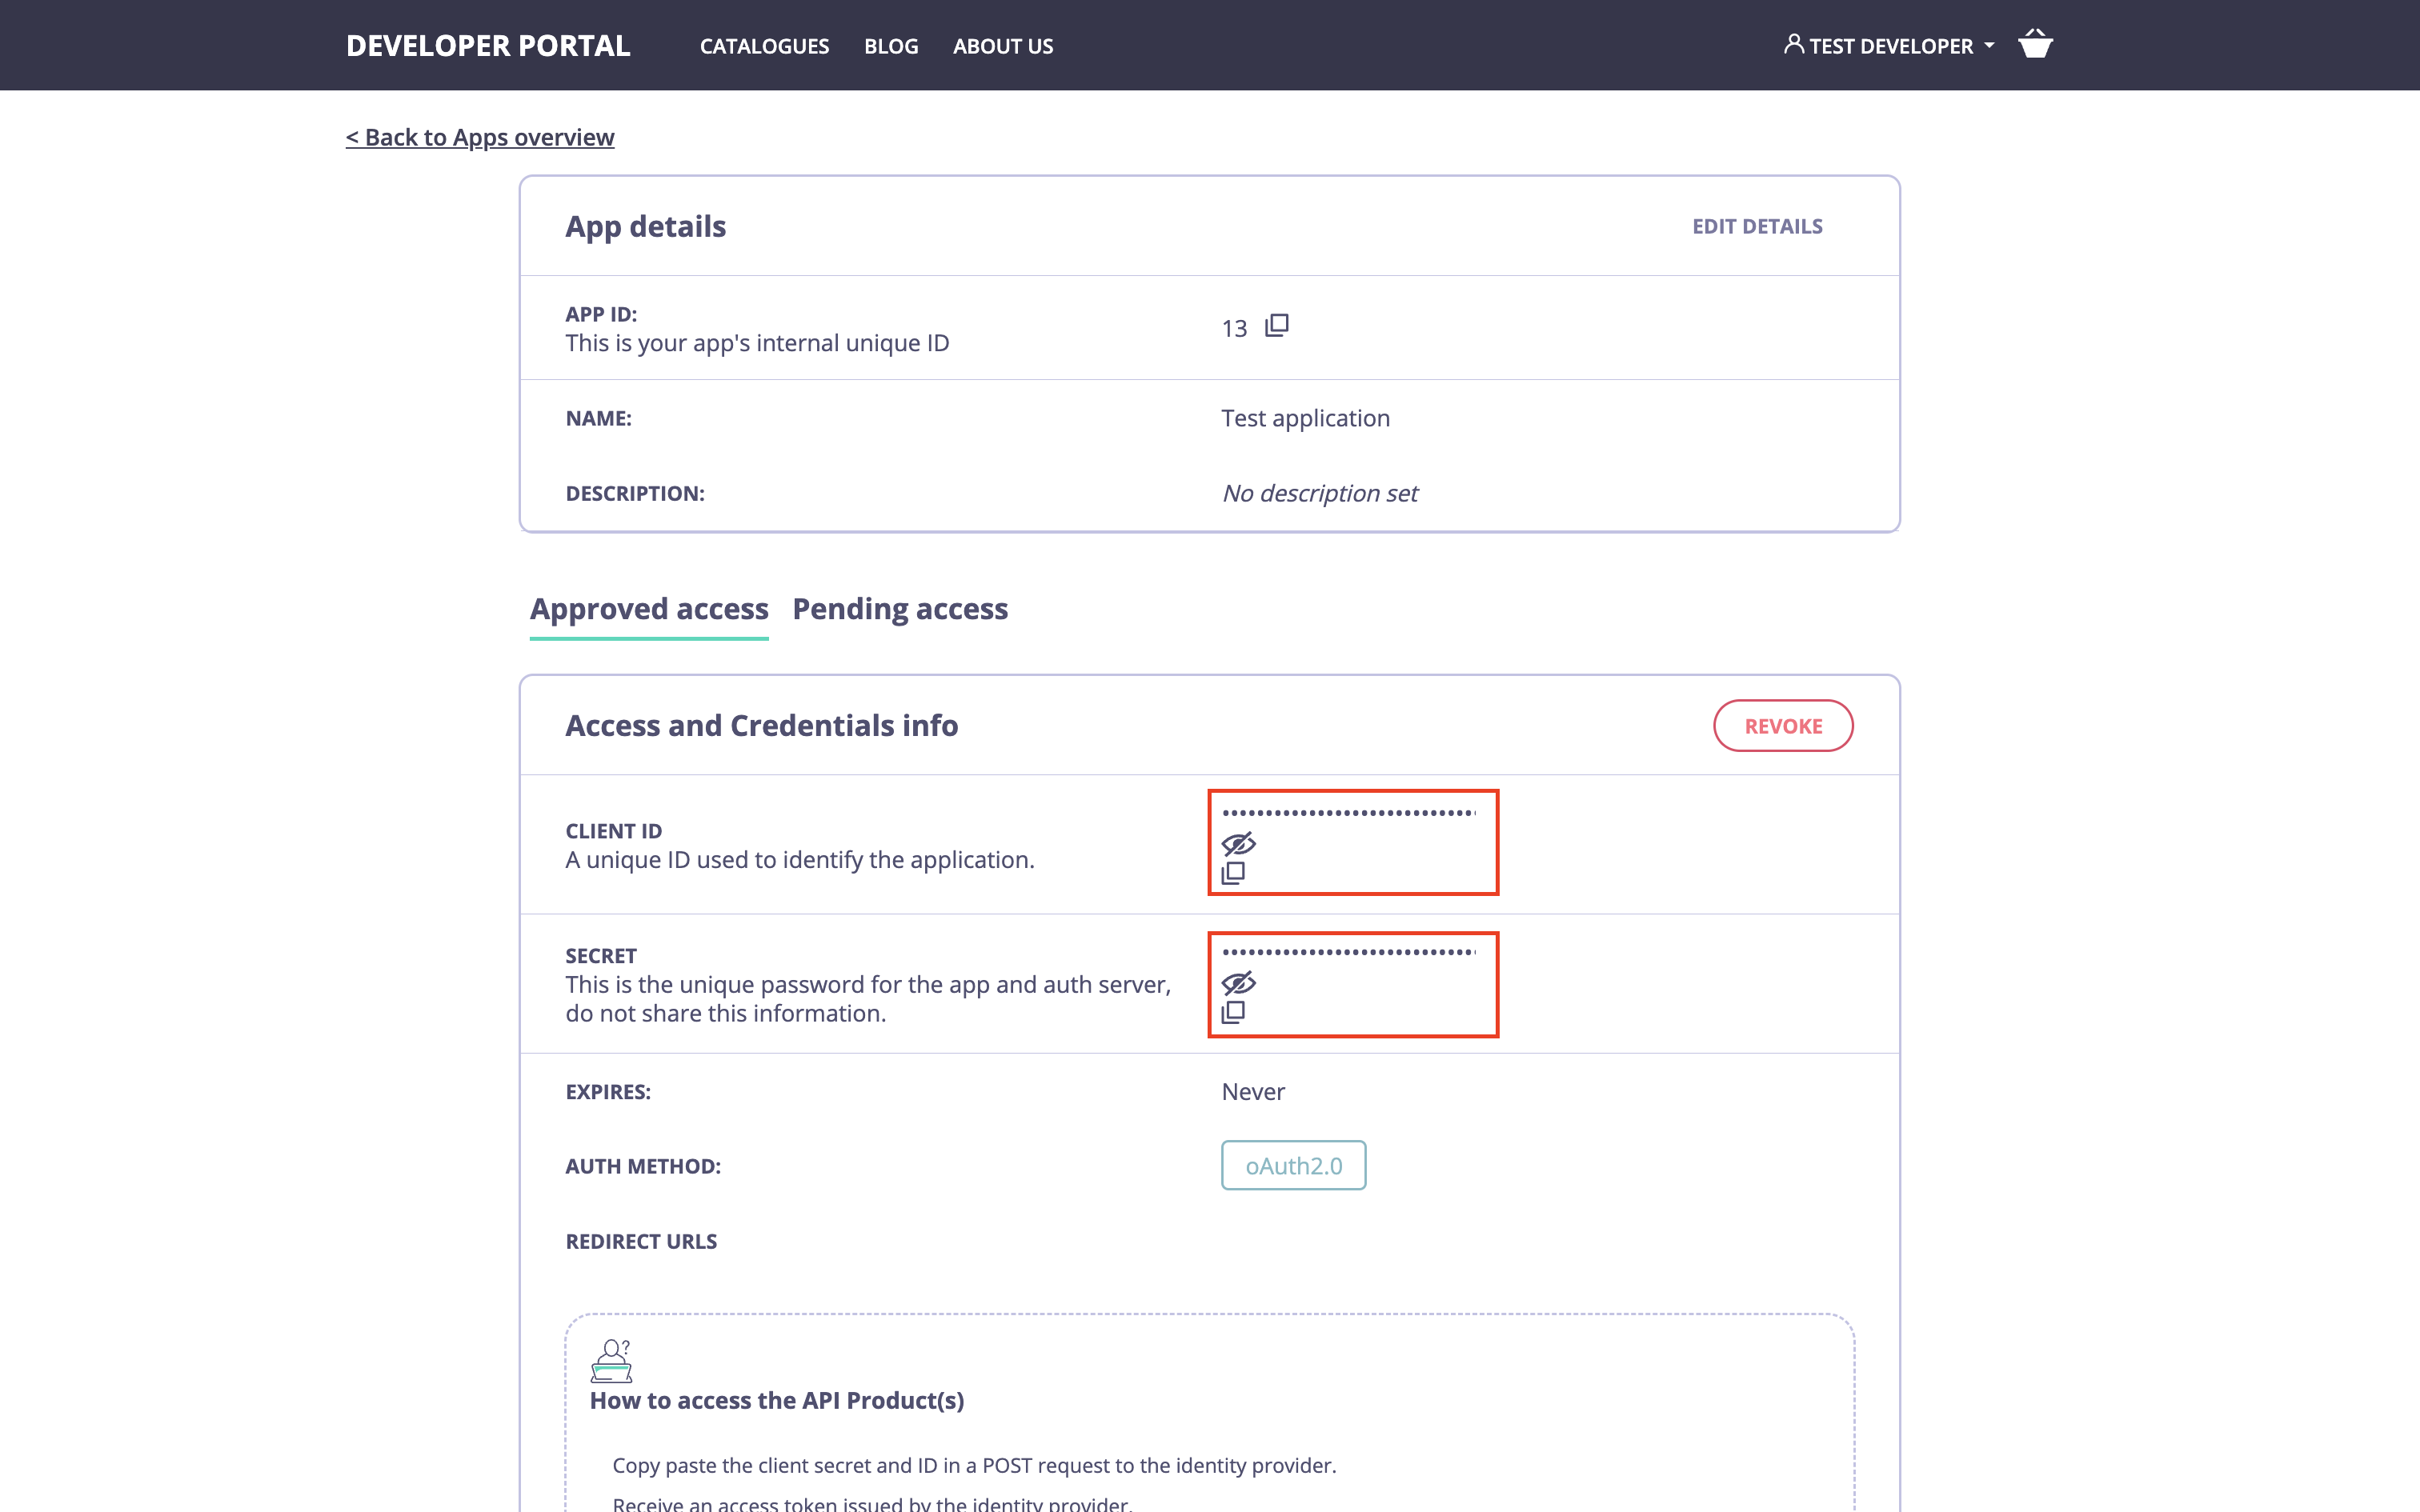
curl:
{client_id}:{client_secret}.
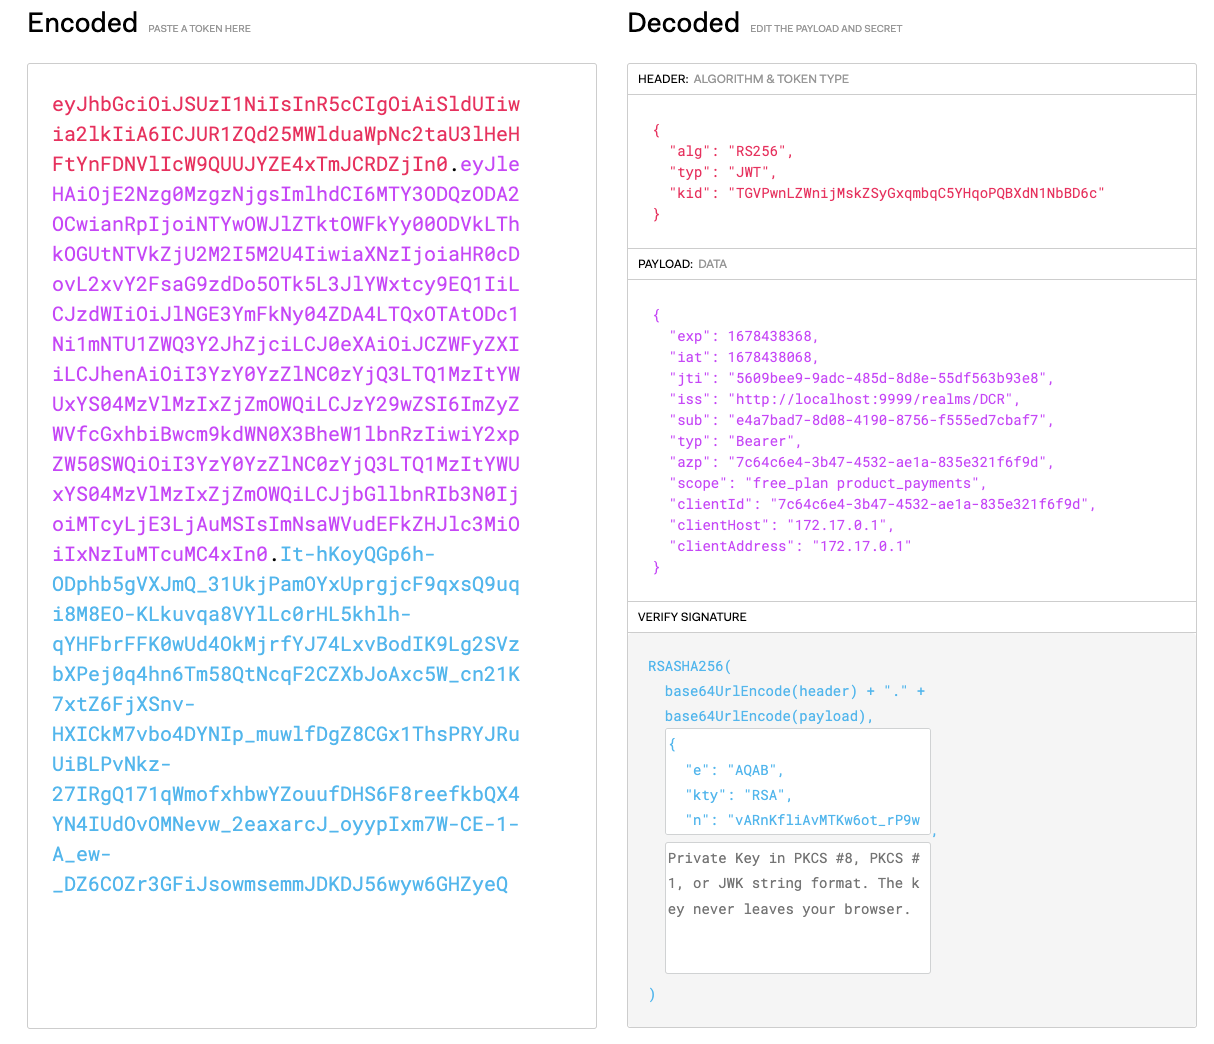
As a result, you should receive a JWT access token containing the required scopes: